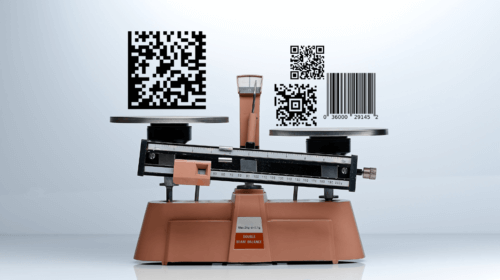
Data Matrix Codes: What They Are And How They Work In Odoo

Introduction

Data Matrix codes make a huge impact in situations when not much space is available and are useful within various sectors. Their peculiarity is that a considerable amount of information is located in a rather small space. Such codes are very often used in logistics and manufacturing, as they perfectly encode numeric data as well as text. 

Data Matrix codes are essential for business. After such a code is scanned, the buyer sees the path of their item from the producer to the shop, and the number of counterfeit goods is significantly reduced. 

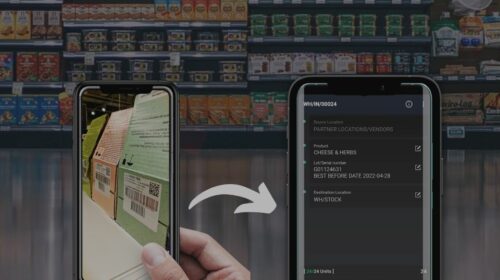
If you have ever been interested in business topics, you have probably heard about Odoo—a package of business applications that are fully integrated with each other. This system completely covers all aspects of your company, including coding goods with Data Matrix codes. When you simply scan the code, Odoo immediately distinguishes the correct product and inserts its batch number and best-before date into the fields.   

Data Matrix codes significantly simplify many business processes and become a key constituent of modernized companies. Therefore, you should also be aware of modern product coding in order to achieve success and overtake your competitors. Read on and you will discover plenty of useful information!        

Data Matrix Codes: What Are They?

This is a two-dimensional matrix barcode that consists of black and white cells.
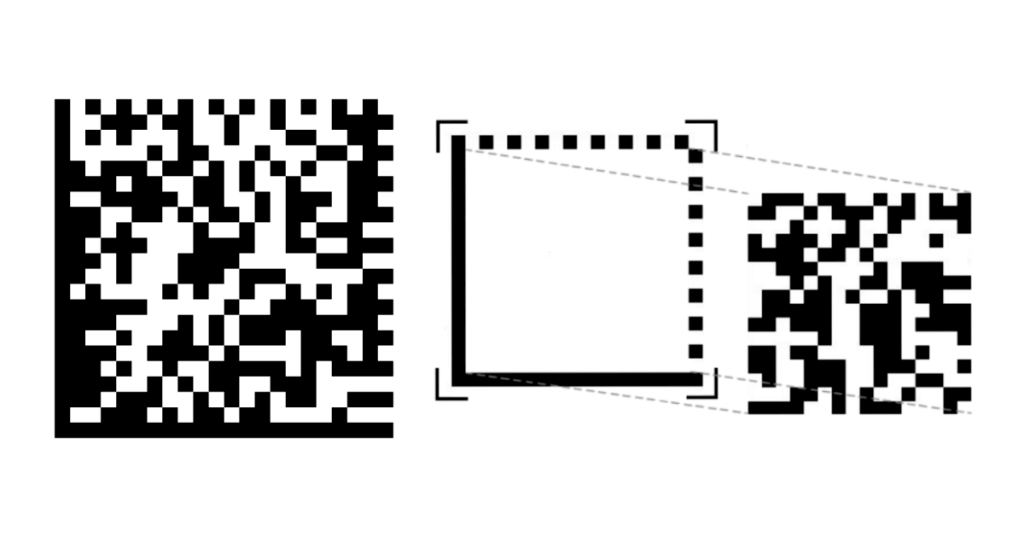
As a rule, it is arranged in the form of a square, but it may also be rectangular. Data Matrix code uses the lower structure: on the left and bottom it is bounded by solid lines that form an “L”. Such a code may accommodate a maximum of 2335 alphanumeric symbols; its visual extent may be 10×10 pixels, and this property provides a huge advantage. 

Traditional Barcodes vs. Data Matrix Codes
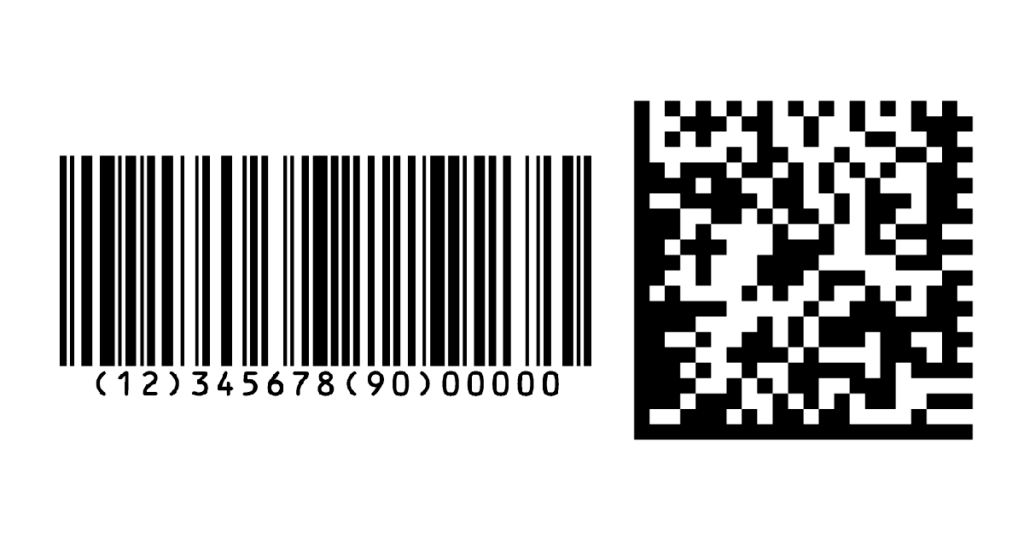
Traditional barcodes are 1D (one dimensional), and they are presented in the form of a rectangle that is comprised of parallel black stripes and white spaces, which may have different widths. The most widespread type of a traditional barcode is EAN, which is composed of 13 numeric symbols, containing a country code. EAN barcodes, in comparison to Data Matrix ones, accommodate significantly less data and comprise only basic information, which is their drawback. Traditional barcodes are actively used in asset tracking, healthcare, and logistics.

QR Codes vs. Data Matrix Codes

QR codes are two-dimensional codes (2D), as well as Data Matrix ones. Normally, they look like squares with black and white cells and have a characteristic arrangement of three large squares in three corners. QR codes are able to reserve a lot of data (a maximum of 4296 alphanumeric symbols), which is why they are perfect for connecting URLs, text, and data. In contrast to Data Matrix codes, QR ones are not compact enough, and this often becomes their drawback, making them unsuitable for encrypting small goods. 

There are benefits and drawbacks to these types of barcodes, but each are effective in their own ways. Which one to choose depends only on your purpose. To come to an ideal decision for your production needs, you will want to consider:

  • the data specification (QR codes will be great for encoding URLs, whereas Data Matrix codes will be suitable for compact data storage)
  • the capacity that is allocated for the code (when it is small, the choice should definitely be on the side of Data Matrix codes)
  • spheres of application (QR codes are more common in marketing, entertainment, or goods packaging, and Data Matrix codes are actively used in manufacturing and healthcare)

Aztec Codes vs. Data Matrix Codes

The Aztec code is a 2D barcode and is shaped as a square that contains a matrix of square parts. In the center of this matrix is a bullseye, which, in turn, consists of concentric squares. It may contain a maximum of 3067 alphanumeric symbols and is actively used for encoding numbers, text, and binary data.    

Data Matrix codes exceed Aztec codes with reference to coding efficiency when there are more than 298 symbols in the text.

Data Matrix Codes: Key Features and Benefits

High data volume: Easily encode a large quantity of symbols in a really small space, which is crucial for small-sized items.

Economy of space: Use up less space, as these codes have a high data concentration. Moreover, sometimes Data Matrix codes are so tiny that they may be noticed only when looking closely. In view of the fact that these codes are compact, they are quite economical: less ink is wasted and smaller labels can be used. 

Correction of errors: Data Matrix codes are quite fault-tolerant as they provide automatic error correction up to 30%. Just imagine, that if ⅓ of the code is corrupted, you will still be able to read it. A huge benefit of such codes is their readability, which is possible with a contrast of only 20%. As a consequence, some manufacturers allow themselves to experiment a little with colors and enrich packaging design.  

How Do Data Matrix Codes Work?

You have probably at least once wondered how Data Matrix codes work. In fact, the process is not so simple, and complex coding is used here. Code characters are composed of modules that are located within the boundaries of the search pattern. The data areas that make up a symbol have modules in the form of a periodic array. Interestingly enough, there are no standards for the form of the module, so they may be either square or round. 

The latest variant of the Data Matrix codes, ECC 200, uses Reed-Solomon codes to prevent errors or restore erased information. The majority of characters are square, and their size fluctuates from 10×10 to 144×144 modules. 

Scanning barcodes is necessary at different stages of the logistics network, for example, during receiving or sale. Two-dimensional scanners are suitable for reading Data Matrix codes.
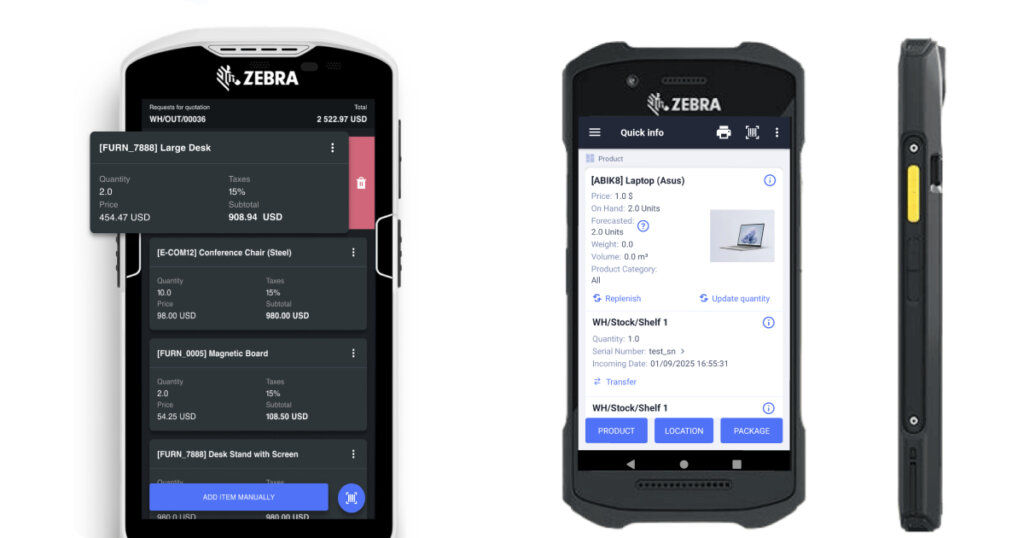
They are capable of recognizing 2D encoding and transmitting data to the online cash register. Fortunately, many modern scanners have already been created for such codes. They recognize a code at a distance of 10–20 cm and have minimal contrast, high reading speed, and a broad scanning angle. 

These codes are actively used in many different spheres, and Data Matrix code examples are widespread in retail, manufacturing, and logistics. However, they are most useful and widespread in the field of pharmaceuticals.
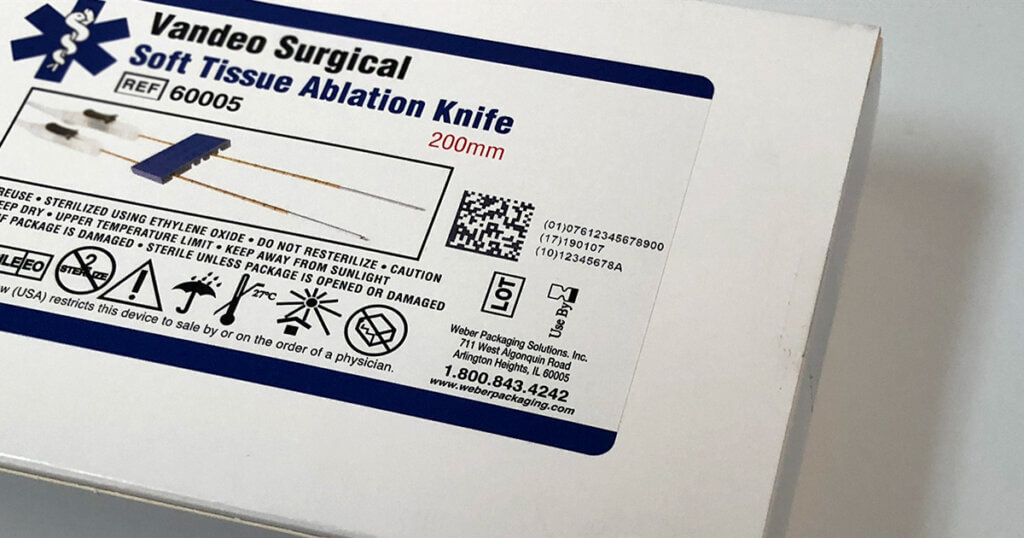
As a rule, medicine packages are quite small, and other types of barcodes may simply not fit on them, while up to 2 KB of information may be entered into the Data Matrix code, saving much space in the packaging. Moreover, such codes were introduced in the medical field in order to protect medicinal products from falsification. The labeling of medical drugs includes the name of the product and dosage, serial number of the product, batch number, product code, and the drug’s shelf life.      

The Place of Data Matrix Codes in Business

Modern businesses are increasingly utilizing Data Matrix codes and are gaining huge benefits from this: The codes are economical, but at the same time they contain all the important information. 

You may be surprised, but such codes are actively used even in the banking sphere. They are applied to payment documents in order to later enter the information into their database. Corporations that manufacture electronic elements, such as personal computers or microprocessors, also benefit from Data Matrix codes, as most often such products are tiny in size while encoded information is still required. 

A huge benefit of Data Matrix codes is that a unique code is issued for each unit, thus eliminating all inaccuracies. Another reason why modern businesses choose these codes is their ease of use. They can be read at different angles as well as in mirror form.     

Many companies use these codes as their business card. For example, Data Matrix codes are often seen the entrances to restaurants, shops, and even hotels. As a rule, they encode the name of the establishment, telephone number, and sometimes the website address. Other examples of Data Matrix code usage in real life include clothing and footwear labels, cigarette packaging, cosmetics, and food products. Because of such widespread usage, Data Matrix codes are much closer to you than you might first think!   

How Odoo Supports Data Matrix Codes

Odoo is a system used by a great number of various modern companies as it easily covers all their needs. By the way, barcodes are not the exception. They help to significantly speed up processing for many goods. The Odoo system assists in automatically generating barcodes, along with downloading them from other systems. 

Data Matrix codes considerably simplify and accelerate the identification of goods at almost all stages of processing. For example, Odoo Inventory supports these codes, and then inventory processes are much smoother and more automated, which makes for well-managed warehouse activities. The process is simple: scan the code and see all the details about the item; no need for seeking it out manually. 
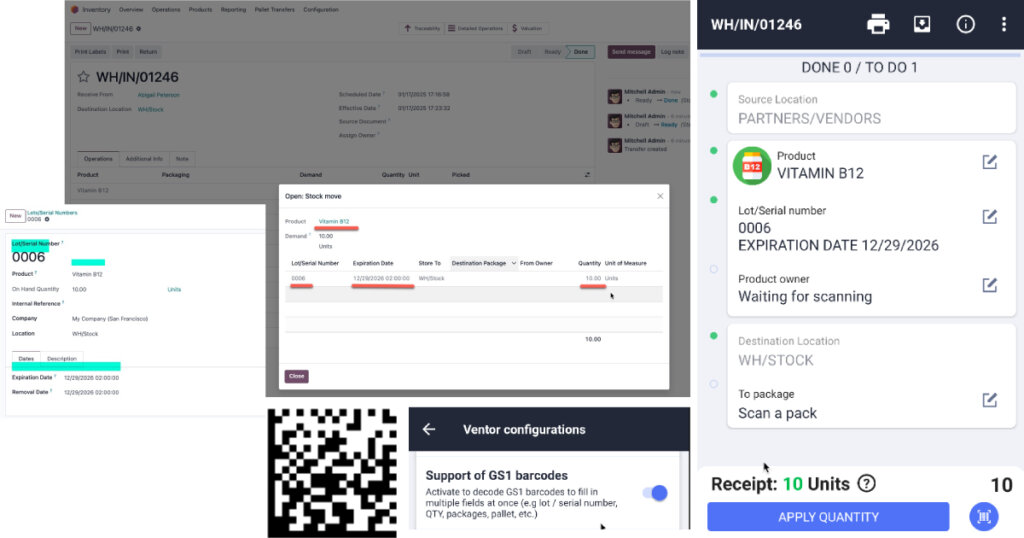
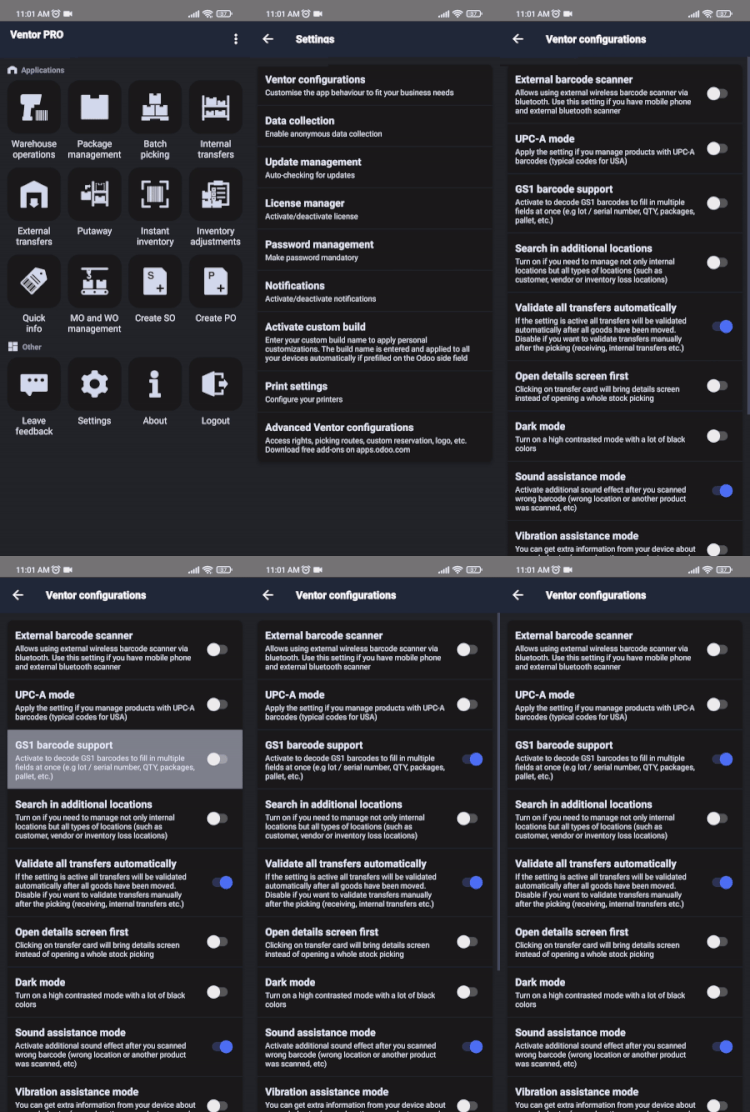
Data Matrix in Odoo and Ventor PRO. If you’re using GS1 in your Data Matrix codes, make sure to enable GS1 support in the Ventor PRO app configurations.

Also, operations at the manufacturing stage, as well as at the retail module, are more fluid due to the fact that Odoo supports Data Matrix codes. As mentioned before, each product has an individual code, and retailers can watch the entire journey of a particular product while making sure that it is original and meets all standards. 

If you want to start using Data Matrix codes in Odoo, you will need to set up barcode readers. This process is easy and doesn’t require much time. Three types of barcode scanners exist in the Odoo system, and you need to choose the most suitable one. 

  • USB scanner

This type is an ideal option for scanning goods on the computer. All you have to do is to connect it to your computer. 

  • Bluetooth scanner

This type allows you to move freely throughout the room and scan the desired goods. You simply connect this scanner to a mobile phone or a tablet. 

  • Mobile scanner

This type is considered to be most convenient and has a wide variety of models. Used through a computer with a barcode scanner in it, this is a perfect option for heavy use. 

It is highly important to note that with USB scanner usage, the scanner keyboard layout must match with the layout of your operating system; otherwise, there is a risk that the characters will not be translated correctly.  

Practical Example: Implementing Data Matrix Code in Odoo

Implementing Data Matrix code in Odoo will give your business many benefits, but it is important to do it correctly. Below, we are sharing a step-by-step guide on creating and managing these codes.

Step 1. Open “Inventory” 
Step 2. Go to “Configurations”
Step 3. Open “Settings”
Step 4. Click “Operations” and then “Barcodes scanner”. 
Step 5. Click “Save” and then return to the previous tab to click “Configure products barcodes”

By the way, you should be highly attentive to adding the code to the item itself, but not to the template—otherwise, differentiating between them will be impossible. 

Remember that to read the code correctly, the default nomenclature must usually be “GS1”. In “General Settings”, the Developer mode needs to be activated. Then open “Configurations” and go to “Barcode Nomenclatures”. You will be able to open the list of rules after you click “Default GS1 Nomenclature”. Keep in mind that the rules can be modified or added, depending on how the data is encoded on the barcode. The most useful rules in GS1 Nomenclature include:

Rule NameTypeGS1 Content – TypContent – Type
GTINUnit ProductNumeric Identifier
ExpiryExpiration DateDate
BatchLotAlpha-Numeric Name
Serial NumberLotAlpha-Numeric Name

Data Matrix in Odoo: Product Tracking

Remember that in the Odoo system, there are two main ways to monitor products: by using serial numbers or lots. As a rule, lots display a certain batch of an item that was received, is still stored, or was delivered from a warehouse. Serial numbers exclusively differentiate the exact product from other items. 

Advantages of Using Data Matrix Codes in Odoo

This ERP system is a wonderful key to a profitable business in general; it helps to run all the business processes efficiently and significantly increases a company’s profit. In this part, we will focus on the key advantages of using Data Matrix codes in Odoo and prove that they are really worth implementing.

Improved Traceability

As we already mentioned, this encoding system allows for the ability to seamlessly trace the entire path of the product from the moment of its production to its final sale. For better traceability, the Odoo system allows for independently grouping items by serial numbers or lots. The first step is to reset all the default filters by clicking on the search field in the top right corner of the screen. Then, open “Group By” and choose “Add Custom Group”, and you will see a mini pop-down menu—this is exactly what you need. Next, choose “Lot/Serial number” and “Apply”, and you are all done!

Enhanced Inventory Management

Implementing Data Matrix codes greatly speeds up the identification of goods at the Inventory stage and beyond. The Odoo system allows for automatic barcode generation and for transferring existing codes from other systems. This makes inventory management better and easier, as all necessary product information is seen immediately by simply reading its unique Data Matrix code. 

Error Reduction in the Scanning Process

The format of these codes is standardized; thus, they may be read easily by barcode scanners. The Odoo system uses GS1 barcodes for items identification and workflow automations, as are useful for receiving, packing, and shipping. Each code contains all important item data and considerably reduces errors. 

Challenges and Limitations

Implementing a Data Matrix in Odoo is a complex process, and sometimes some problems may occur. The point is that the barcode must be formed in accordance with clear requirements. If some errors were made during the code-generating process, you will definitely see information about them on your screen as soon as you complete the scanning process. The most widespread errors may be as follows:

  • Insufficient data in the scanned code
  • Accidental use of another barcode instead of the Data Matrix code
  • A GS symbol instead of FNC1 at the beginning

Sometimes it happens that everything is fine with the code, but the scanner doesn’t read it. To avoid such situations, you should study in detail the types of scanners that are designed for such codes.  

But, of course, there are also great solutions to the implementation problems. First of all, in order for process management to be fast and problem-free, employees must know how to use the Odoo system and Data Matrix codes. When training employees, it is important that they know the benefits and purposes of implementing codes. You also need to provide them with a detailed training plan, so they understand the main stages and full scope of the new material. Remember, conducting assessments before and after training is crucial in order to monitor the improvement of employees’ knowledge and skills in the field of Data Matrix codes in Odoo.  

There are many barcode scanners available, and each one has advantages for specific use cases. To read barcodes in Data Matrix format, you will need a classic scanner with the technical ability to recognize two-dimensional codes.  

Conclusion

As you can see, Data Matrix codes are a great option for any type of goods, and nearly every successful company uses them. Proof of this may be the huge list of advantages of this type of coding, despite the fact that it is only gaining popularity. 

One of the most important features of Data Matrix codes is the ability to read information even if up to 30% of the code is damaged. In addition, such codes take up little space and can fit even on the smallest packages, making them universal. They are used in almost all areas of activity from advertising and industry to entertainment. In everyday life, you can most often find Data Matrix codes on medicines, shoes, fur, or tobacco products.

Data Matrix code usage in business is becoming extremely widespread, as these codes save not only space but also a company’s money. Additionally, text encoded in this type of coding may be also include a web page, email address, SMS, or phone number.  

These codes are supported by the Odoo system, and this is great news! Odoo ERP is a program solution for businesses that have different modules integrated into each other. As an ideal solution for companies, all business processes can be gathered in one place. 

Having studied in more detail the features and properties of the codes, we can confidently say that these are the codes of the future. They fit a large amount of information into a very small area, and this is what modern businesses need. Moreover, in some countries, Data Matrix codes have already been announced as mandatory, so it doesn’t look as though they will become less popular anytime soon!

Manage your Data Matrix codes in Odoo using a barcode scanner
Additional Resources
  1. Data Matrix Wikipedia Article
  2. Types of Barcodes & Uses of Barcodes 
  3. How to work with GS1 barcodes in Odoo
  4. Enabling native GS1 DataMatrix scanning

Odoo Quality Control in Warehouse with Ventor PRO

Quality control in warehouses is crucial, especially during goods receiving. However, traditional methods often come with frustrating challenges:

  • Inspections typically happen after items arrive
  • Issues discovered late lead to:
    📦 Repacking
    👷‍♂️ Rework
    Wasted time
    📈 Increased risk of errors ⚠️

Today, we’re diving into Ventor PRO’s Odoo Quality Check feature. This isn’t your typical quality control — we’ll show you how Ventor PRO makes quality checks seamless, integrating them directly into your receiving process as an example of real-time quality control. And the best part? This feature extends to all warehouse operations, including receipt, delivery, returns, and more. Let’s get started!
Real-Time Quality Checks in Odoo ERP with Mobile Scanners
Odoo Quality Check Demo

Simplified receiving process and easy-to-follow quality check types. When goods arrive, Ventor PRO guides the storekeeper through each item, flagging those that need quality checks. This proactive approach ensures that any issues are identified and addressed in real-time, keeping your operations smooth and efficient. Ventor PRO’s quality checks are designed for ease and adaptability, meeting a variety of needs for mobile scanning in the warehouse:

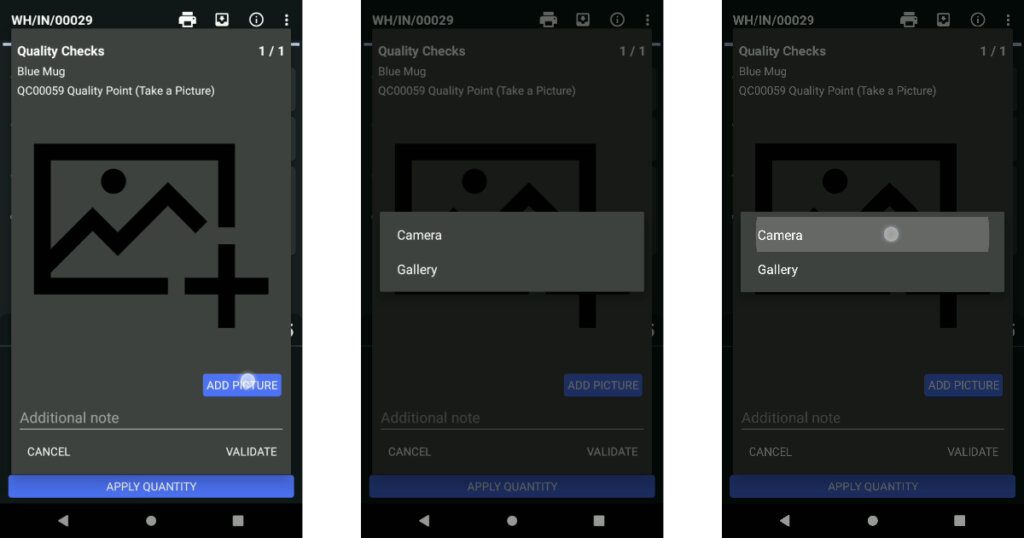
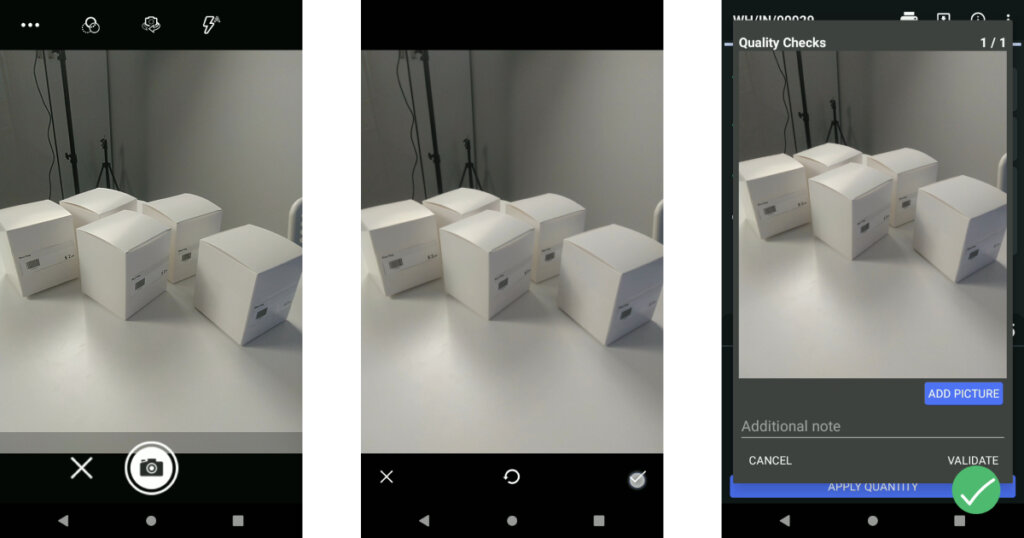
Take a Picture Odoo Quality Check

Steps: Click “ADD PICTURE” → Select “CAMERA” → Take a photo → Apply → Add an internal note (if needed) → Validate.
Use Case: Ideal for visual inspections, ensuring that items meet appearance standards.

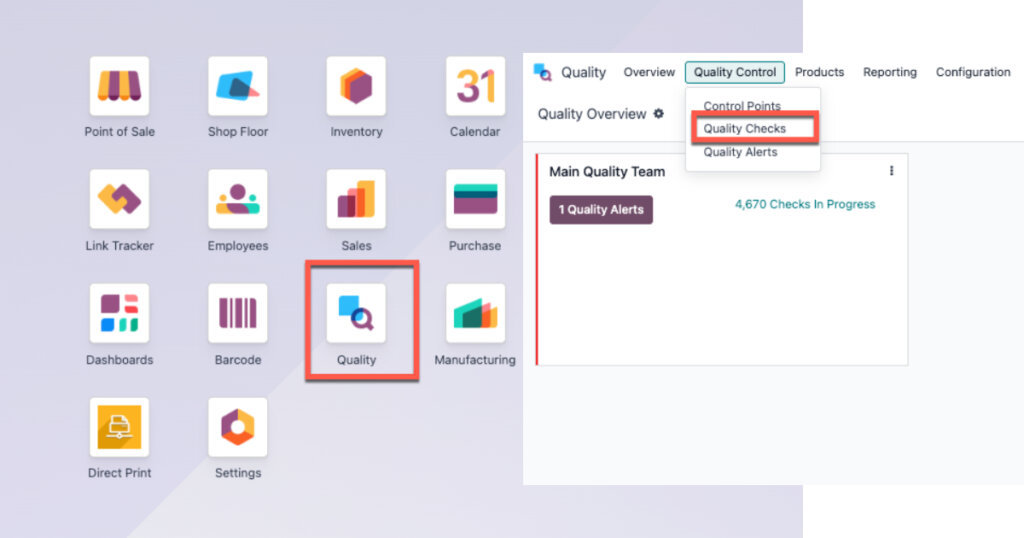
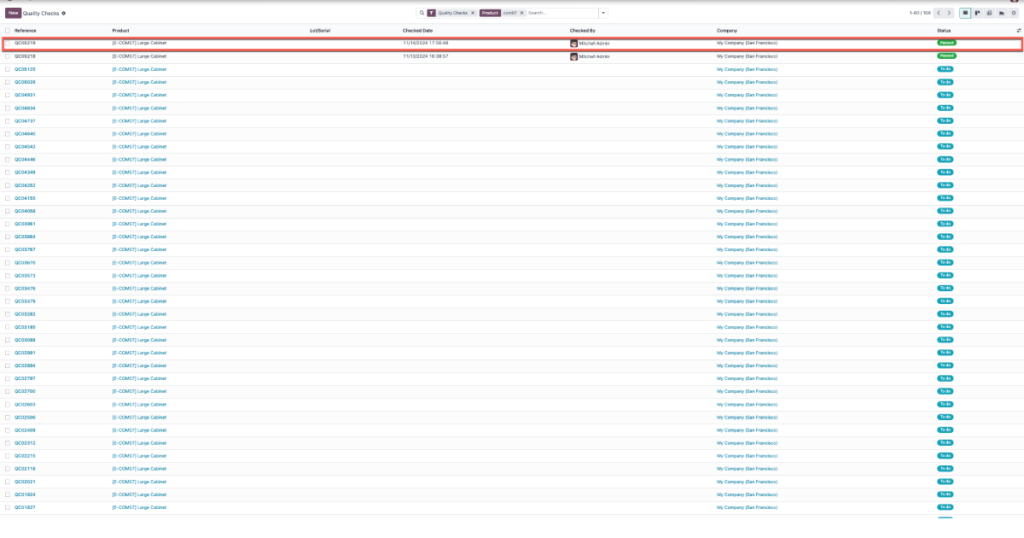
You can find your photos in Odoo by navigating to the Odoo Quality module → Quality Control menu → Quality Checks.

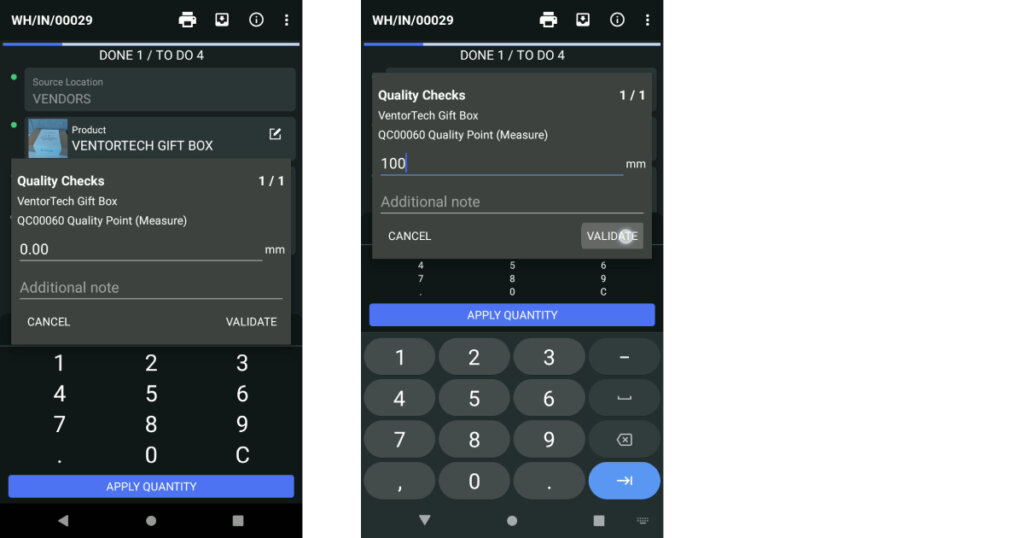
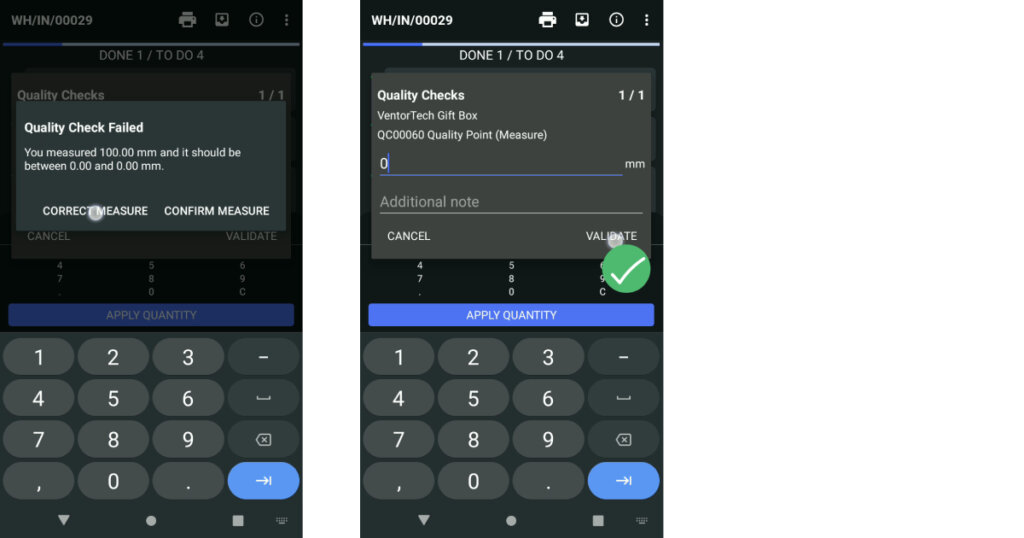
Measure Size Odoo Quality Check

Steps: Click “APPLY QUANTITY” → Enter measurement → Adjust if needed → Add a note if necessary → Validate.
Use Case: Perfect for items where size accuracy is crucial.

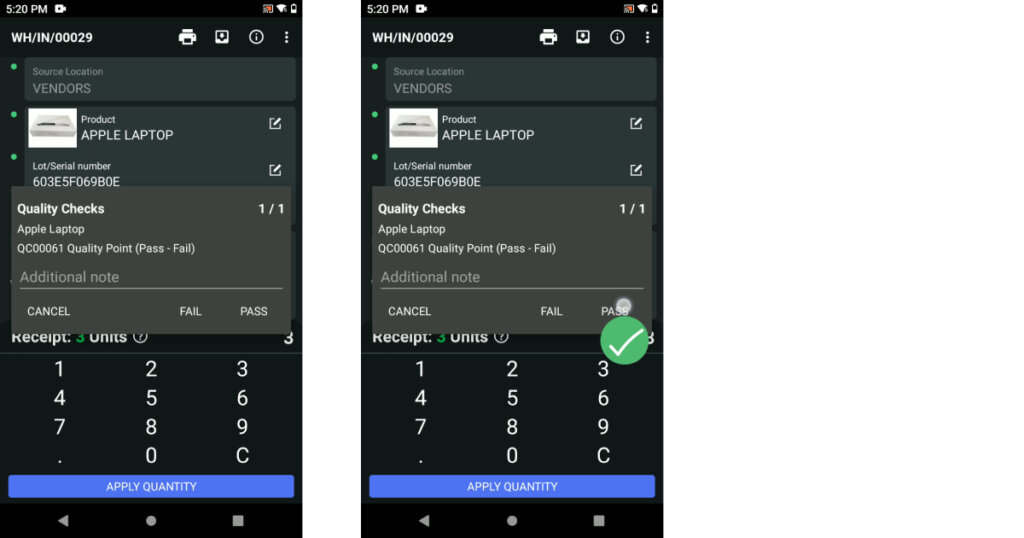
Pass – Fail Odoo Quality Check

Steps: Add a note if needed → Select “Fail” or “Pass” → Validate.
Use Case: Useful for simple pass/fail evaluations, providing a quick way to identify unacceptable items.

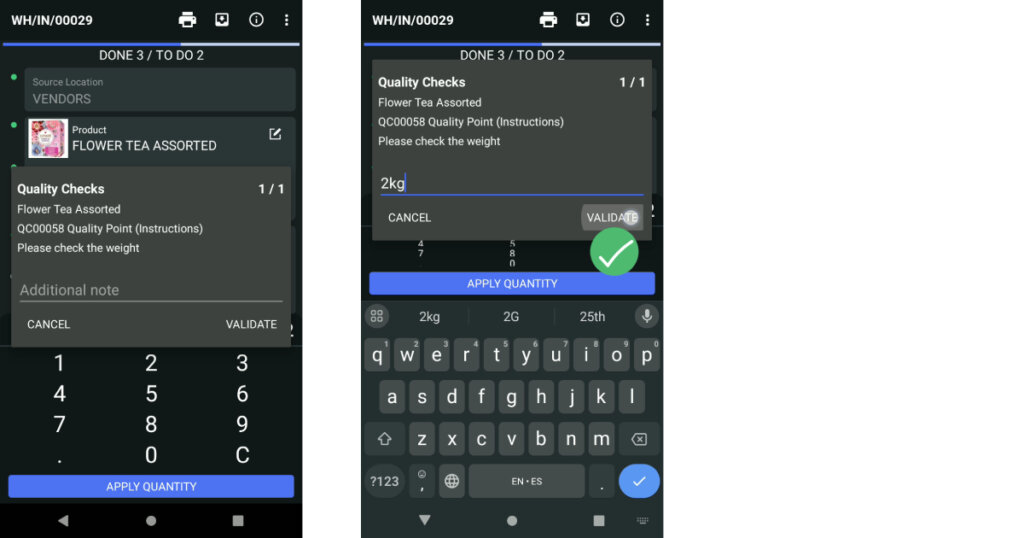
Measure Weight Odoo Quality Check

Steps: Record the weight in the note field → Validate.
Use Case: Ensures that items meet weight specifications, especially important for bulk products.

Ventor PRO stands out with its real-time, integrated quality checks and seamless integration with Odoo, fitting smoothly into your existing workflows:

  • Quality checks happen as items are received
  • Specific items can be pre-designated for inspection
  • Operations continue smoothly, with no interruption to the workflow

This all-in-one approach means fewer delays, more accurate inspections, and a streamlined receiving process.

Get a FREE trial of Ventor PRO

Ventor PRO’s Quality Check feature is here to help drive warehouse operations optimization. With real-time inspections and seamless integration, elevate your Odoo ERP quality assurance to new levels of efficiency.


If you’re unsure if Odoo ERP is the right fit, we offer personalized consultations to help you make the best choice.

Odoo RFID: The Future of Inventory Management

If you manage large inventory volumes, want to reduce manual counting errors, have a complex warehouse setup, or need precise tracking for high-value items, RFID technology could be a perfect fit. RFID excels in industries like retail, manufacturing, logistics, healthcare, and automotive. Not sure? We’re here to help!

Our Ventor PRO RFID solution is fully compatible with Odoo 15 and newer versions, helping you stay ready for the next generation of inventory management.

Watch the Full Odoo RFID Demo:

Odoo RFID: Receive Hundreds of Items and Adjust the Whole Location in One Scan
Odoo RFID demo

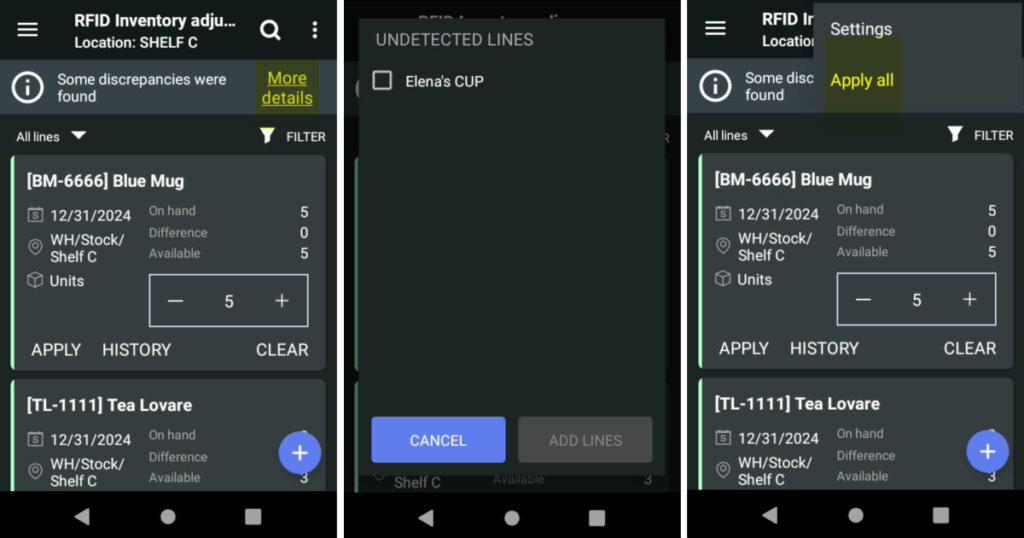
With the Ventor PRO Android mobile app, which supports RFID technology, you can receive large shipments and register them in Odoo within seconds, as well as perform inventory adjustments in just minutes.

Odoo RFID Inventory Setup

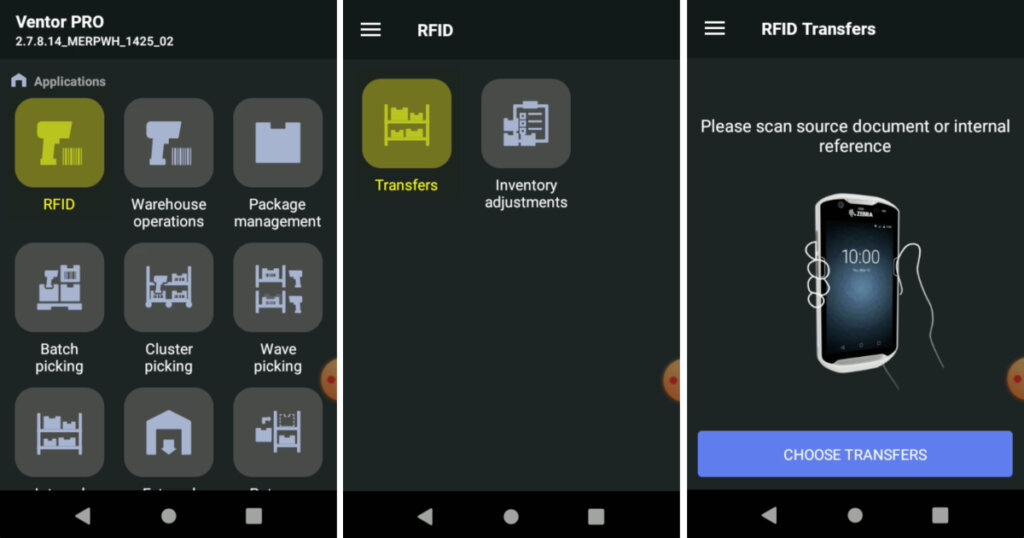
Odoo receiving using RFID:

  1. Items are pre-tagged with RFID by the supplier
  2. Using the Ventor PRO app, navigate to the RFID menu and select the Transfer option
  3. Scan the shipment document (Odoo purchase or receiving order)
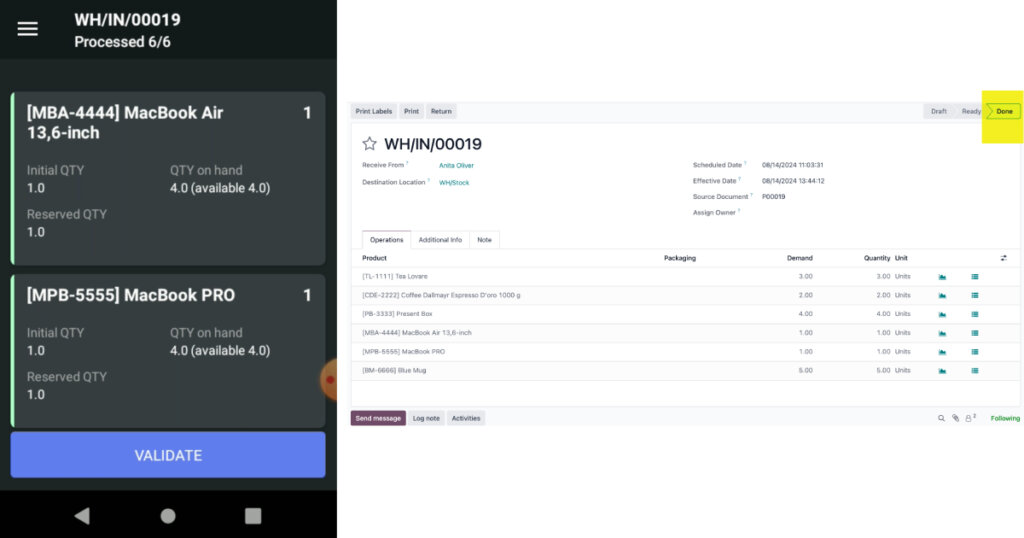
  4. With a single RFID scan, all items in the shipment are instantly recognized and displayed
  5. Click the Validate button and the entire shipment is registered in Odoo

The beauty of this solution is its scalability. Whether handling 6 items or 600, a single scan does it all. It’s fast, easy, and incredibly efficient!

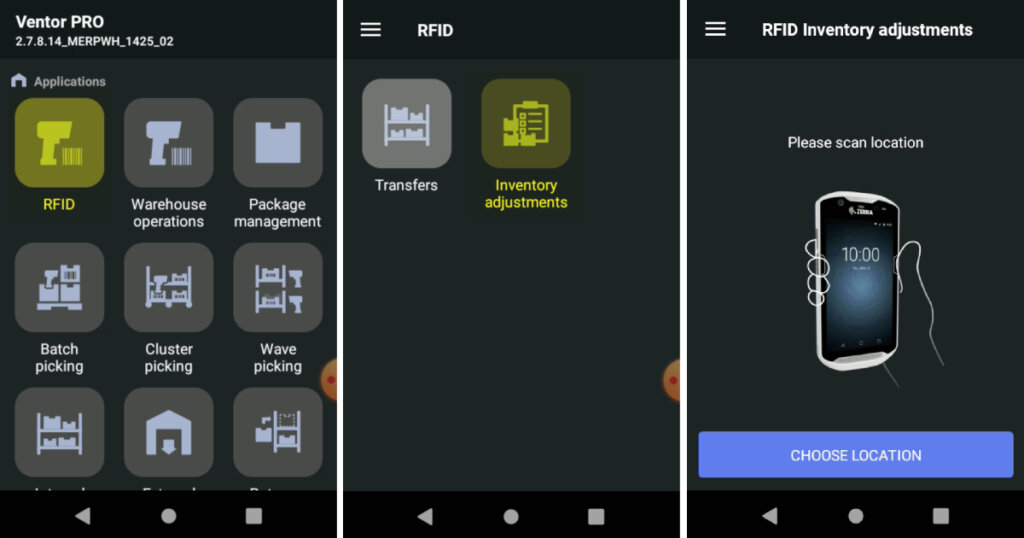
Odoo Inventory Adjustments using RFID:

  1. Go to the RFID menu in the Ventor PRO app and select Inventory adjustments
  2. Scan the location you want to adjust
  3. The app displays all items initially recorded at that location
  4. Perform a single RFID scan of the area
  5. Ventor instantly recognizes all items and highlights any discrepancies
  6. Review and adjust as needed, then click “Apply all” to validate the inventory adjustment

This process removes the need for manual counting and saves significant time. For example, you can perform daily inventory adjustments across all warehouse facilities rather than just once a year, leading to a much more accurate stock count.

Please note that your goods will need RFID tags. While these tags are relatively affordable (starting from around 10 cents each), the cost can add up significantly for large volumes. It’s essential to carefully analyze the business case to ensure a worthwhile investment before implementing RFID.

Recheck packed shipments in Odoo using an RFID scanner:

We’re working on a new feature for RFID scanners: Odoo Order Recheck. This will enable you to quickly verify that all items in a packed order match the delivery slip before leaving the warehouse, reducing shipment errors and minimizing return costs.


Every business has unique needs, and our team of experts is ready to assess your specific case to determine if (and how) RFID technology can enhance your operations. We’ll guide you through the potential ROI and provide customized support for Odoo implementation.
Complete this survey to get started!

Ventor PRO supports Odoo v18

Exciting news for our Ventor community! 🎉 Ventor is now ready to roll with the brand-new Odoo v18. It’s just our way of making sure you’ve always got the coolest tech at your fingertips for managing your Odoo inventory.

What This Means for You

  • Immediate Compatibility: As soon as Odoo v18 hit the market, Ventor was ready to go. No waiting, no delays
  • Access to New Features: By updating Ventor to the latest version, you’ll be able to connect with your Odoo v18 instance and manage your warehouse
  • Continued Support: We’re here to ensure your transition is smooth. If you encounter any issues while using Ventor with Odoo v18, please report them here, and our team will swiftly address them

Ventor Compatibility

  • Odoo Versions: Compatible with Odoo 8-18 (latest three versions get updates)
  • Editions & Hosting: Supports Community and Enterprise editions, all hosting options (Odoo online, Odoo.sh, Odoo on-premise)
  • Legacy Support: Available for Odoo 8-15 (some features may be limited)
  • Devices: Works with Android 5.0+ devices (handheld computers, RFID scanners, mobile phones)

Stay Ahead with Ventor PRO

By choosing Ventor, you’re not just selecting an inventory management solution—you’re partnering with a team dedicated to boosting your efficiency and minimizing downtime. Benefits for your business: 

  • Use Ventor from the very first day of the Odoo 18 release. No waiting required
  • No need for time-consuming code migration. Your workflow continues uninterrupted
  • Skip the expense of buying separate modules for the fresh version. Ventor has you covered
  • Simply log in to your v18 instance and get to work. It’s that easy

Thank you for being part of the Ventor community. Together, let’s embrace the power of Odoo v18 and take your inventory management to new heights!

The Ventor app Enhances Amazon’s FBA Prep Service in Chicago

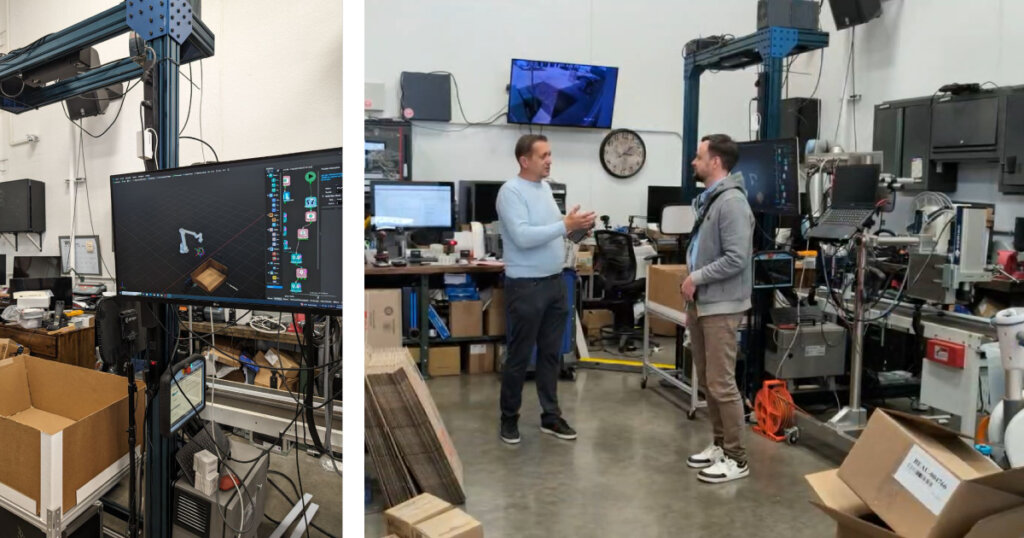
Thomas Dauksys, the owner of Shipux LLC in the Greater Chicago Area, Illinois, runs an FBA prep service that caters to Amazon sellers and e-commerce businesses. His company, Shipux LLC, is an experienced FBA prep center that handles everything from receiving to inspecting, labeling, and packaging inventory. This allows sellers to focus on growing their business instead of getting bogged down in tedious logistics.

Shipux’s warehouse operations had become too complex to manage manually, necessitating the integration of barcode processes for receiving, inventory management, picking, and shipment. The standard Odoo barcode app did not smoothly handle 3PL-related operations, which involved managing goods from multiple product owners. 

Thomas Dauksys, the owner of Shipux LLC, and VentorTech CEO Oleg Kuryan

In 2020, Thomas began improving his business with VentorTech. Shipux LLC utilizes the Odoo system and have integrated the Ventor PRO app (Odoo barcode scanning software) with their scanners.

Thomas reports that Ventor has greatly improved their efficiency by reducing overall time spent on picking, packing, and barcode scanning. 

Talking about hardware, Thomas uses Zebra scanners such as MC9300 and TC7X that communicate with Odoo using Ventor, and Zebra printers such as ZT400 to print shipping labels.

BTW, you can instantly print Odoo shipping labels via the Odoo Direct Print PRO app.

Thomas highly recommends the Ventor app to anyone using Odoo for warehouse management. According to him, the software has significantly enhanced their warehouse operations.

Looking ahead, Thomas plans to expand Shipux LLC with the help of Odoo and the VentorTech team. Currently, Shipux LLC operates out of a 5,000-square-foot warehouse but aims to move to larger facilities, ultimately targeting a 100,000-square-foot space. He believes that with the right technology from VentorTech, they will achieve this growth quickly. For businesses seeking to enhance their e-commerce solutions, Thomas suggests considering Odoo and VentorTech for their easy integration and efficiency improvements.

You can watch the video version of Thomas’s feedback on the VentorTech YouTube channel.

Reduce your time spent on picking, packing, and barcode scanning in Odoo:

Recommended articles:

  1. Receiving goods in Odoo via a barcode scanner: Receive, putaway, manage lots, serial numbers, packages
  2. Make Odoo inventory quickly and accurately using Ventor app
  3. Ventor App FAQ

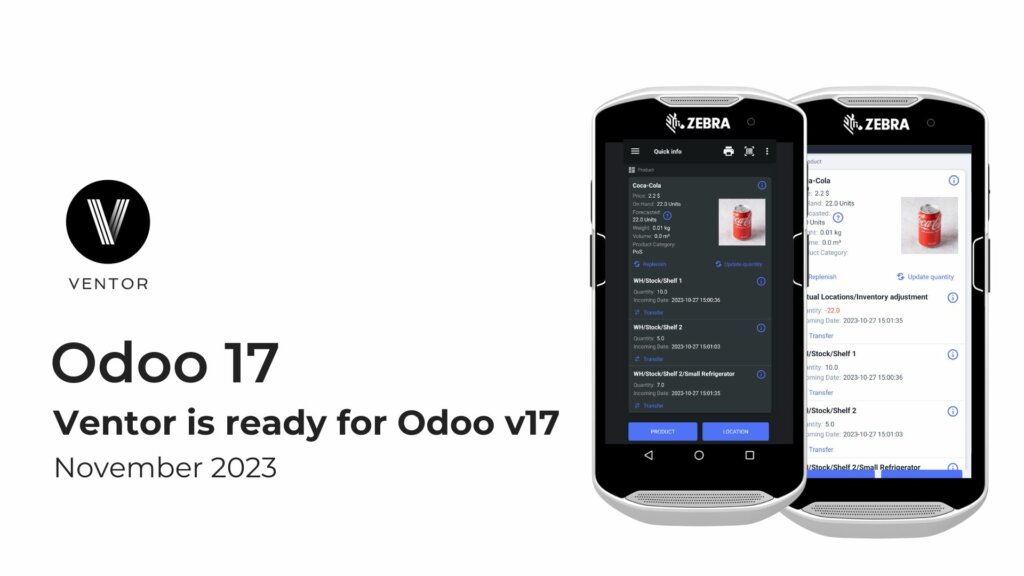
Ventor is ready for Odoo v17

Hello Ventor Users,

We’re thrilled to share the latest update – Odoo v17 has just hit the market, and we’re proud to announce that Ventor is already compatible with it. Your inventory management solution is always ahead of the curve.

To dive into the Odoo v17 experience, please ensure you’ve updated Ventor to the latest version. This will enable you to connect Ventor with Odoo v17 and explore its new features and enhancements.

Have some hiccups along the way? No problem! If you encounter any issues using Ventor with Odoo v17, please report them here, and we’ll work diligently to resolve them quickly.

Thank you for choosing Ventor. Stay updated, stay efficient, and stay on the cutting edge with Ventor and Odoo v17!

Compatibility

  • Ventor works with Odoo 8 and higher
  • Compatible with both Community and Enterprise editions
  • Only the three latest versions get update improvements

Make Odoo inventory quickly and accurately using Ventor app

In this article we are going to show you how to do an instant inventory of any product in your Odoo warehouse. This article will be useful if you need to do an initial inventory, cycle count or just update any product on the go.

Also, we recorded a video, and you can watch it on our YouTube channel:

https://youtu.be/YOCLABGWA5I

Table of contents:

Case 1: Initial Odoo Inventory

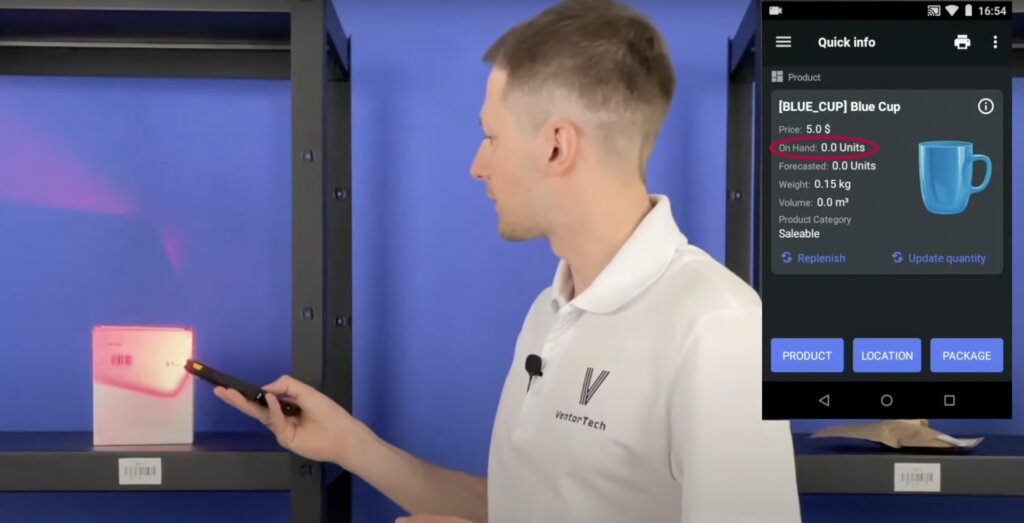
Imagine that we have an empty warehouse in our Odoo inventory, for example we’ve just started our business or have a fresh Odoo installation. Goods are on the shelves, but not in the system yet. Let’s check it. We scan any item.

We see the quantity on hand is zero.

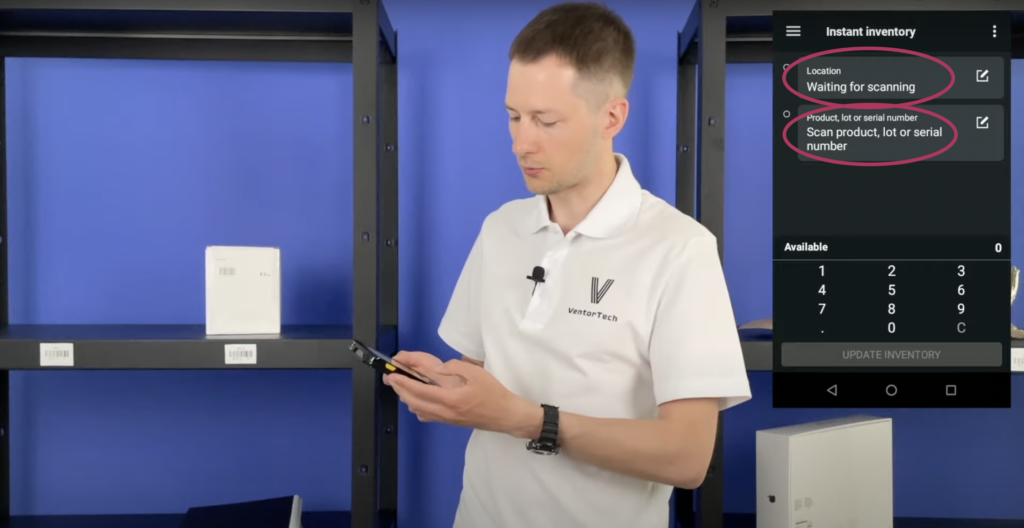
Now let’s add everything to the system. For this let’s open Ventor application and ‘Instant inventory’ menu.

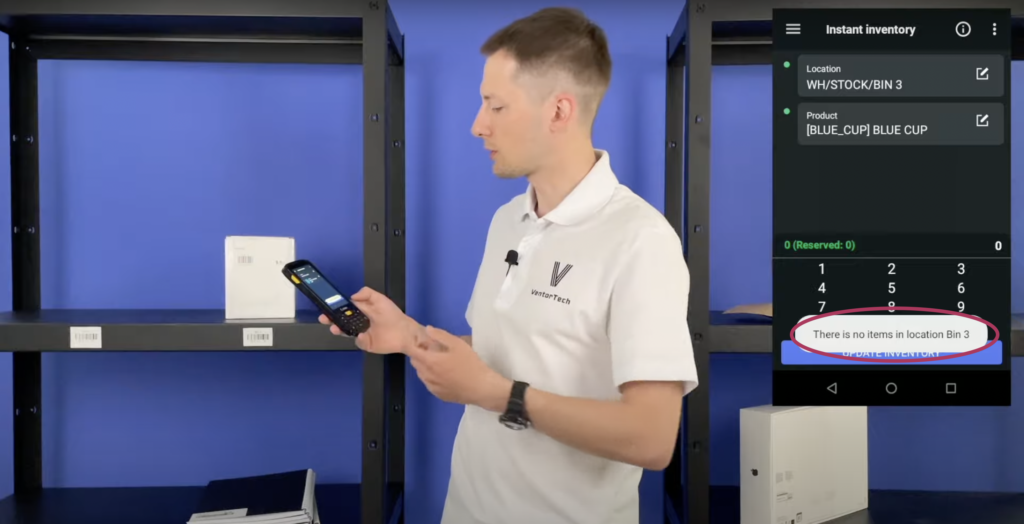
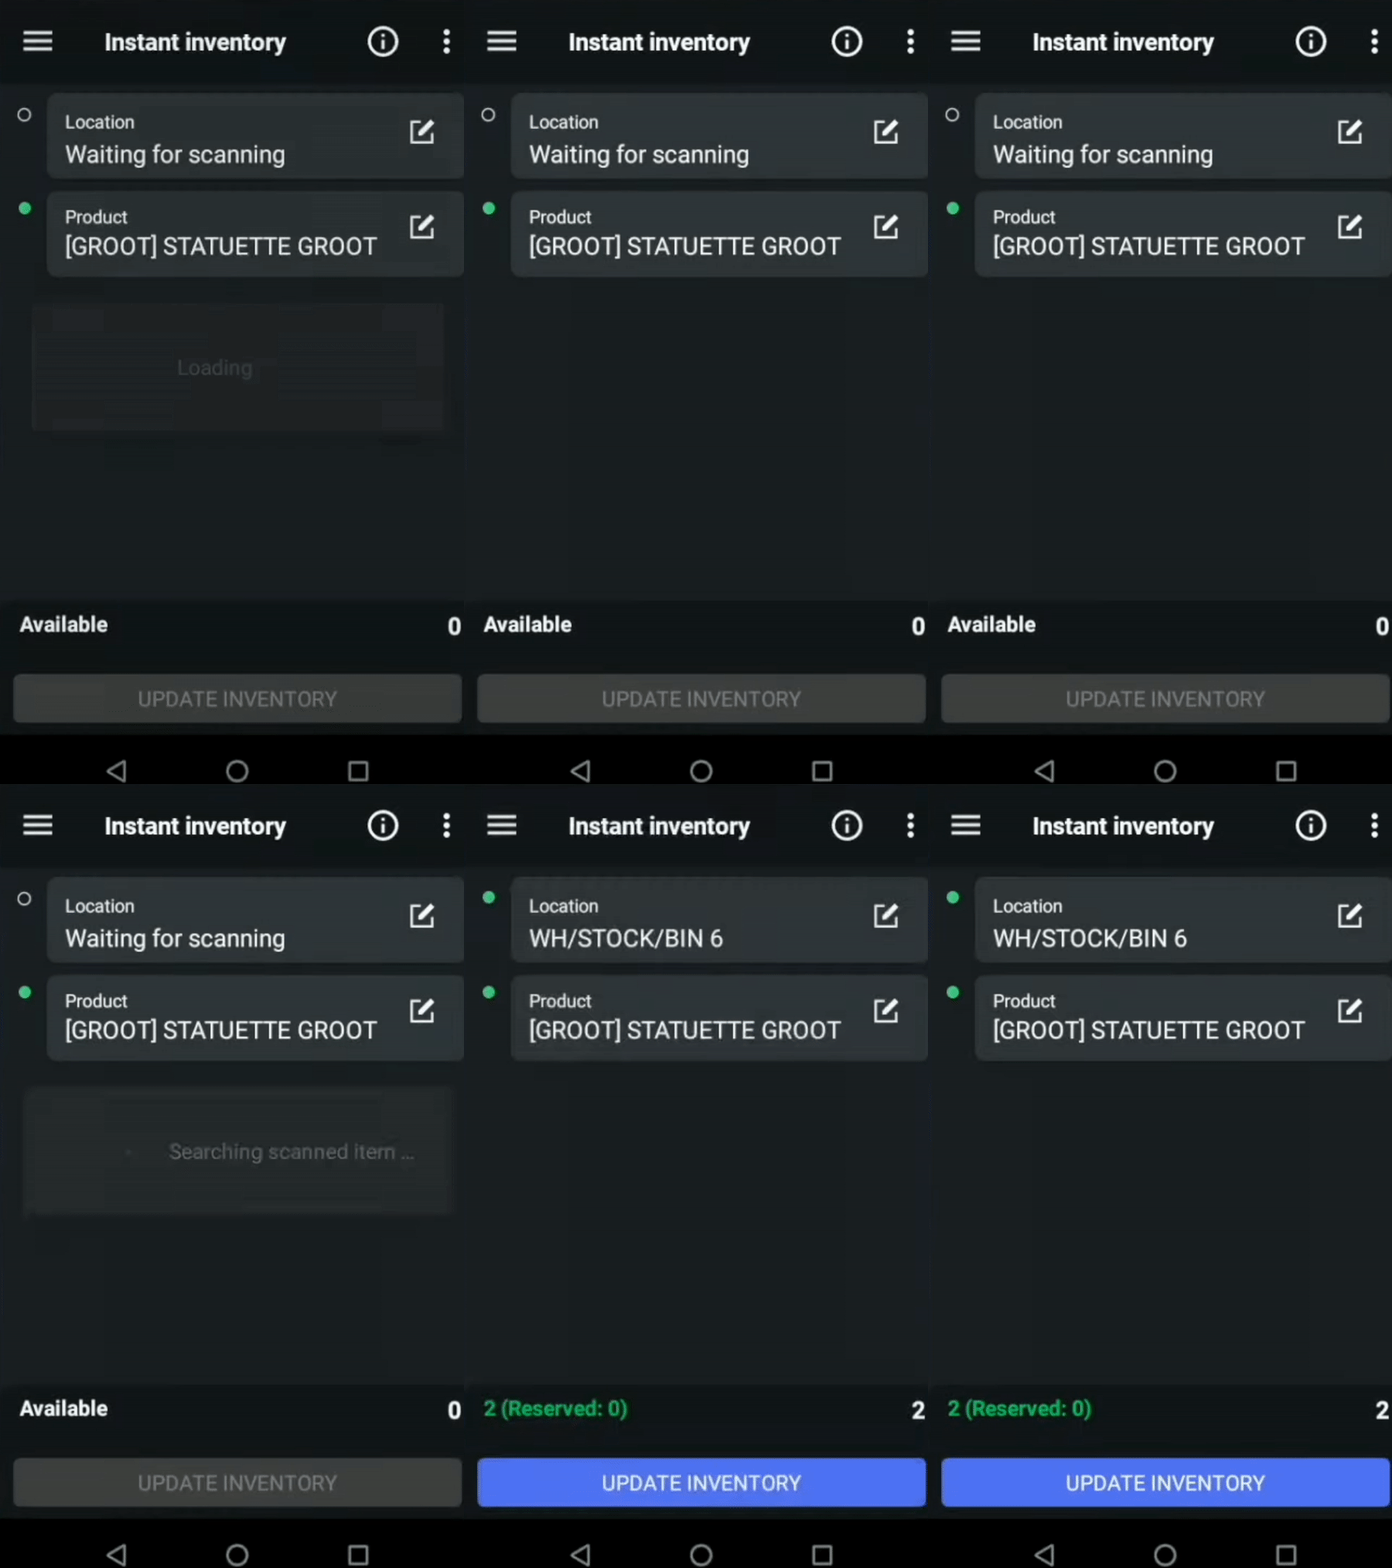
We see 2 lines – ‘Location’ and ‘Product’. Let’s scan the barcode of the product and barcode of the shelf.

We see a warning, that there is no items in this location, it’s correct because we haven’t added it yet. Let’s add it.

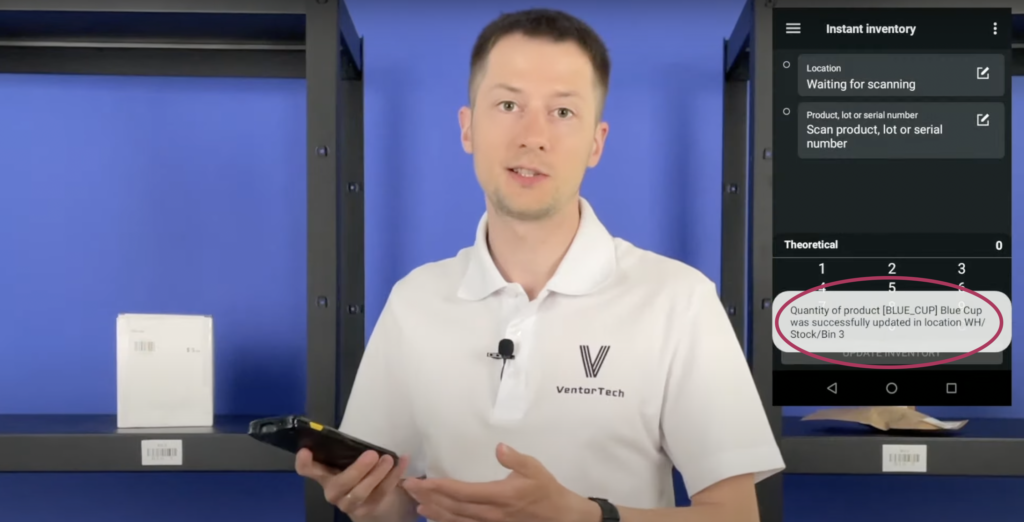
Enter quantity one and apply. After that update inventory. And now you can add other products in our warehouse.

Try Ventor for FREE

Case 2: Cycle count and Update qty on the go

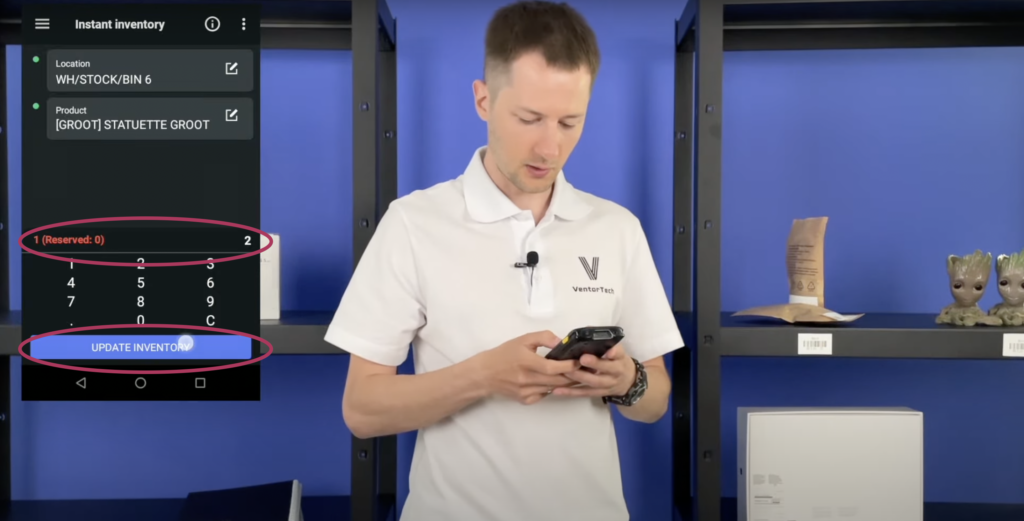
Let’t imagine, you are a warehouse worker. Sometimes warehouse manager just walk into warehouse and checking shelves randomly and if you find difference , you can easily update stock in a few seconds.

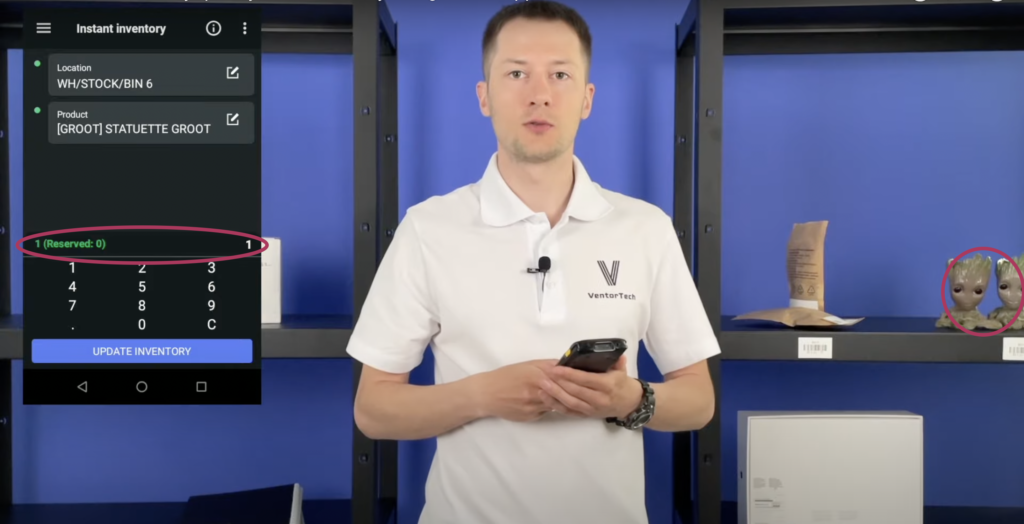
Let’s say you want to check first shelf. Scan it.

You see that should be only one Statuette Groot but it’s two. Sometimes it happens in the warehouse.

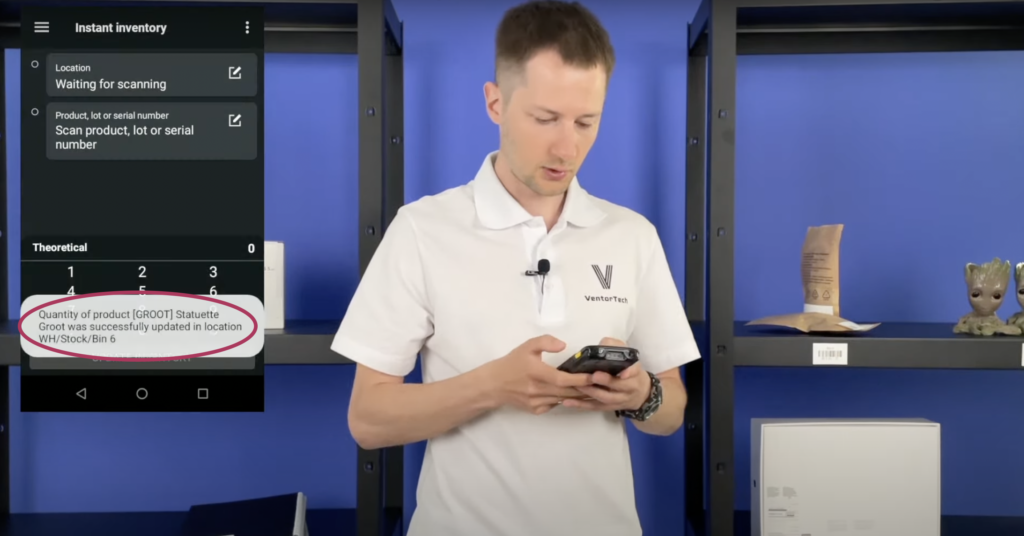
Let’s just update inventory to keep our stock up to date.

This option is also useful if you set cycle count for some location or product. Your workers can go to needed location once a day or once a week and easily update or confirm inventory.

Case 3: Update Odoo inventory while doing other warehouse operations

It often happens that pickers can’t find needed products on related shelf, while doing picking .

Related article: How to pick orders in Odoo efficiently ?

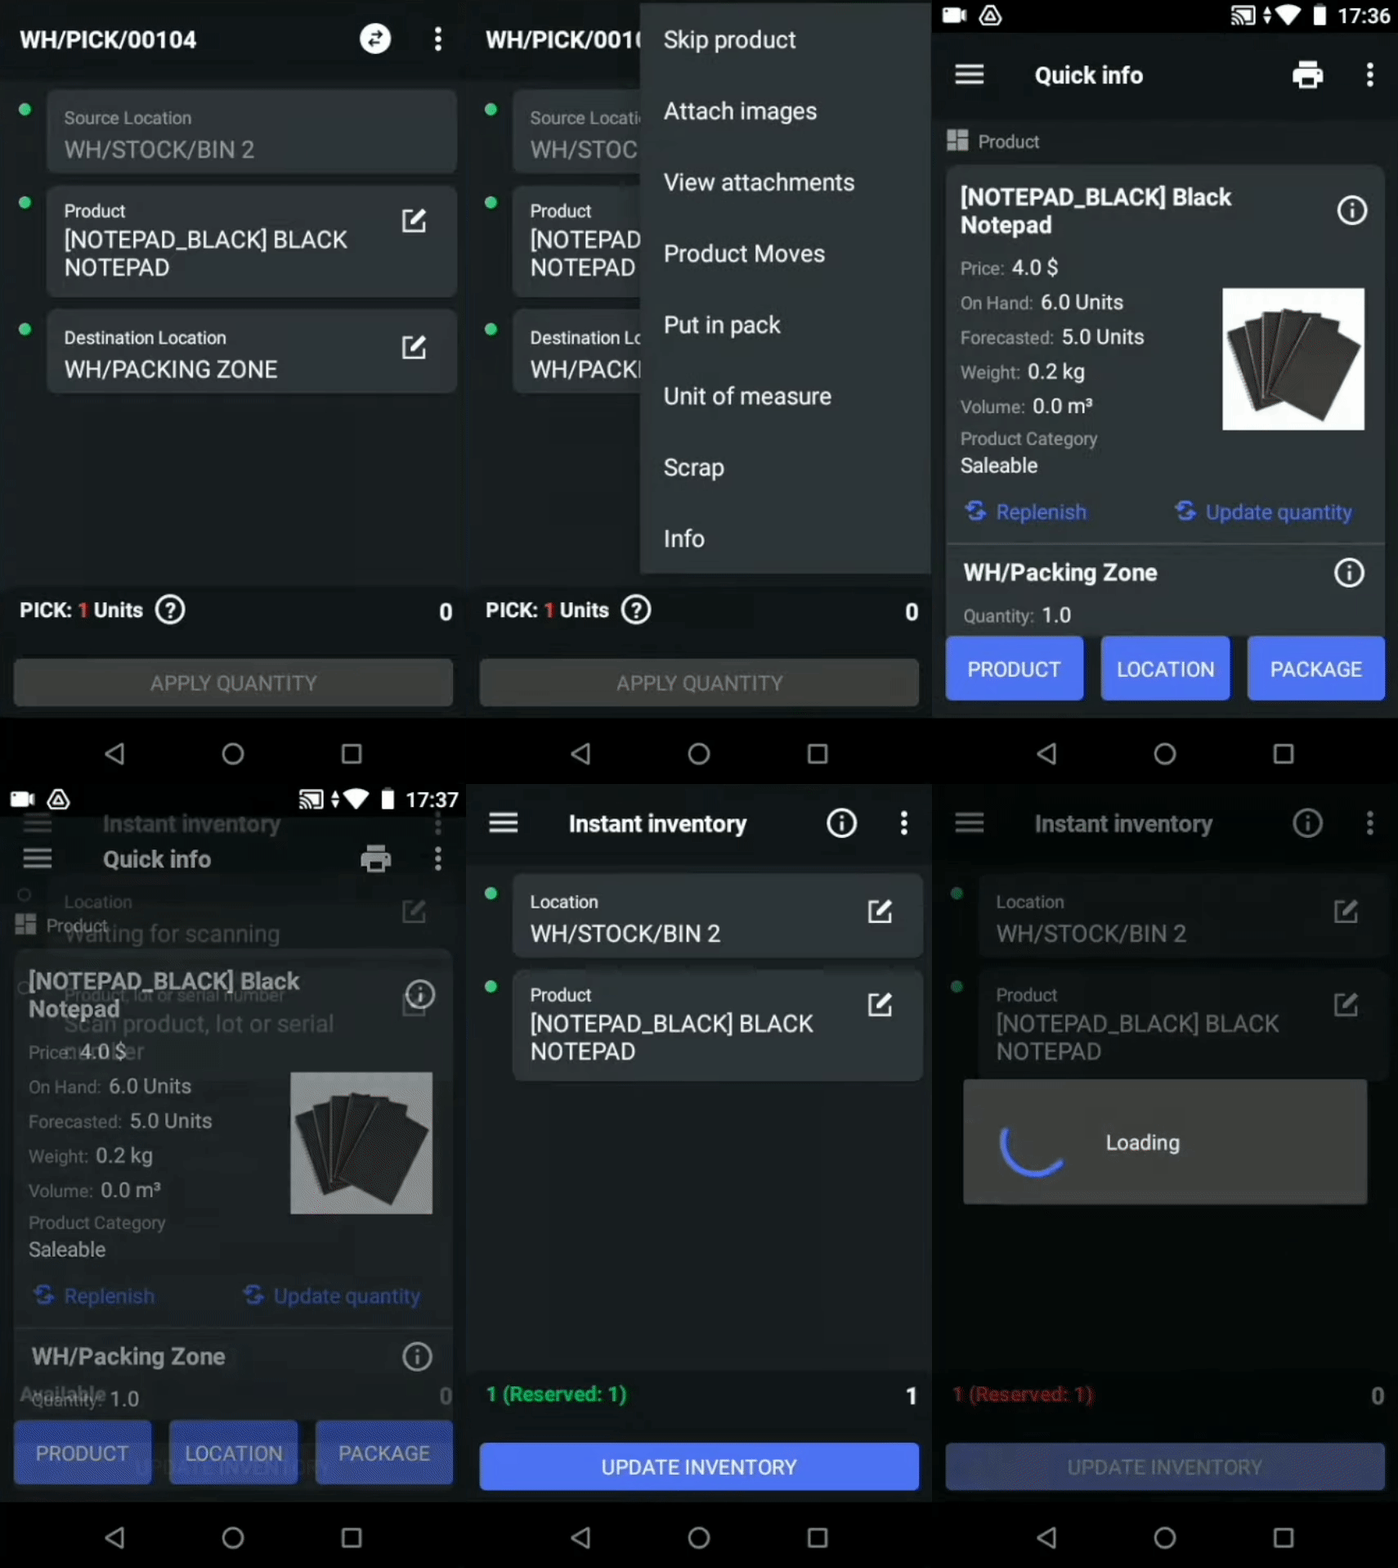
Let’s start picking. The app guides to ‘Bin 2’ to take one notepad.

We see that it’s empty, it’s important to update quantity right now, not to waste time in the future. Let’s do it.

We are going to ‘Product info’, update quantity, choose the location and set ‘0’ for this.

Now we can return to our picking to take product from another location and continue our picking .

Case 4: Adding Odoo serial number

Often serial numbers aren’t added on receiving, but applied on picking, packing or delivery. Ventor allows doing this easily.

Related video playlist: Ventor: Odoo barcode app for your inventory

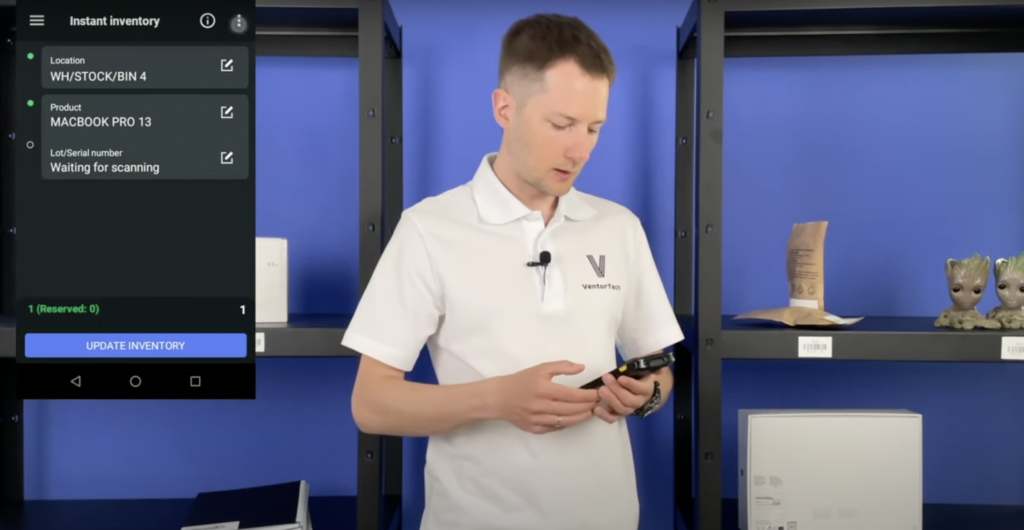
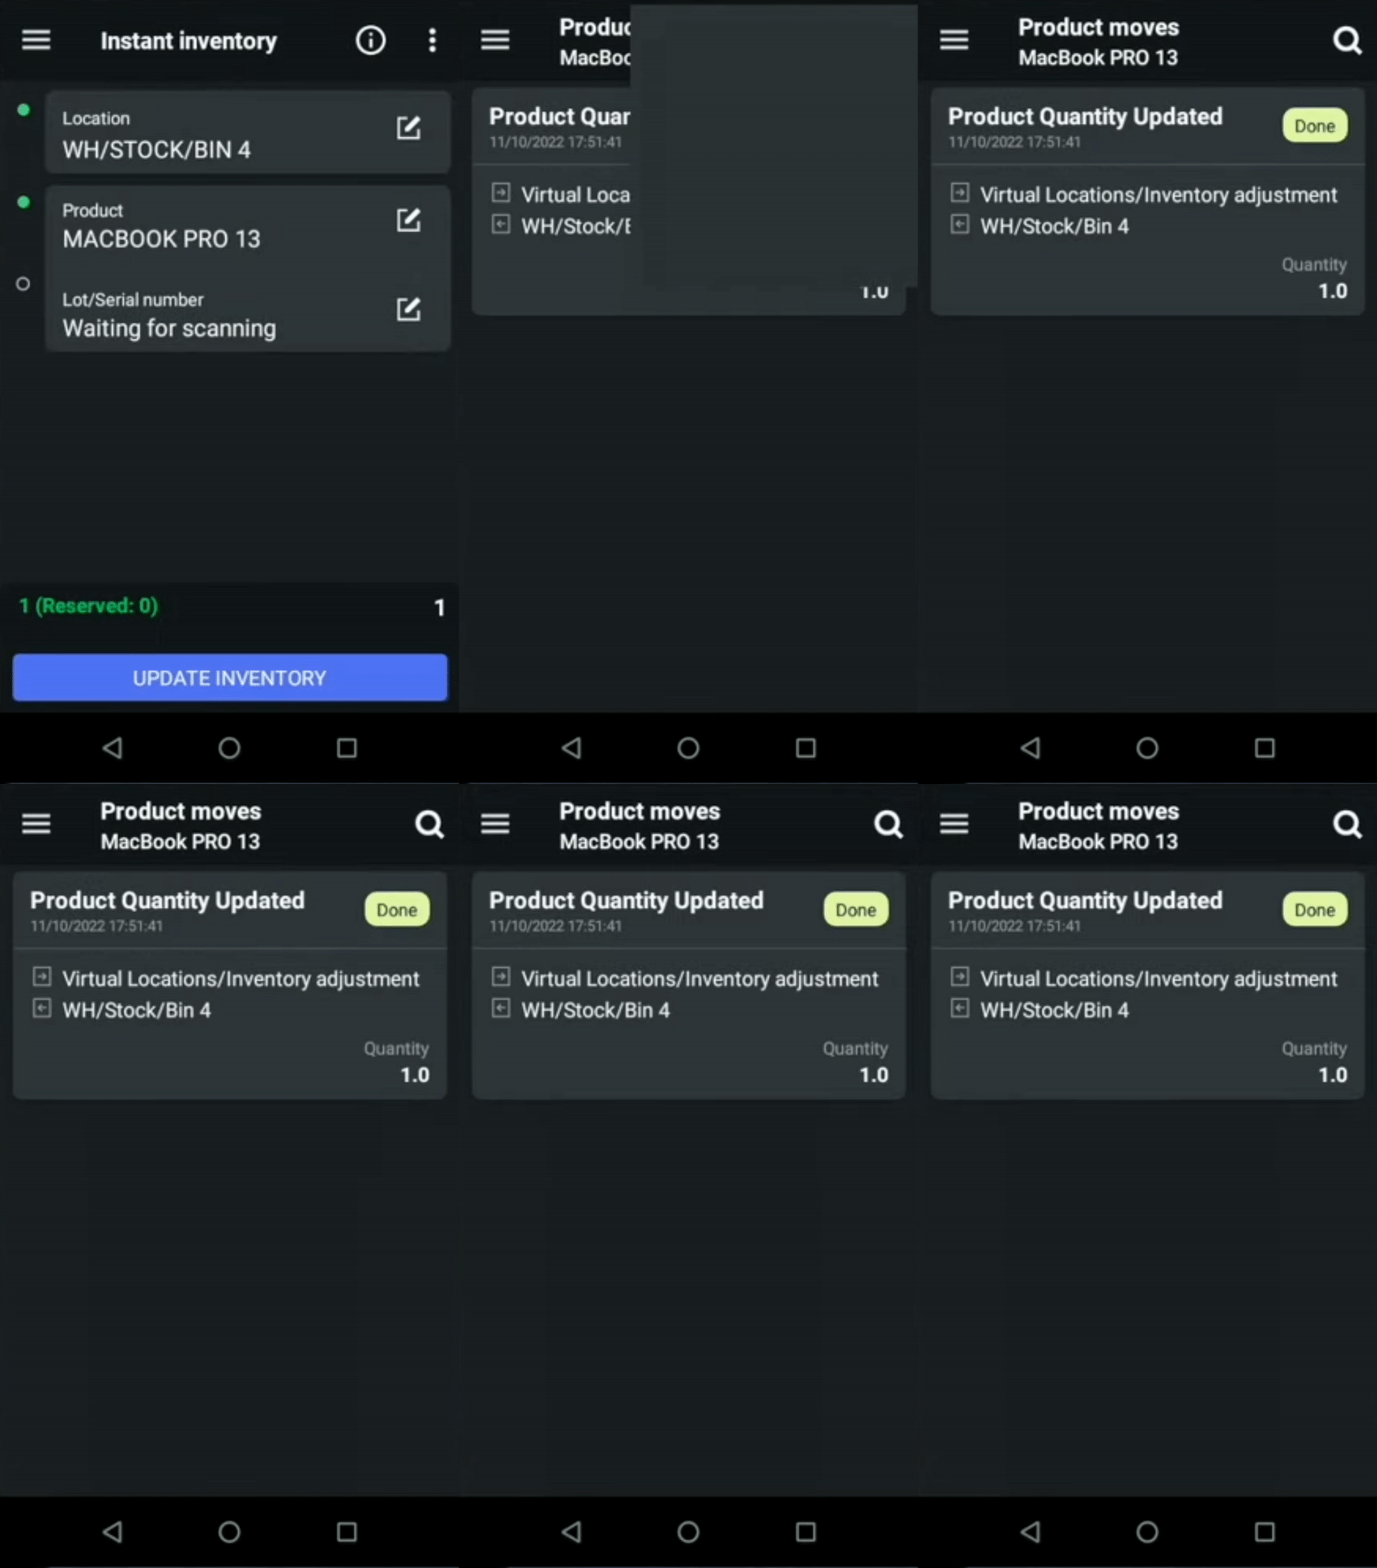
With the ‘ Instant inventory’ menu you can assign serial number at any moment. For example the MacBook from ‘Bin 4’.

Let’s check its product moves.

We see that this product was recently received and hasn’t been moved yet. It’s good that we found this product without serial number while nobody picked it. Let’s go back and add serial number.

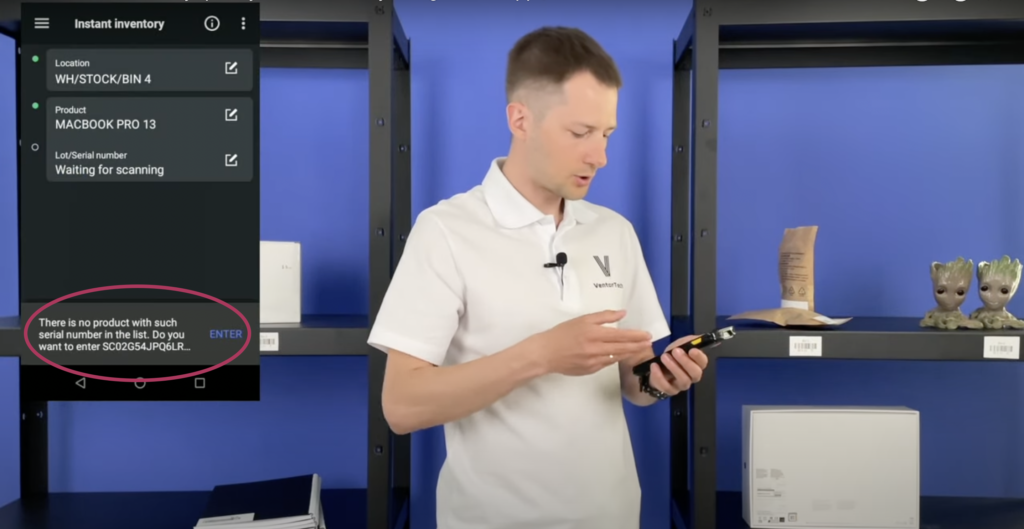
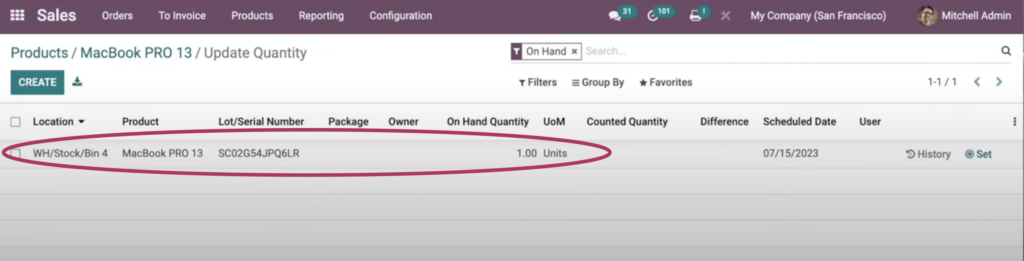
First of all we need to update this Quant, set quantity zero and create a new one, but with serial number.

Scanning the product and the serial number. The app shows a warning that there is no serial number, but suggest to enter it.

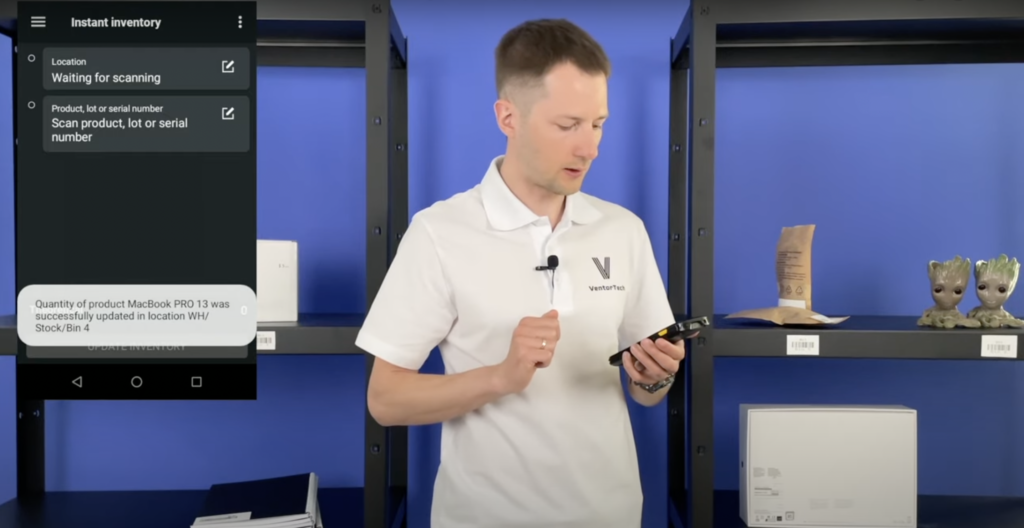
Let’s add one and update inventory.

Case is done
Ventor app pricing

Case 5: Adding Odoo expiration date

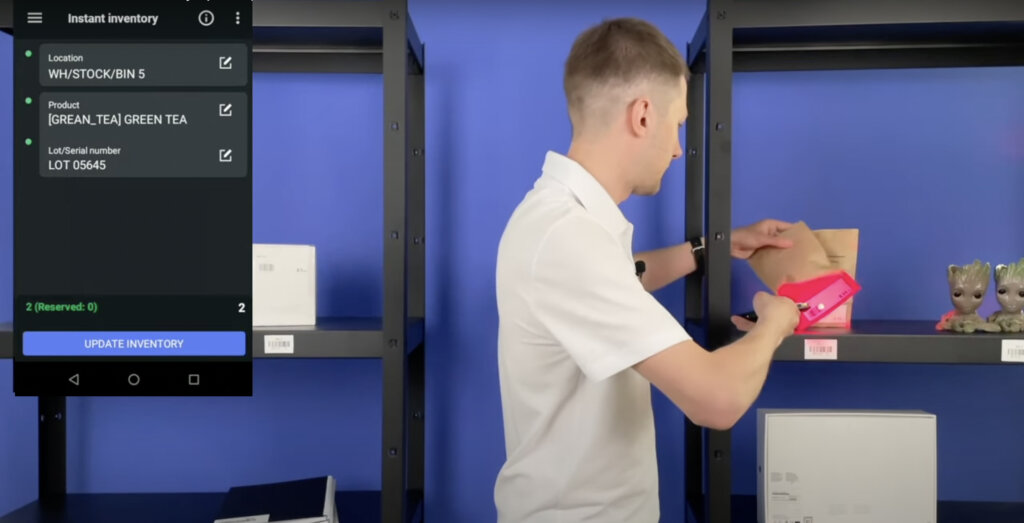
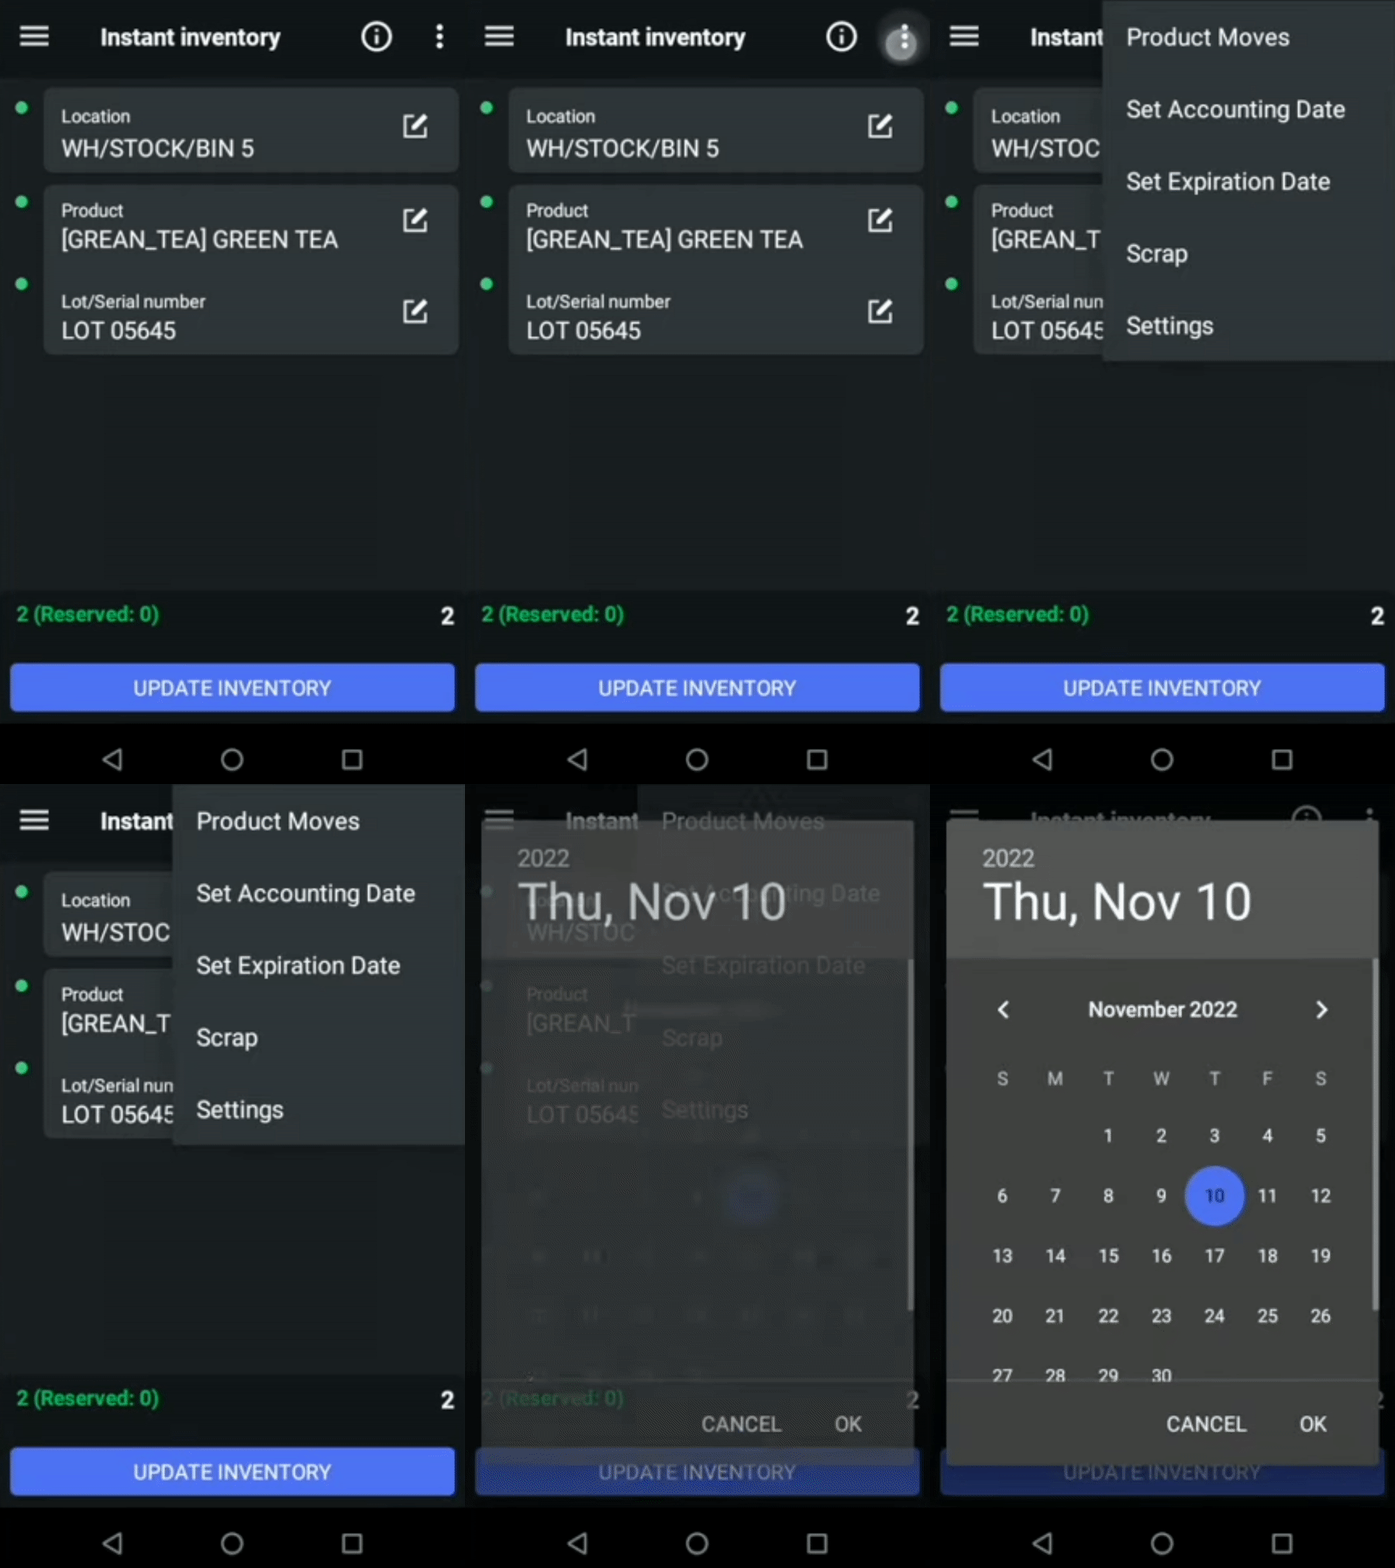
Another important point is expiration dates. If you sell goods, you know how it matters to always have relevant information about this day. I know that product ‘green tea’ in our warehouse has no expiration date in our system, so let’s add it. Scanning it.

Choosing ‘Lot number’. By the way the application shows us only lot numbers from current location. Let’s add expiration date. For this go to ‘three dots’, after ‘Set Expiration date’ (it expires on June 30) and update inventory.

Adding Odoo expiration date

That’s it. Now this product will be properly reserved by Odoo to ship in time. Case is done.

Case 6: Odoo Scrap

Sometimes it happens that you find a product in your warehouse and it is damaged or defective. In these cases you need to scrap it from your warehouse . Let’s do it with Ventor.

Scan product, location, quantity, go to ‘three dots’, ‘Scrap’. We see a warning, click ‘Agree’ . Case is done.

Odoo Scrap

As you see, the ‘Instant inventory’ menu allows doing serious things with your goods: add, remove, scrap them and etc. Make sure, you provide access to this menu only to reliable users.

Try Ventor for Free

***

Ventor: Quick Start Guide – ventor.app/guides/ventor-quick-start-guide/

Ventor complete guide. Introduction – ventor.app/guides/ventor-introduction-guide/

Odoo inventory optimization for a Baltics packaging supplies retailer, PaperSeal – https://ventor.tech/odoo-inventory-optimization/

***

Receiving goods in Odoo via a barcode scanner: Receive, putaway, manage lots, serial numbers, packages

In this article you will see how to receive items using Ventor – Odoo inventory mobile app. Basic receiving, changing default location (put away), adding a barcode for a product from a barcode scanner, lots and SN management, putting on pallets (packages).

Also, we recorded a video, and you can watch it on our YouTube channel:

Receiving goods in Odoo via barcode scanner: Receive, putaway, manage lots, serial numbers, packages

Table of contents

Prerequisites

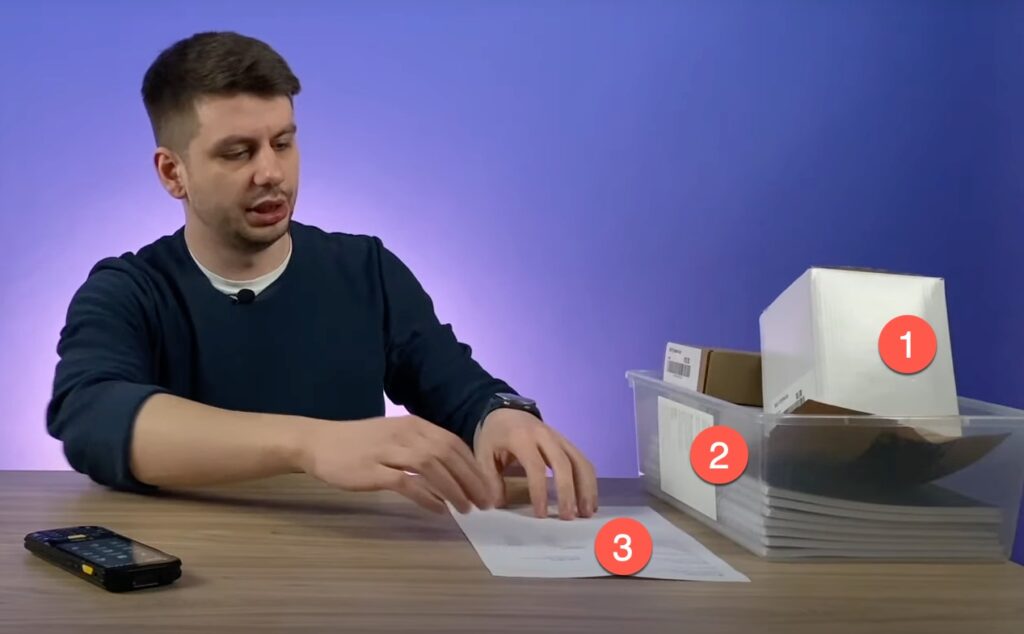
Before we start, we have:
1. An incoming shipment (physical goods)
2. A label with Internal reference
3. A delivery document with a barcode

odoo receiving

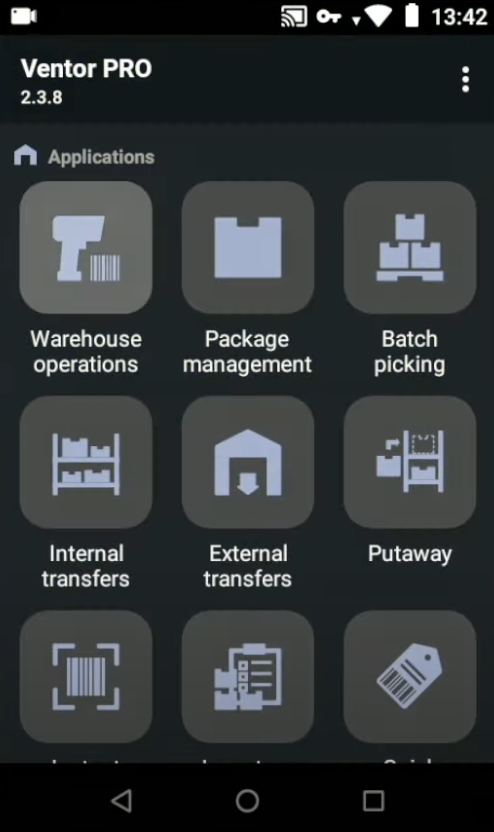
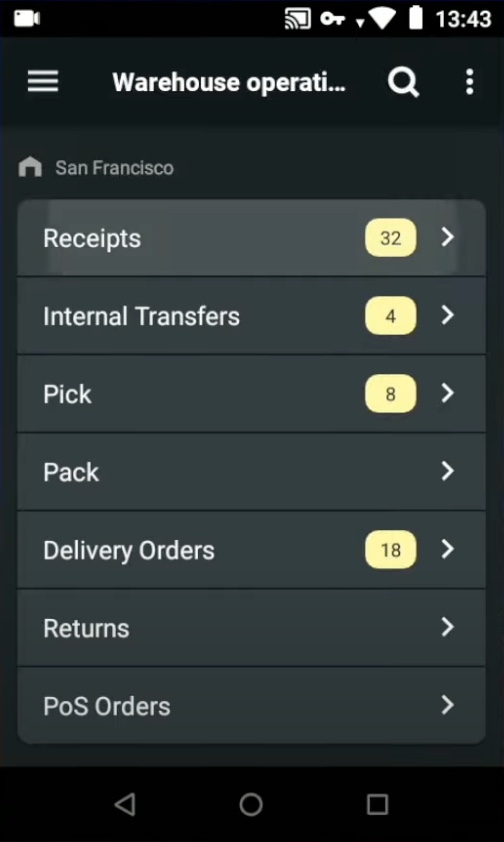
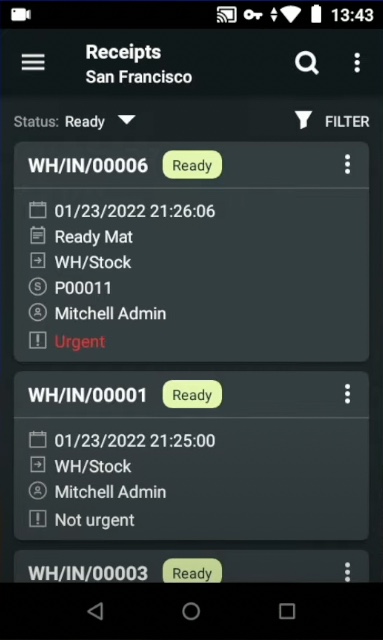
Open the Ventor app (How to connect to your Odoo), choose ‘Warehouse operations’ and open a ‘Receipt zone’ to find incoming shipments.

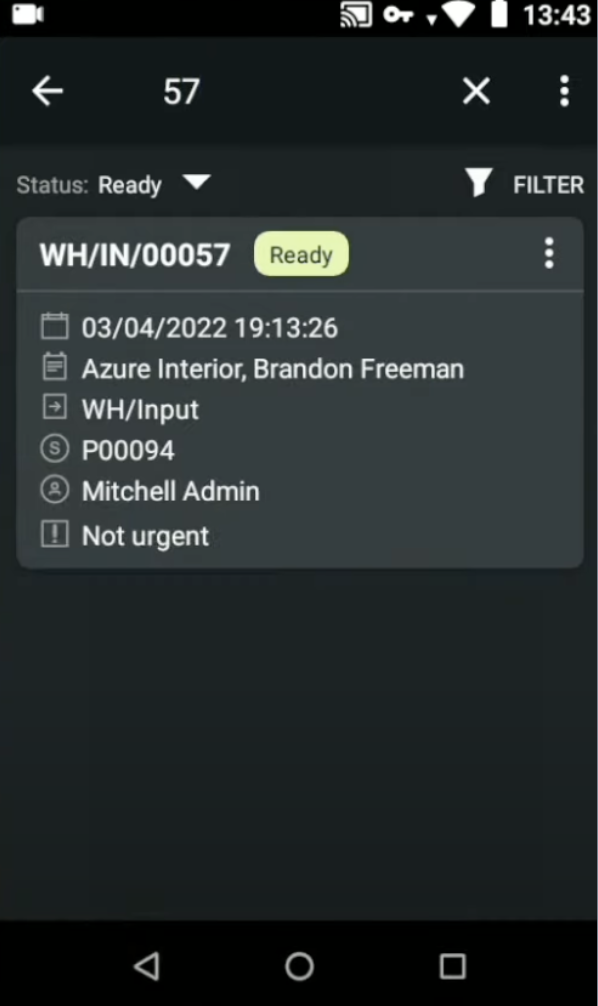
You can also scan any item from this order right here to immediately find all the orders where the same item is presented. But in this article, we are going to open the item and find the orders manually. Click on the ‘Search’ and insert the number ’57’

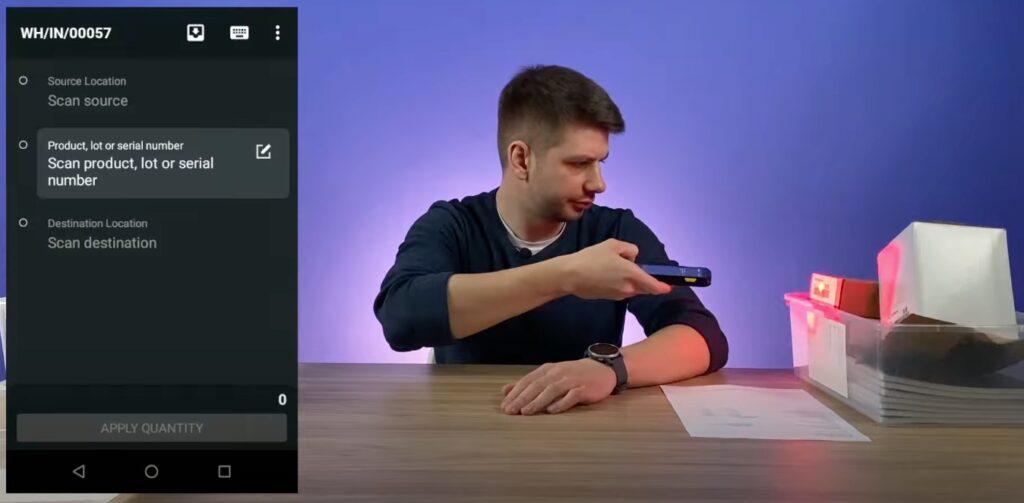
We’ve just found this order. Let’s open it and start the transfer.

Case 1: Change destination location on receiving (put away)

Click on the ‘Start transfer’ and scan the first item.

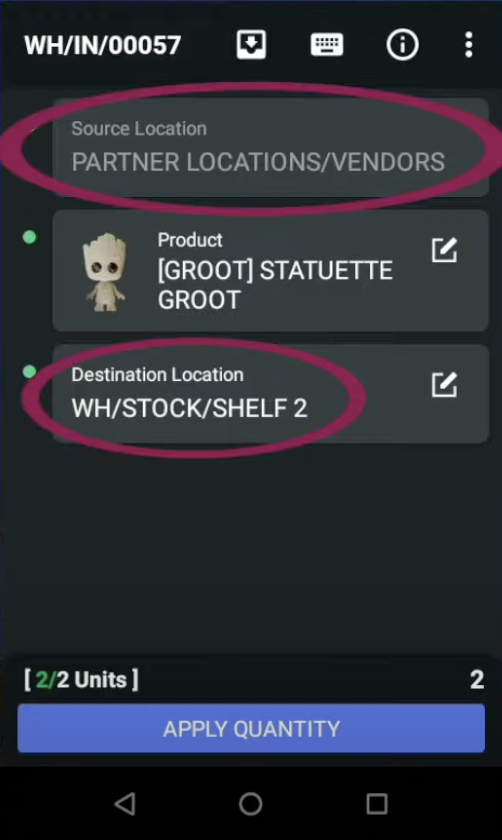
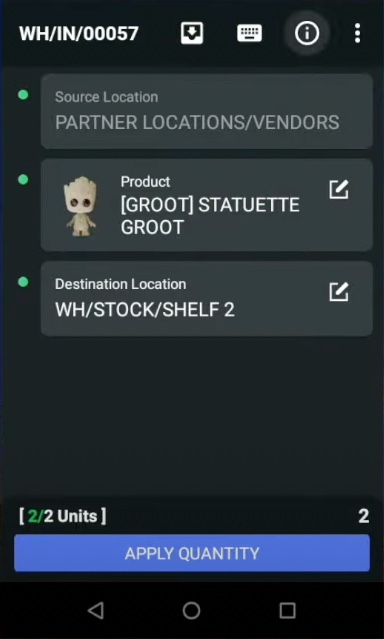
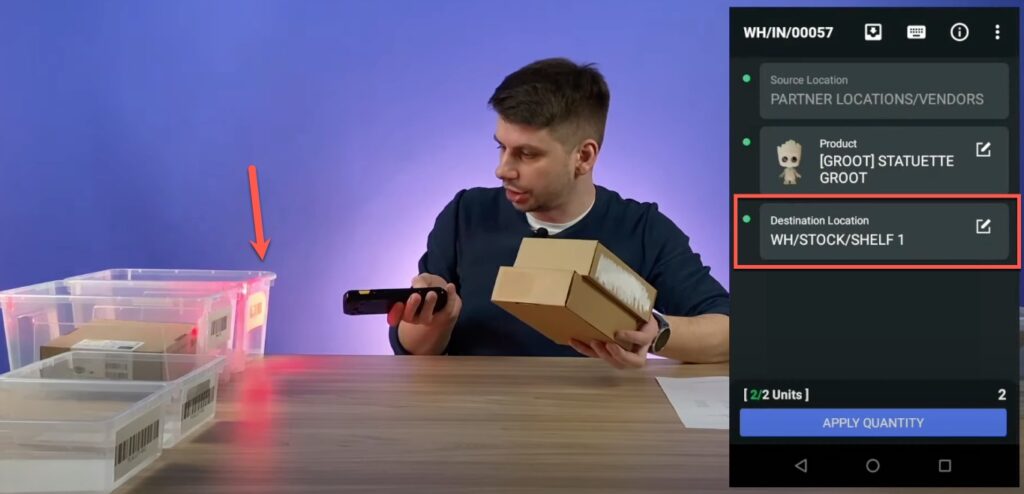
We have two Groot statuettes. Here we have all the information from where we are taking these items, from the ‘Vendors’ location to the distinction location on ‘Shelf 2’.

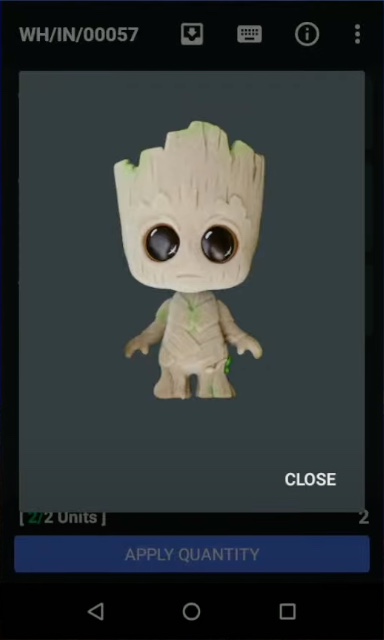
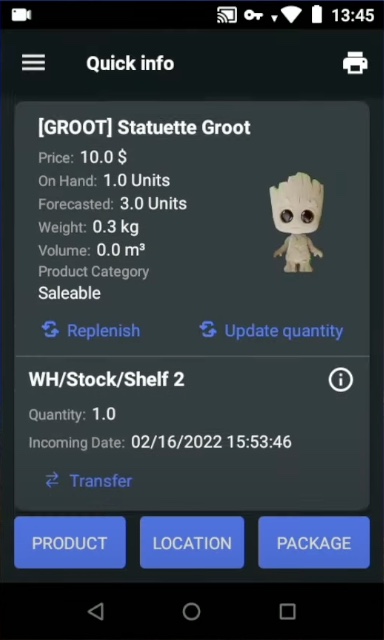
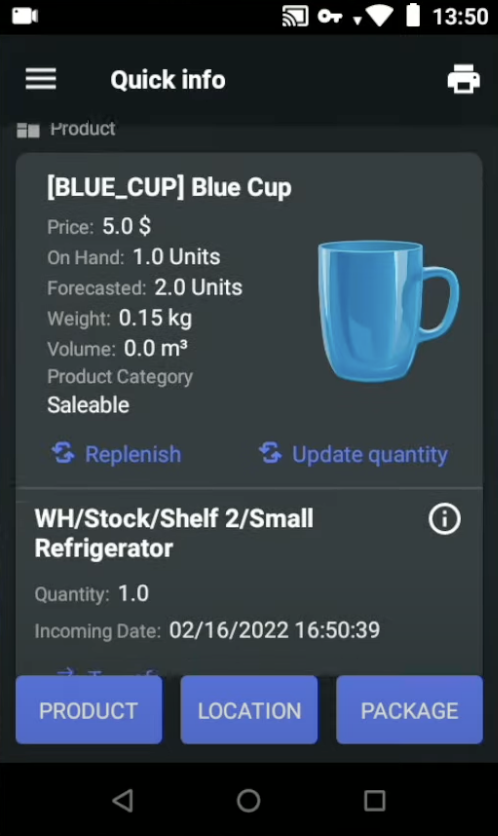
You can click on the image of the product to see it in a bigger size, so you can quickly compare what you’re receiving and what you have in the system. Also you have a ‘Quick info’ button: if you click on it, you can find where else this item is located, like on ‘Shelf 2’.

Let’s go ‘Back’ and put these two items into the ‘Shelf 2’ location,  and then you can confirm it. You can also change the destination location in Odoo, for example, it should be going to ‘Shelf 2’, but there is not enough space, so you can change the location – exchange the original location from ‘Shelf 2’ to ‘Shelf 1’ and put these two items into ‘Shelf 1’.

change destination location in Odoo
Change destination location in Odoo

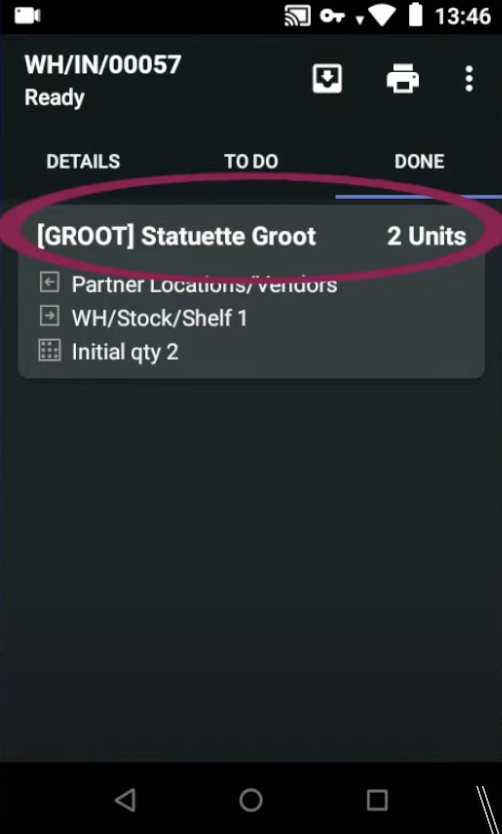
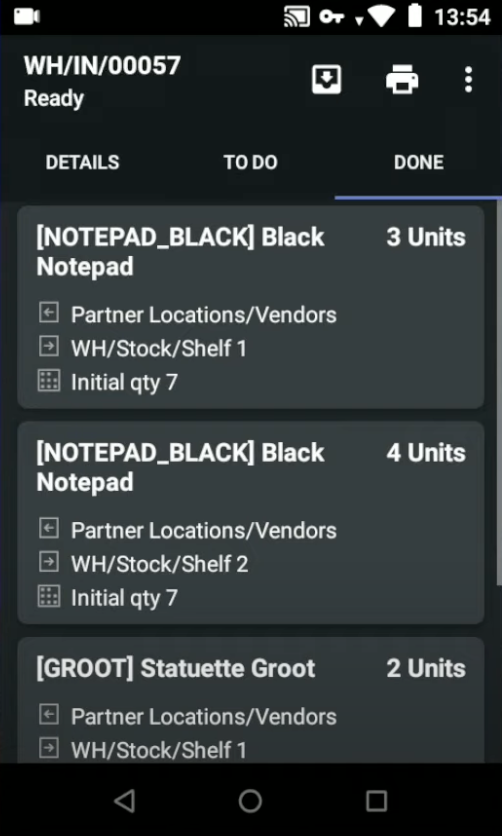
Click ‘Apply quantity’, and we are ready to scan the next item. So now, let’s quickly check that these 2 items were moved to ‘Shelf 1’. Go to the Done tab. Here we can see that 2 units of this statuette Groot were already moved to ‘Shelf 1’.

You can click ‘Back’ to close this order and then open it once again. At any time, you can move back to get some rest and then move back to the order and pick it again. So, click on ‘Continue transfer’, and we are ready to scan the next item.

Case 2: Add product barcode in Odoo via a barcode scanner

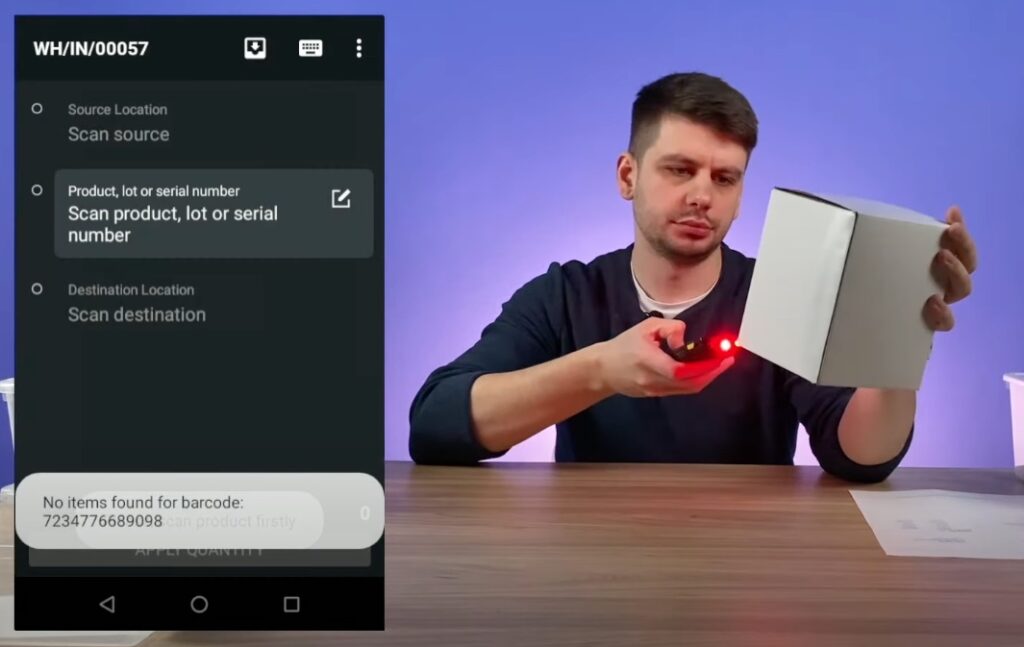
Let’s take the next item, a ‘Blue cup’. But after scanning it, we get an error:

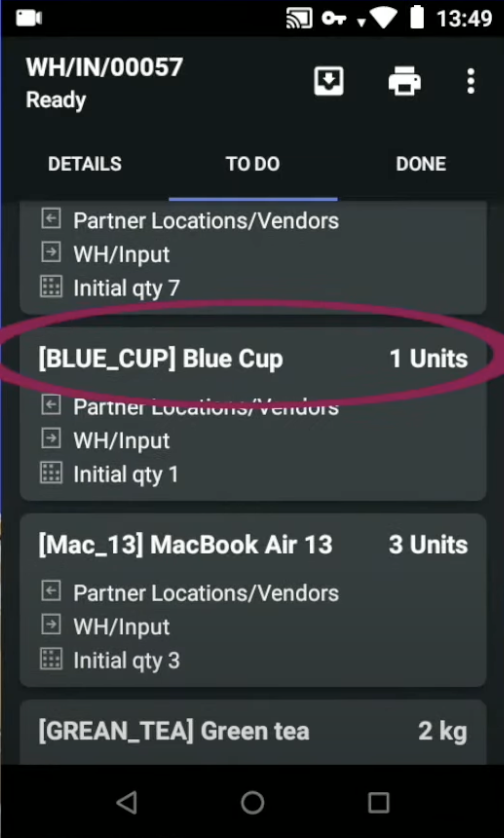
First of all, let’s check if this product really should be in this order.

This product is present in the Odoo view, but its barcode is missing. It’s a common situation; what can we do?

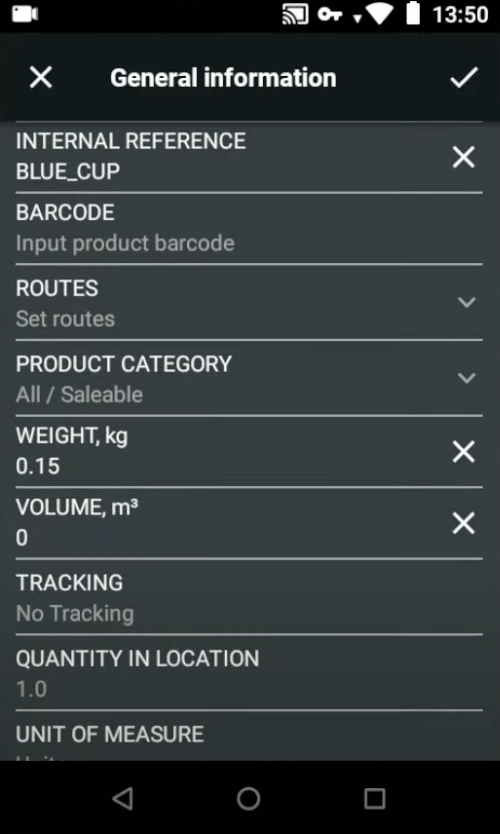
First of all, we can choose this product manually: Click on ‘Blue cup’ and then click on the ‘Info button’. Here we can get additional information about this product.

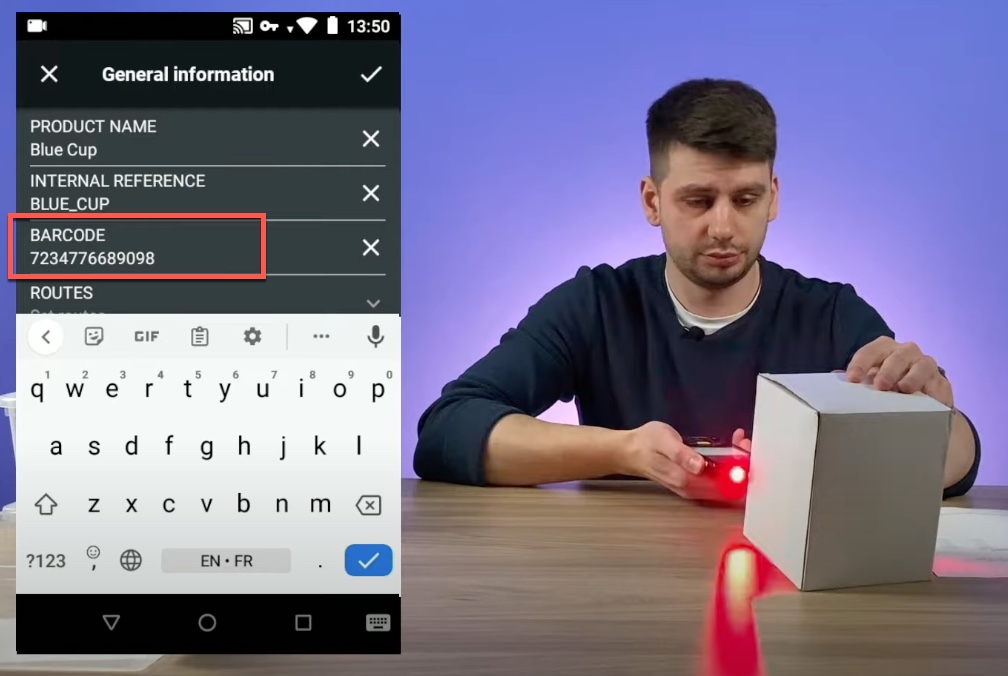
Let’s click on the ‘additional info’, and we have many fields related to this product here. We see that the ‘Barcode’ field is empty. Let’s scan it in right now.

Fill in, click ‘Save’, and move back.

Add barcode to Odoo

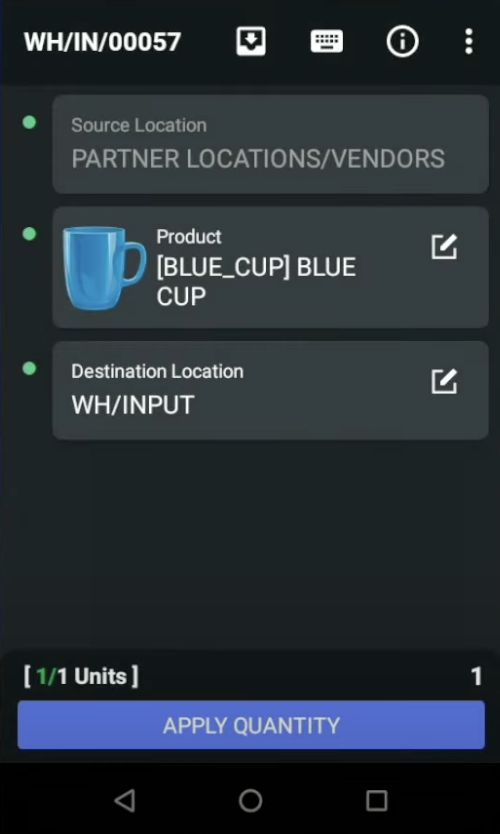
Now we are ready to apply the quantity of this item and move it to the ‘Input zone’ or check it once again. Next, click ‘Back’ and then click ‘Continue transfer’ and scan it one more time. Now the product can be recognized.

During the reception process, we are ready to quickly go to Ventor’s ‘Quick Info’ menu and update the information about this product to make it possible to receive it in future, without needing to put this information on the Odoo site and so on. It’s a really useful feature to update some fields right on the reception or picking process.

We want to put the product into the ‘Input’ zone, so click on the ‘Apply’ button and move it to the ‘Input zone’, and the process is finished. 

Case 3: Split on receiving to put part of a batch on a different shelf

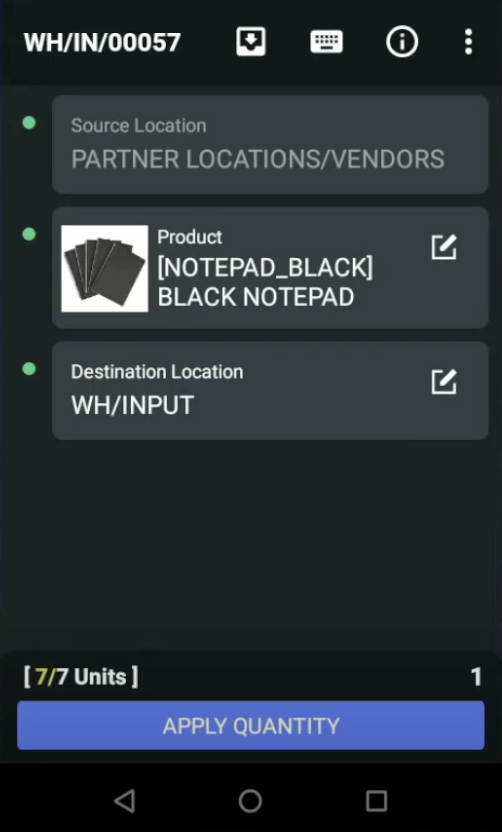
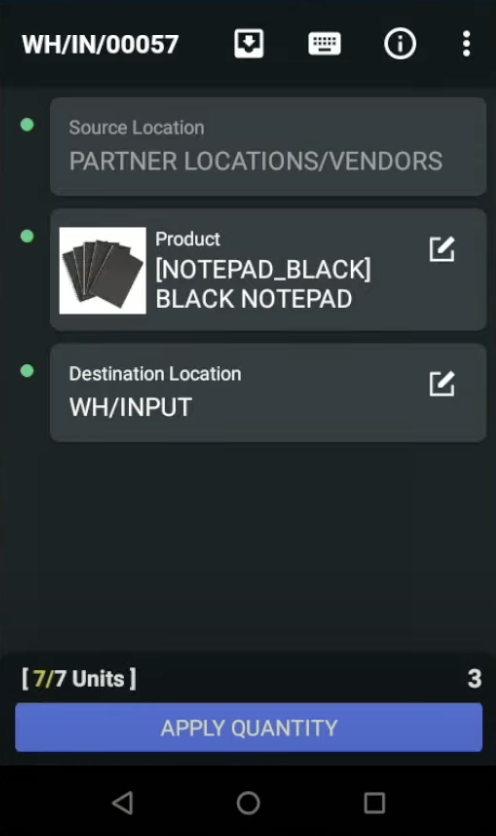
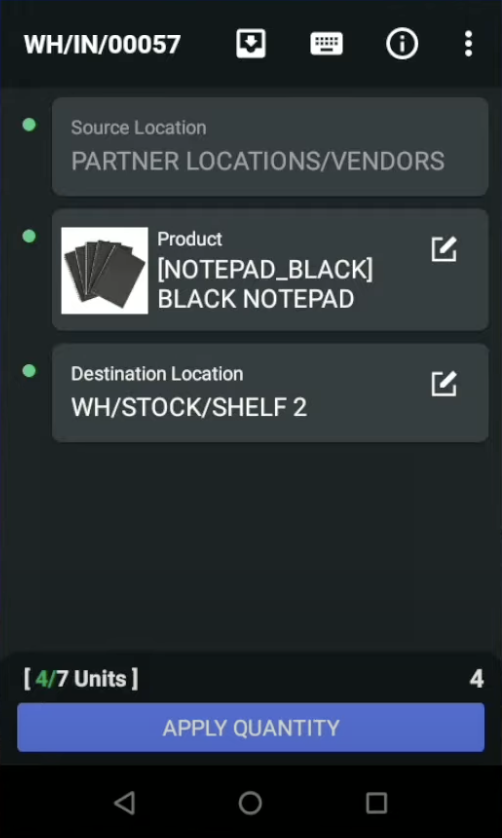
In this case, we have 7 notebooks. Either you can scan them 7 times, or you can just get the information about this product and insert ‘7’ on your physical keyboard.

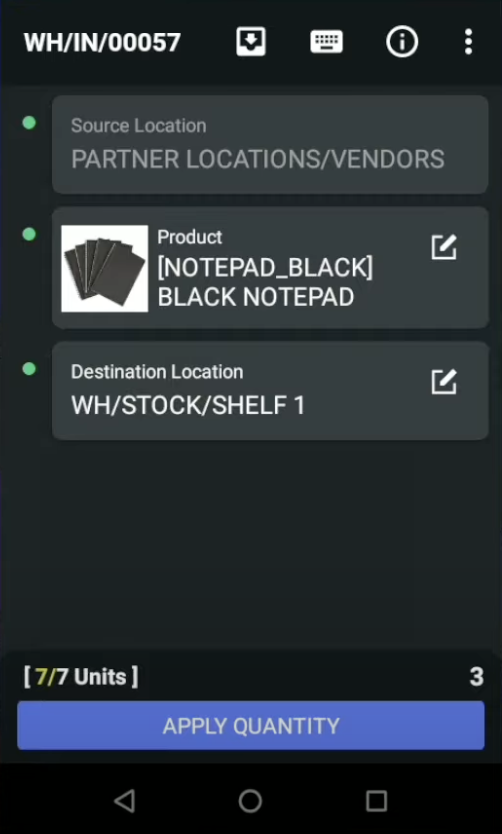
We want to split this item, putting 3 of them into ‘Shelf 1’ and 4 of them into ‘Shelf 2’. First, we insert ‘3’ and then put this into ‘Shelf 1’. By default, the destination location is the input zone, but we can change it to ‘Shelf 1’ and apply the quantity.

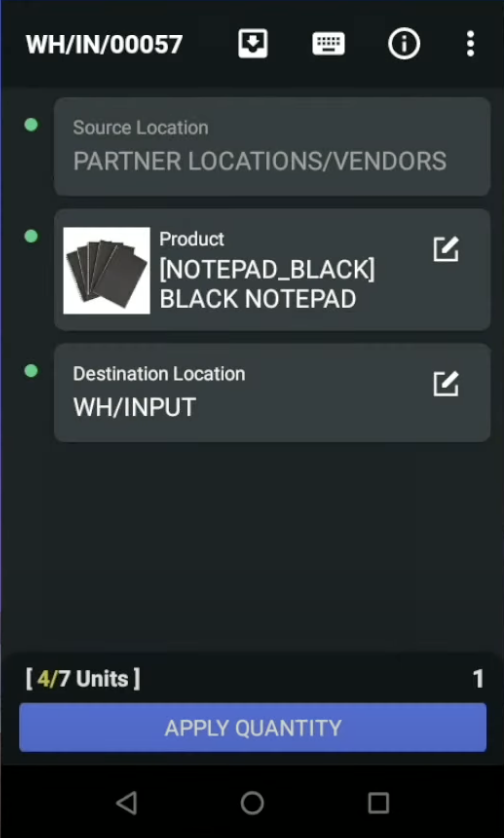
As you might see, ‘4’ is left out of ‘7’, because ‘3’ were already moved to ‘Shelf 1’.

Still the ‘Destination location’ is the input zone, so we need to change it to ‘Shelf 2’ here and insert ‘4’. Click on ‘Apply quantity’ and go back just to check that everything is correct.

Case 4: Create a lot on receiving and put it on a pallet

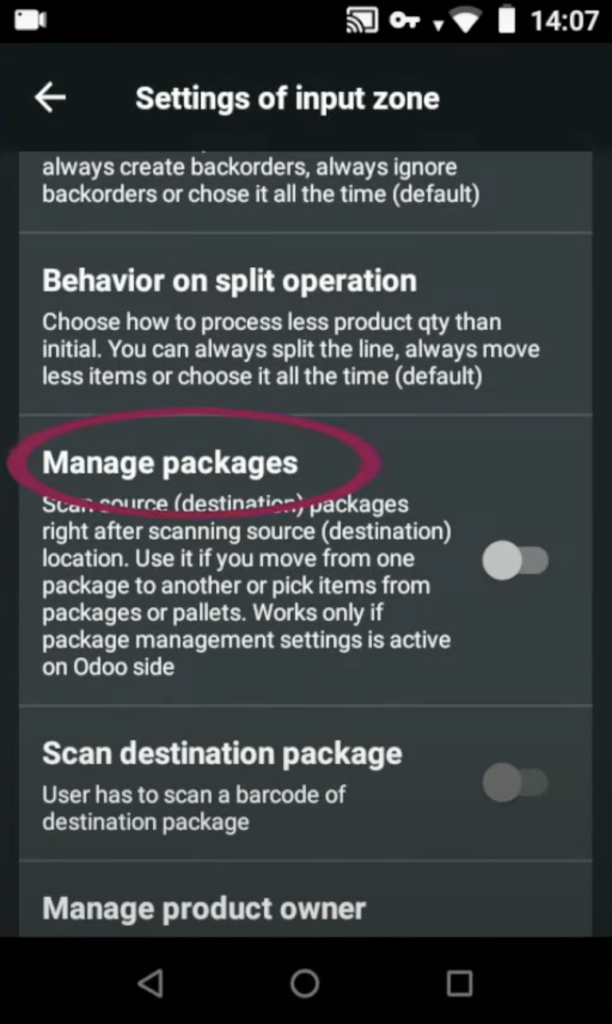
In this case, we are going to put green tea packs on one of the palettes. We need to activate ‘Palette management’. Let’s go back, click on ‘Settings’, swipe down, and find ‘Manage packages’. Let’s activate it. By default it’s deactivated, and it’s up to you when to activate package management.

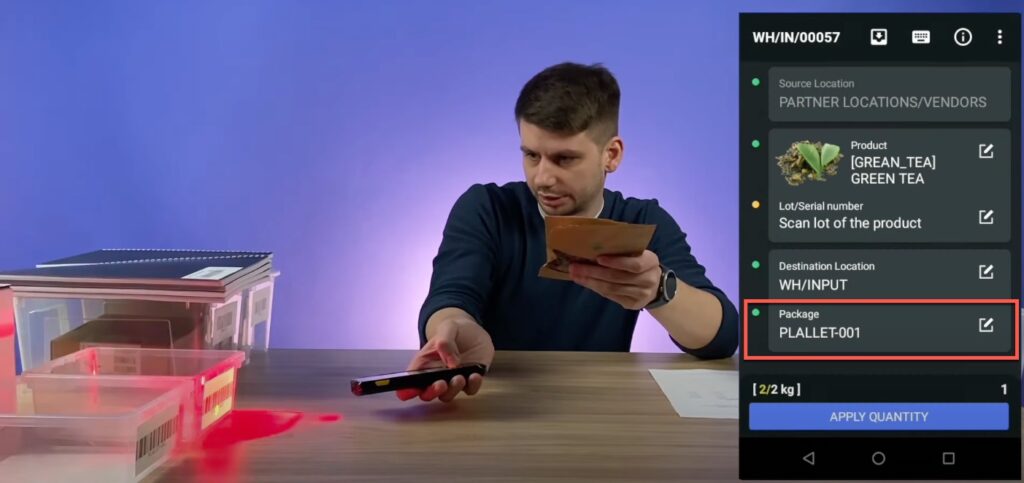
Click on ‘Continue transfer’ and scan these 2 packages of green tea.

We have all the information here, we’re going to put it into the ‘Input zone’, but additionally we want to put it into palette number 1. So let’s scan it the package should be filled with ‘Palette 1’.

put in pack in Odoo
Add to a pallet in Odoo

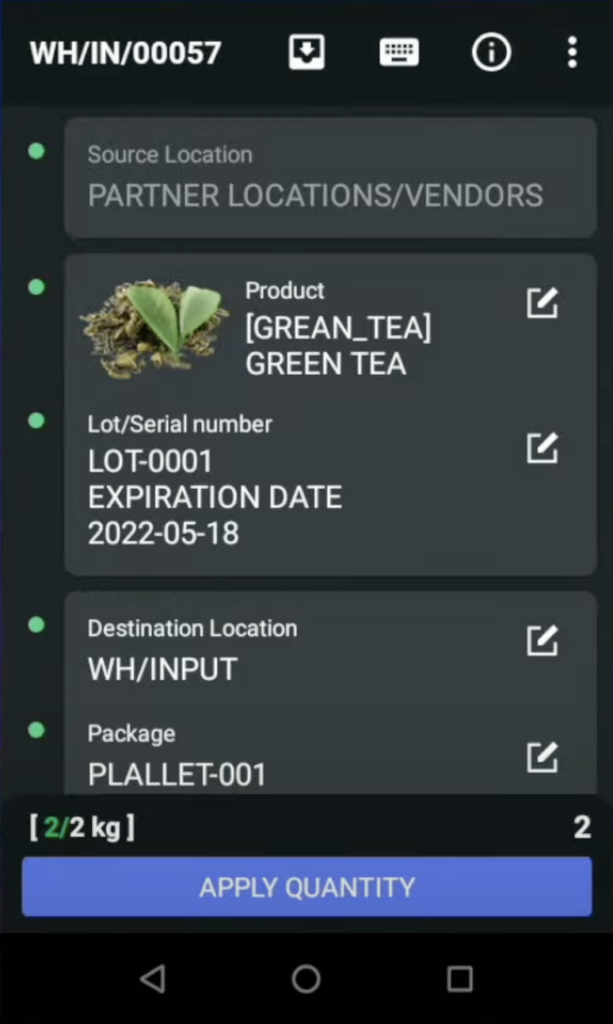
But the application is asking us to insert the ‘Lot number’, because this green tea is tracking by ‘Lot’. By click on it to create the lot manually, we have a suggested ‘Lot 1’, but we are going to create a new one – Lot-0001. Also, let’s insert expiration date – May 18.

Put the lot into the palette and click on ‘Apply quantity’. Case completed!

Case 5: Create serial numbers on receiving by scanning SN barcodes

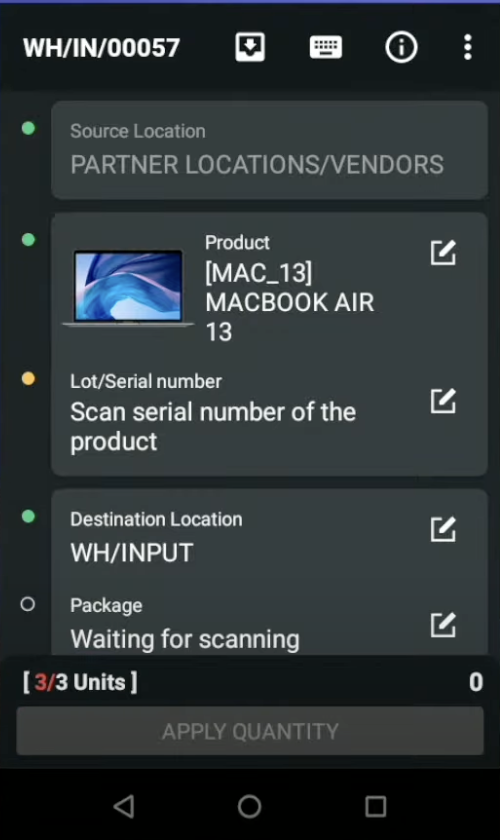
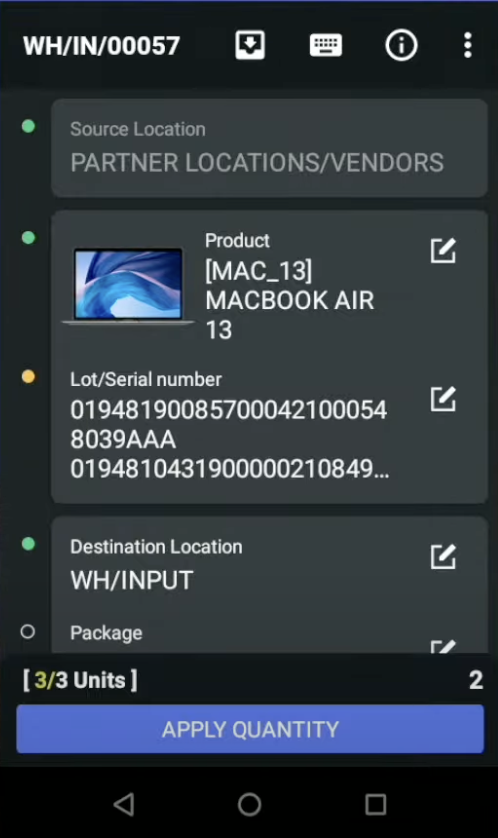
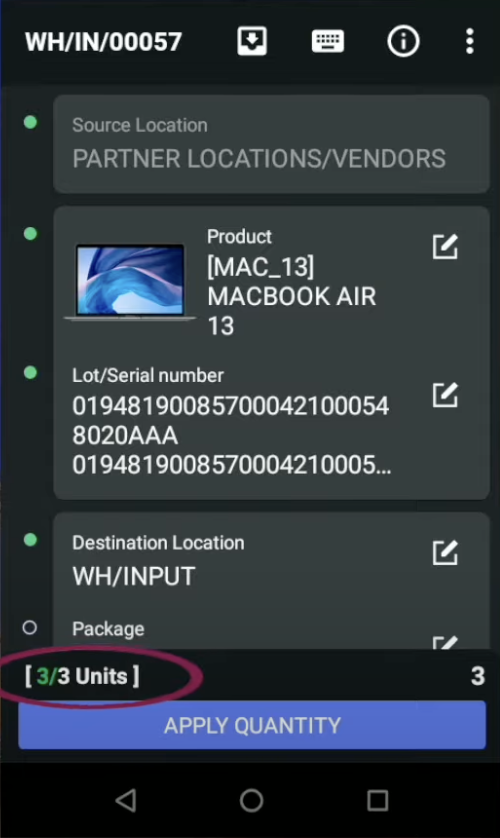
We have 3 MacBook Airs.

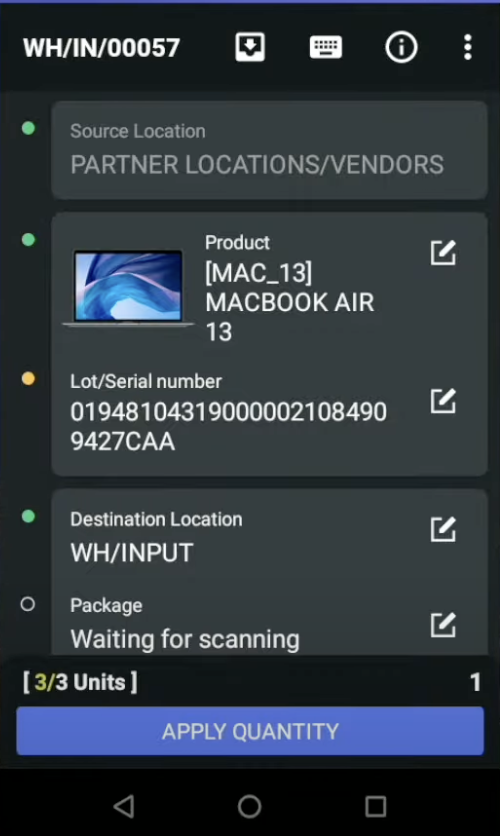
This product is tracked by ‘Serial number’, and we need to receive 3 different serial numbers to track them later. Let’s scan it.

Let’s scan palette number ‘2’ to put them all in this palette for this package. Click on ‘Apply quantity’. The transfer should be validated automatically.


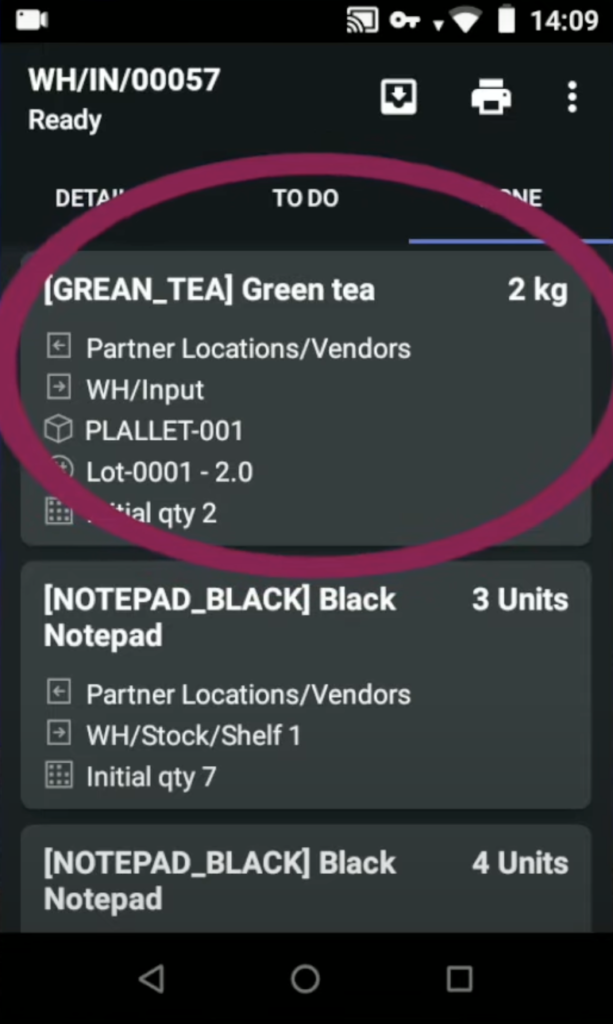
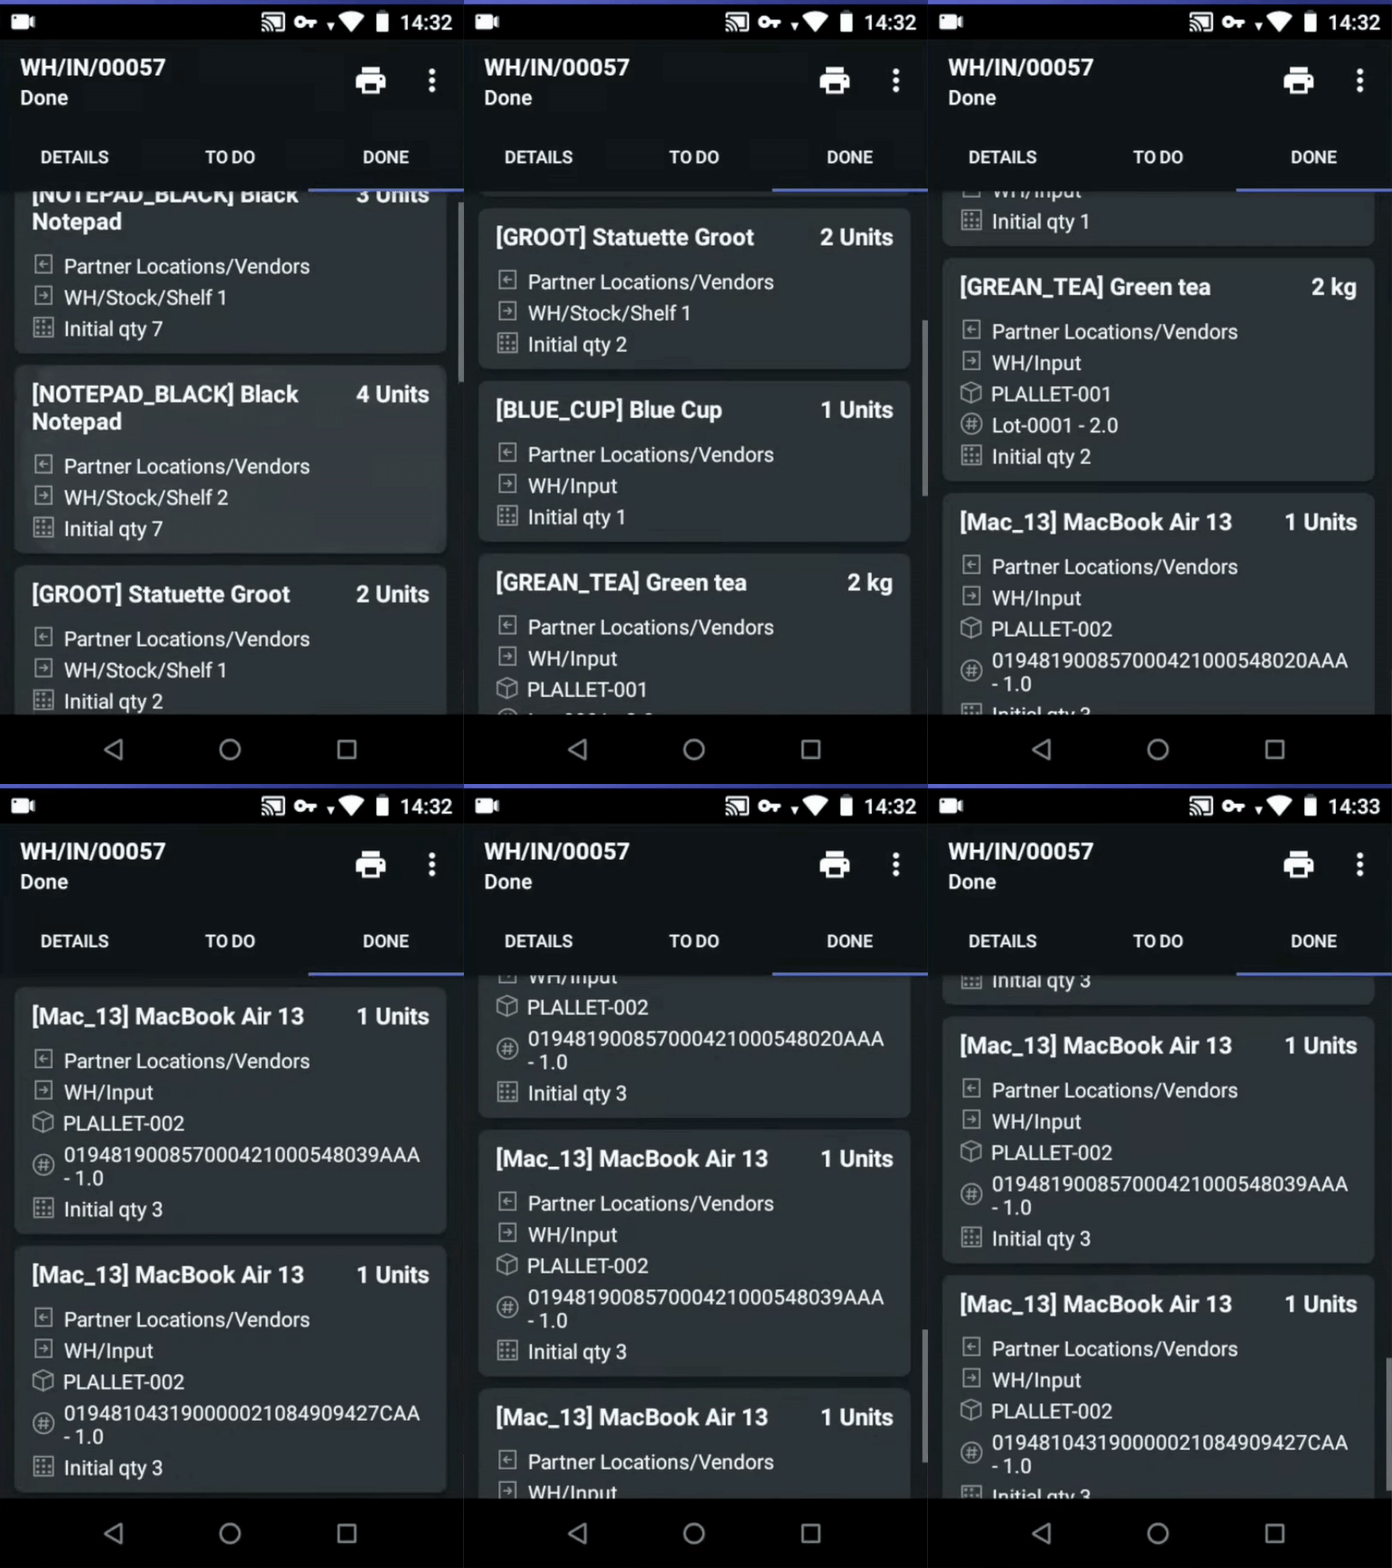
Let’s finally check our order. Open it and let’s check the Done tab: 3 black notepads, 4 black notepads, 2 Groot statutes, and 1 Blue cup in the input zone; green tea on palette number 1 and 3 MacBook Airs that were put on palette number 2.

This order was received! Now, using Ventor, you can easily receive your products in Odoo in just a few steps.


We hope that you have found answers to your questions in our article. If you have any other questions, then feel free to leave your comments under this article. We look forward to hearing from you!

***

Ventor: Quick Start Guide – ventor.app/guides/ventor-quick-start-guide/

Ventor complete guide. Introduction – ventor.app/guides/ventor-introduction-guide/

Make Odoo inventory quickly and accurately using Ventor apphttps://ventor.app/guides/make-odoo-inventory-quickly-and-accurately-using-ventor-app/

Feel free to subscribe to our newsletter and follow us on Linkedin to stay up to date with our latest news.

Ventor supports GS1 in all modern Odoo versions, Community and Enterprise

We already experienced implementing GS1 barcodes in Ventor (Odoo Inventory mobile app) for some of our customers and were going to release this feature in our generic app. And the Odoo v15 release forced us to do it now 🙂

Oleg Kuryan, CEO & COO of VentorTech; Fabien Pinckaers, CEO & COO of Odoo SA

Now, using Ventor, you can read GS1 barcodes in Odoo v11 and higher (Community and Enterprise). This function works in the Warehouse operations, Instant inventory, Quick info and Internal transfers menus (by Nov. 2021). Support of the other menus will be added in next releases.

You can instantly read the following information coded in a single GS1 barcode (GS1 identifiers in parentheses):

  • Product barcode (01) (02 + 37) – Global Trade Item Number
  • Quantity (37)
  • Variable count (30)
  • Weight (310)
  • Length (311)
  • Lot number (10)
  • Serial number (21)
  • Best before date (15)
  • Sell by date (16)
  • Expiration date (17)
  • Package / Pallet (00) – Serial Shipping Container Code (SSCC)
  • Product owner (401)

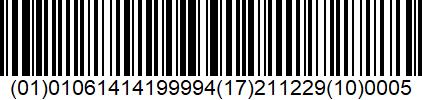
For example, if you scan this GS1 128 barcode,

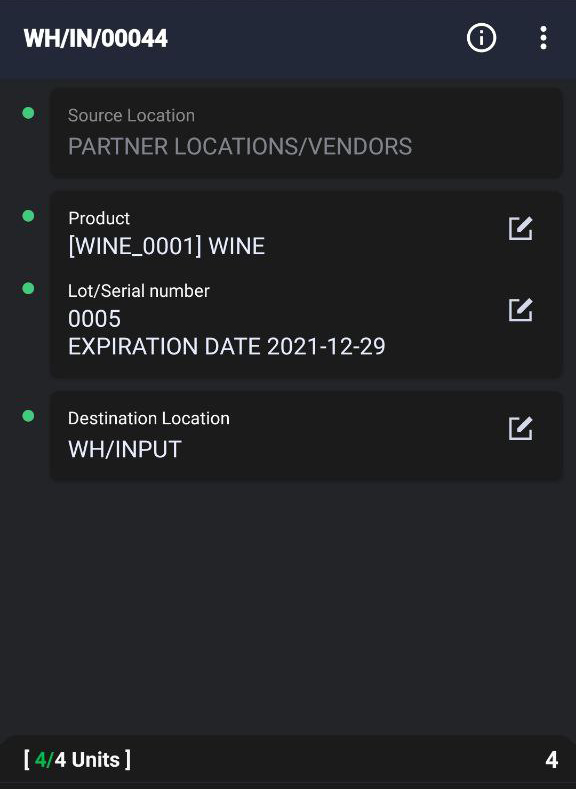
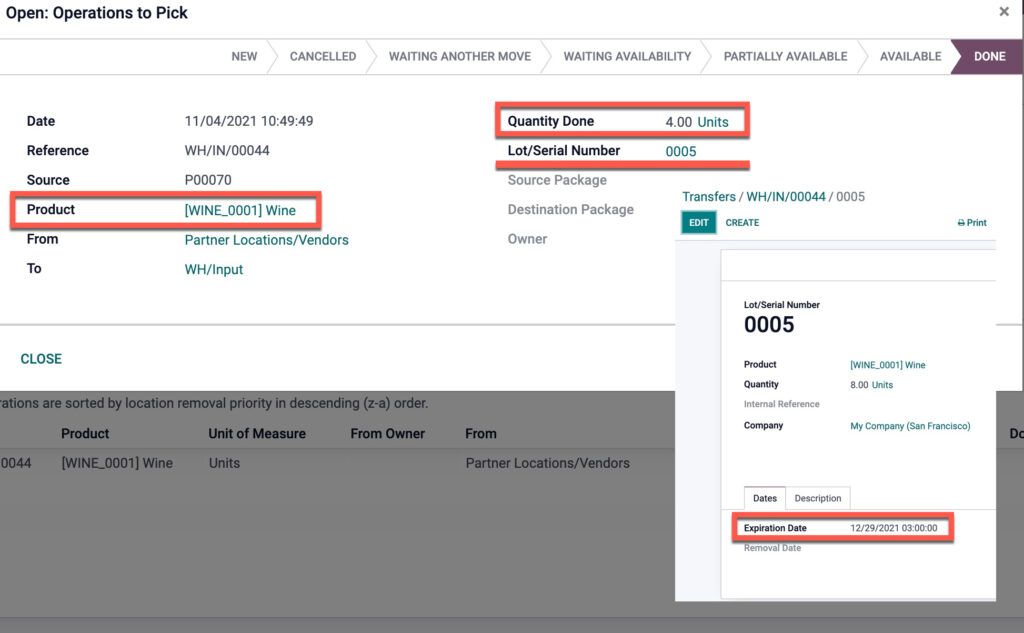
The app will recognize the item, qty (packaging), expiration date, lot number.

And will send the information to related fields in your Odoo.

So now you can receive, pick, and ship your products much faster when they contain GS1 barcodes.


How to work with GS1 barcodes in Odoo v11+ Community and Enterprise


The same for internal moves; you don’t need to separately scan the item, Lot / SN, package, QTY, and more. Just scan a GS1 barcode and destination location. Any inventory adjustments: just scan, scan, scan, and that’s it.

The app also works with SSCC barcodes. You can put items on a pallet by scanning SSCC, and then move whole pallets from one warehouse location to another.

Activate a setting in the app to scan GS1 barcodes. GS1 activation in Odoo (v15e and higher) is not required; Ventor allows working with GS1 barcodes independently from Odoo, and works with v11 and higher.

Release notes for version 2.3.1

  • Support of GS1 barcodes in the Warehouse operations, the Quick info, the Instant inventory and the Internal transfers menus (beta)
  • Improved work with Lot in the Internal transfers menu
  • Improved Putaway menu
  • Added Expiration Date for Lots in the Quick info menu
  • Now user can see the content of the package on the Done tab in the Warehouse operations menu
  • General bugfix and improvement

As it’s a new feature in the app, we will need your feedback. If you find a bug or have a suggestion, please contact us.

If you haven’t tried Ventor yet, get it for free for the first two weeks and test it with your Odoo in a real warehouse!

Subscribe for free for 14 days >

Feel free to subscribe to our newsletter and follow us on Linkedin to stay up to date with our latest news.

Your Odoo Inventory on mobile

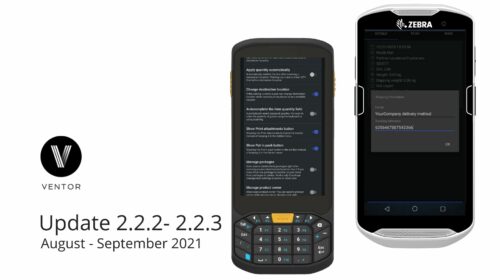
Release notes / August – September 2021

The new update of the Ventor app (Odoo inventory app for Odoo Community and Enterprise), version 2.2.3 (1.8.3 on Google Play), is here.

Update your app to the latest version to get new features.

Get Ventor for free for 14 days if you haven’t had a chance to test the app yet.

WHAT’S NEW?

Release notes for the version 2.2.3

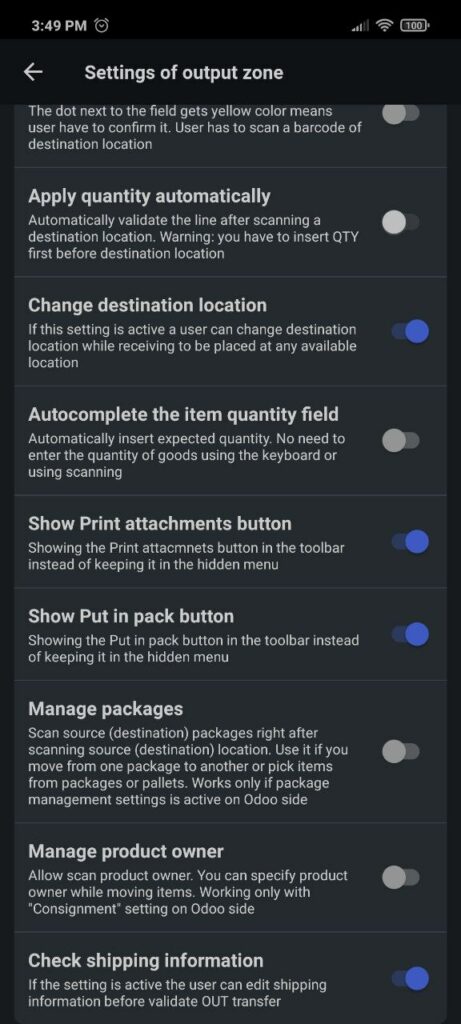
  • Added the ‘Autocomplete the item quantity field’ setting in the Warehouse Operations menu.
  1. Automatic inserting of expected quantity. 
  2. No need to enter the quantity of goods using the keyboard or using scanning.
  • Added the ‘Apply quantity automatically’ setting in the Warehouse Operations menu.
  1. Automatically validates the line after scanning a destination location. 
  2. Important: you have to insert QTY first before destination location.
  • Added an option to hide icons on the toolbar for each operation type with the ‘Show ‘Put in pack’ button’ and ‘Show ‘Print attachments’ button’ settings in the Warehouse Operations menu.
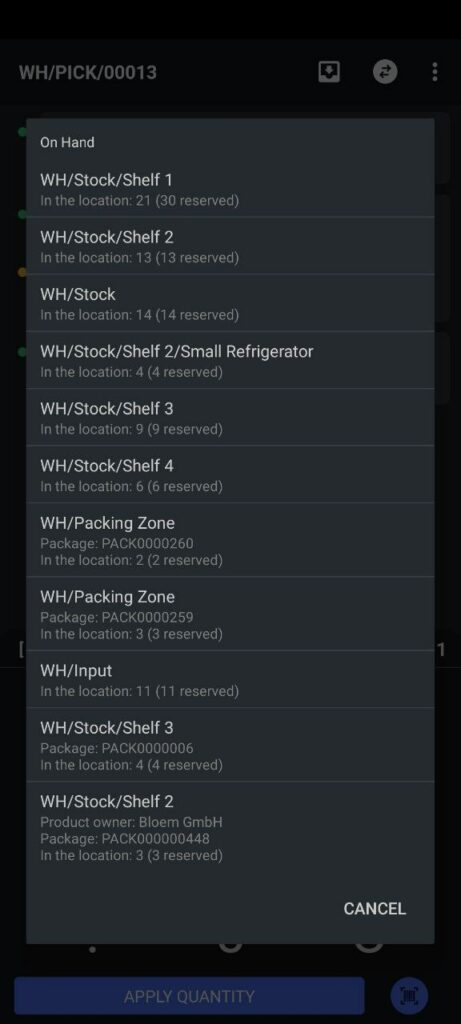
  • Now putaway locations are visible in the Warehouse Operations menu (choose the putaway location button) and the Putaway menu, Change destination location button.
This image has an empty alt attribute; its file name is 11-461x1024.jpeg
  • Improved lot management for the Warehouse Operations and the Internal Transfers menus.
  • General bug fixes and improvements.

Release notes for the version 2.2.2

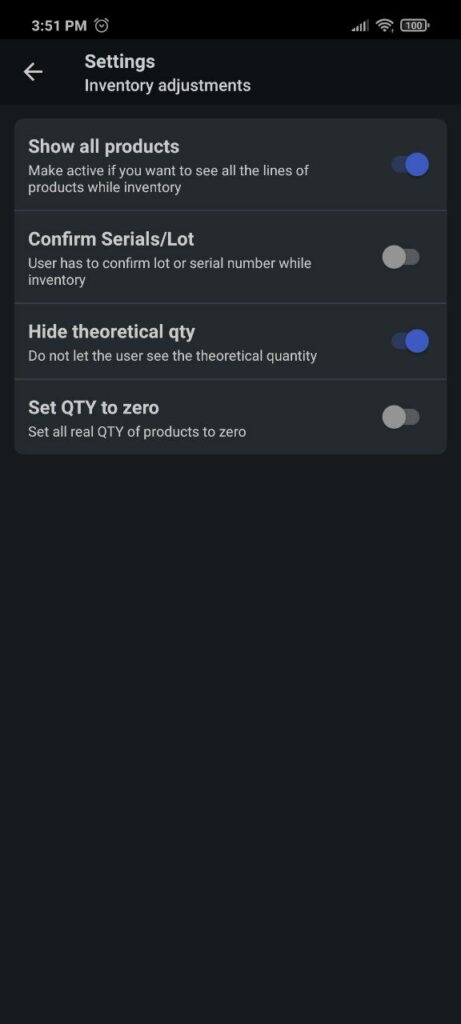
  • Added the option to hide theoretical QTY in the Inventory Adjustments menu.
  1. Do not let the user see the theoretical quantity.
  • Added the “Address type” section for each contact on the contact list.
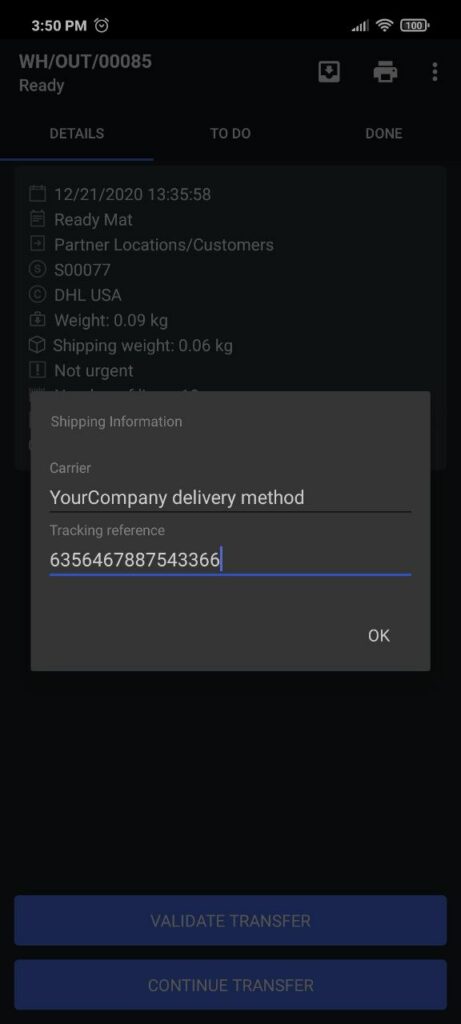
  • Added “Check shipping information” before validating OUT transfers in the Warehouse Operations menu.
  1. If the setting is active, the user can edit shipping information before validating the OUT transfer.
  • Added a “Validate” button for “Waiting” transfers in the Warehouse Operations menu.
  • Fixed work with SN in the Internal Transfers menu.

New Videos on Our YouTube Channel


Suggest your feature

Are you a Ventor user or just testing our Odoo inventory app and found the app useful but that it lacked a really needed feature? Drop us an email and describe a business issue. Add screenshots and explain how you would like to improve the app. We read all emails and choose the best one to implement for free or with a good discount!


Your Odoo Inventory on mobile

Exit mobile version