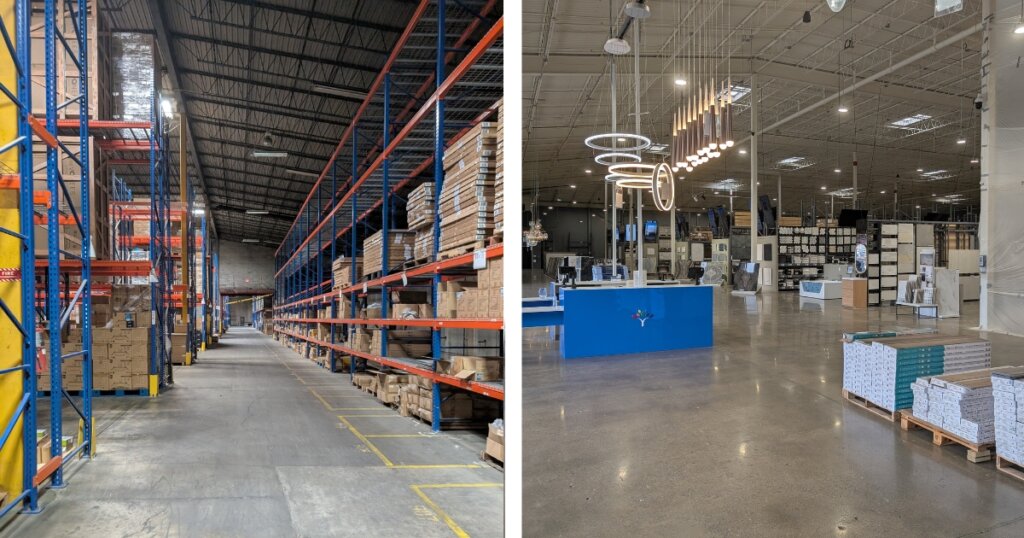
BuildMyPlace is a fast-growing company based in Louisville, Kentucky, led by Rahul Anand. Their business model can be described as the “IKEA of building materials.” Operating as a direct-to-consumer (D2C) brand, the company offers a wide range of home improvement and renovation products: from kitchen cabinets, flooring, and tiles to doors, windows, bath fixtures, and lighting.
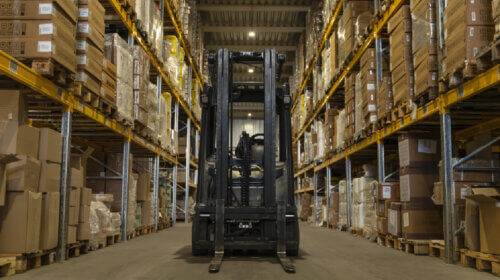
BuildMyPlace warehouse and store
Some of BuildMyPlace’s products involve complex manufacturing and assembly processes. That’s why it was crucial for the team to find a solution that could bring transparency and efficiency to every stage — from production to final delivery.
“As we grow, our goal is to evolve these functionalities and make both the shop floor and assembly floor seamless,” says Rahul.
Initial Challenges with Odoo
Like many businesses, BuildMyPlace faced limitations with the out-of-the-box Odoo system, especially in the area of warehouse management.
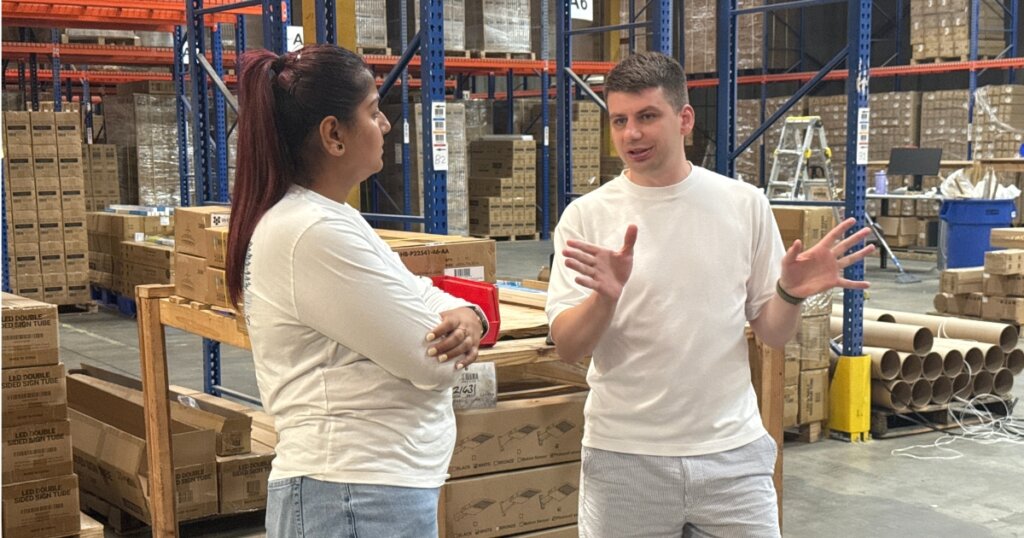
This is where VentorTech and the Ventor PRO app came into play. For more than seven years, the app has been a critical part of their operations. “Ventor has been a great asset, constantly evolving and adding new features that are vital for real-world business scenarios where core Odoo falls short,” Rahul explains.
“VentorTech helps us keep all these processes seamless, from picking and packing to returns and receiving,” Rahul shares.
More Than Technology: A True Partnership
One of the key advantages Rahul highlights is VentorTech’s ability to bridge the gap between technology and real-world use cases. Many IT agencies or consultants understand software but fail to adapt it to business reality.
“That’s where VentorTech really stands out. They not only know the technology but also deeply understand the challenges companies like ours face. It’s been a great partnership,” says Rahul.
The experience of BuildMyPlace proves that successful digital transformation requires both the right tools and the right partner. VentorTech continues to help businesses worldwide simplify, optimize, and scale their operations with Odoo.
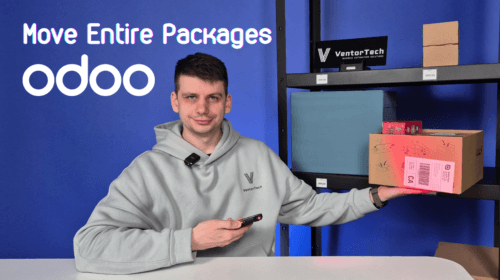
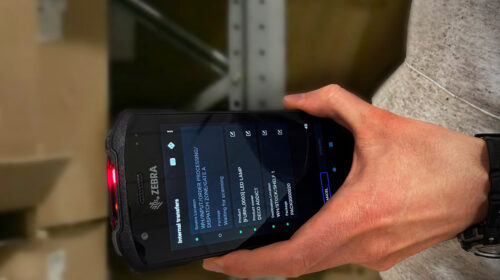
One common task in warehouse management is moving packages from one location to another. But what if you don’t want to scan each item inside a package? Good news—you don’t have to.
In this quick guide, we’ll walk you through how to move an entire package in Odoo using the Internal Transfer Menu, without scanning individual items.
Move an Entire Package Demo
📦 Move a Whole Package in a Few Simple Steps
Instead of scanning every single item inside a box or pallet, Ventor PRO allows you to scan the package barcode and move the entire contents at once. This saves time and reduces human error in your warehouse operations.
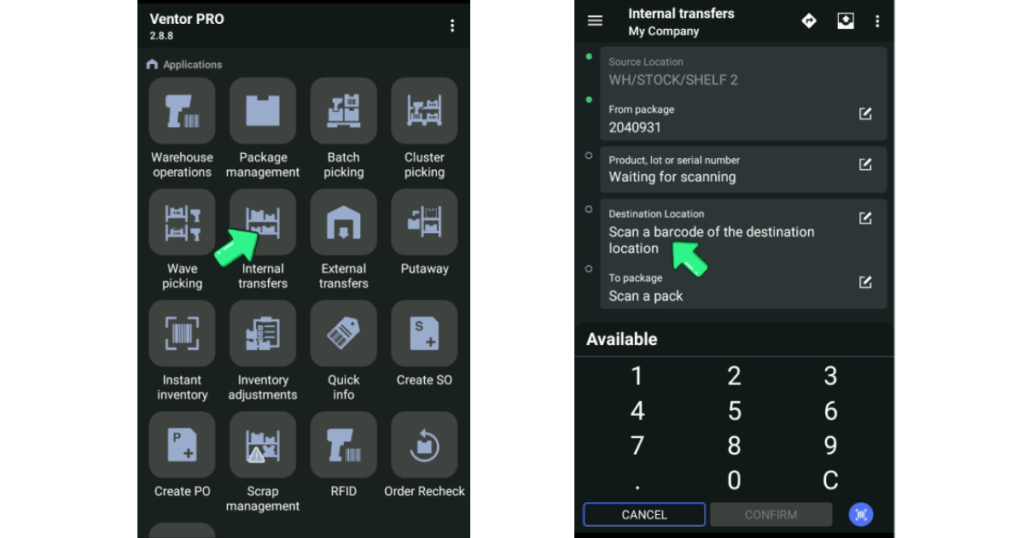
1️⃣ Select the Package to Move Start by choosing the box or pallet. In our case, we selected a nicely labeled package with a barcode and multiple tea products inside.
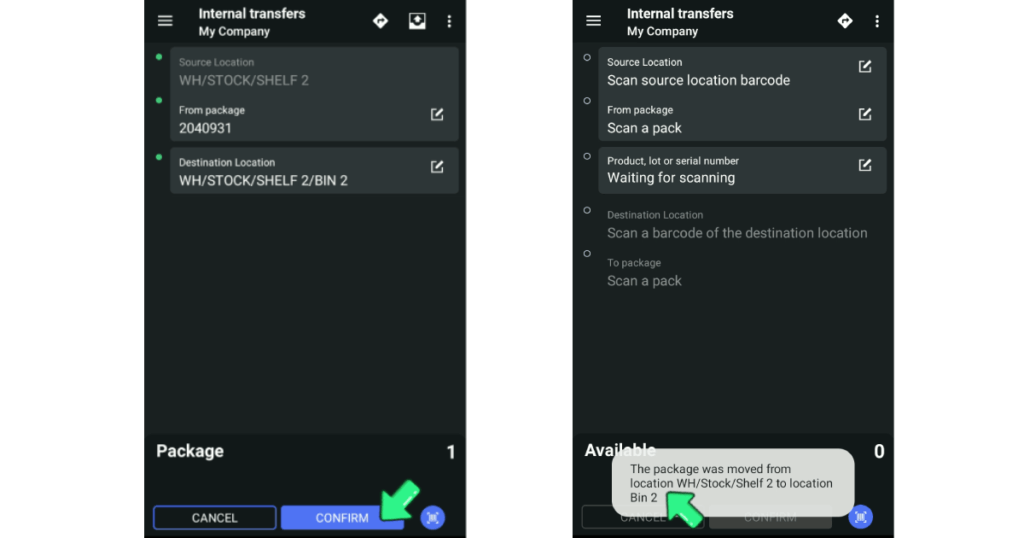
2️⃣ Open the Internal Transfer Menu In Odoo, navigate to the Internal Transfer section. Although there are multiple fields (such as source location, products, etc.), we only focus on scanning the package barcode.
3️⃣ Scan the Package Barcode Once scanned, Odoo identifies the current location of the package. For example, our package was originally located on Shelf 2 and had the ID 2040931.
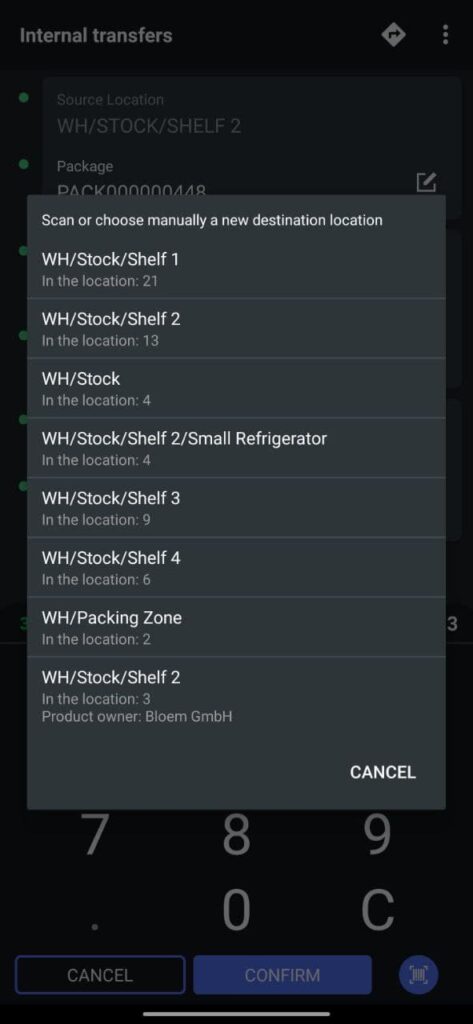
4️⃣ Choose the Destination Location Next, scan the barcode of the new location—like Bin 2 on the same shelf or another location entirely within your warehouse. Odoo will instantly prepare to move the entire package there.
5️⃣ Confirm the Move After confirming the action, the package (along with all the products inside it) is automatically updated in the system as moved. No need to touch or scan the individual items inside.
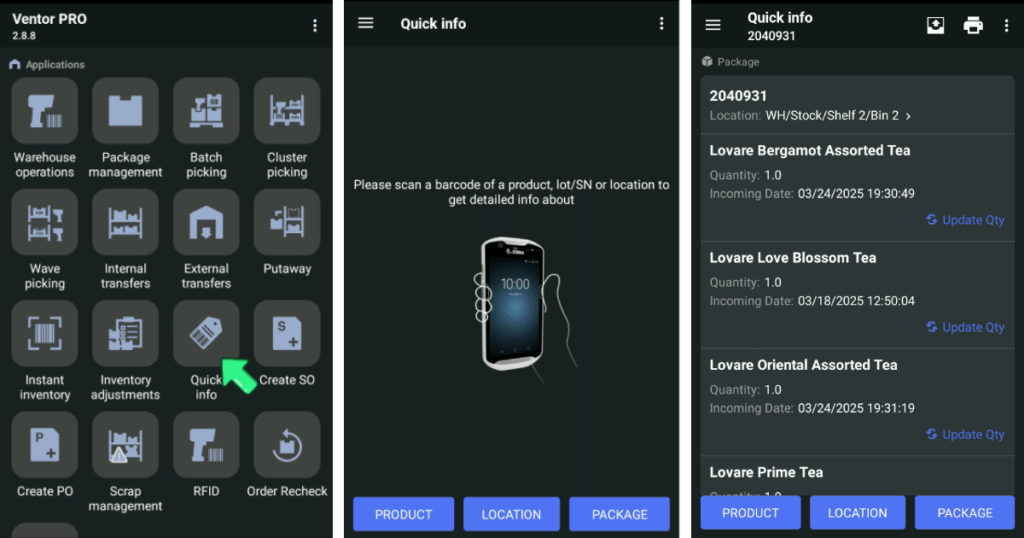
✅ Verify the Transfer
To double-check the move, use the Quick Info Menu. Just scan the package barcode again, and the Ventor app will show you all items currently inside the package, along with their updated location. It’s fast, simple, and accurate.
Why This Matters
This workflow is perfect for teams managing bulk inventory or frequently relocating items across storage zones. It reduces time spent on manual scanning and helps maintain an organized, real-time view of stock locations.
Don’t forget to check out Ventor PRO—our professional inventory management tool designed to make Odoo even more powerful and user-friendly.
For several years now, Artificial Intelligence (AI) has been changing not only our daily lives but also how we do business and manufacturing. While the first thing most people associate with AI is simplification, what we are looking at, in fact, is a complex set of interconnected components combined in various ways. Regardless of composition, AI is gaining relevance in the logistics industry, helping to optimize workflows and significantly improve efficiency. With the help of modern AI tools, the speed and quality of order processing are enhanced as errors are reduced. Such improvements decrease the load on support teams, due to automation of accurate work performed by software and related mechanisms.
Warehouse operational efficiency is critical for maintaining overall productivity, and it is exactly AI that provides this efficiency. A wide range of modern warehouse solutions currently exist on the market, such as Ventor PRO—a solution that is trusted by a huge number of successful companies. In this article, we elaborate on the importance of AI in competitive warehouse operations and share tips for using the most modern solution to significantly simplify your company’s operations while increasing efficiency.
Benefits of AI in Warehousing
When talking about AI in logistics, we first consider inventory management. By using AI-based solutions, enterprises avoid under- or over-stocking, since these tools analyze all inventory data and optimize inventory levels. In addition, AI also optimizes inventory management tasks, such as supplier management and demand forecasting. A huge advantage of AI is its ability to quickly analyze large amounts of data, allowing you to accurately and confidently predict future sales. Moreover, by analyzing detailed data on traffic congestion, weather conditions, and cargo delivery times, AI generates the most efficient routes. This saves delivery time, reduces fuel consumption, and significantly reduces vehicle wear and tear.
Of course, AI has a huge number of benefits. Below, we give a examples of those most important for successful warehouse operations.
Cost reduction. Given the most recognized reason for being in business, AI helps to reduce costs and thereby increase competitiveness. AI systems integration works toward reducing transportation costs, inventory management, and even personnel costs, since, due to automation, many processes are performed without human employees.
Faster operations. Modern AI-based solutions significantly shorten the execution of operations, thereby increasing productivity for core warehouse activities, such as picking and packaging, scanning barcodes for inventory control, and quickly identifying optimal routes. In addition, AI systems operate every day and around the clock.
Improved accuracy. The use of AI systems ensures high accuracy of operations, such as that needed for inventory management or order picking. This is primarily due to the absence of human factors. Such systems can also predict and prevent errors. This significantly improves the quality of customer service and reduces the number of returns.
Real-time data processing. AI systems quickly and accurately analyze large amounts of data, enabling companies to optimize supply chains and inventory levels, detect security breaches in logistics operations, and effectively forecast demand; along with shortening delivery times, a high level of customer satisfaction is guaranteed.
Effective barcode scanning. Barcodes are the backbone of goods movement, as they help us to avoid manual data entry errors. Software solutions that read barcodes and identify empty cells ensure a smooth and quick inventory control process.
Ventor and AI Integration
Logistics and warehouse management directly affect profit and service quality, so they should be given as much attention as possible. Many successful companies trust Odoo to manage, automate, and optimize their processes, as this multi-functional system includes many features and is scalable for small, medium, and large businesses.
As for logistics, Odoo is an efficient and modern warehouse management solution that allows you to access real-time data, optimize roots, and manage your transportation fleet. It helps to reduce losses due to inventory shortages, speed up processes, and manage operations in real time.
Ventor PRO Augmented Reality Camera
How the Ventor app helps your business grow
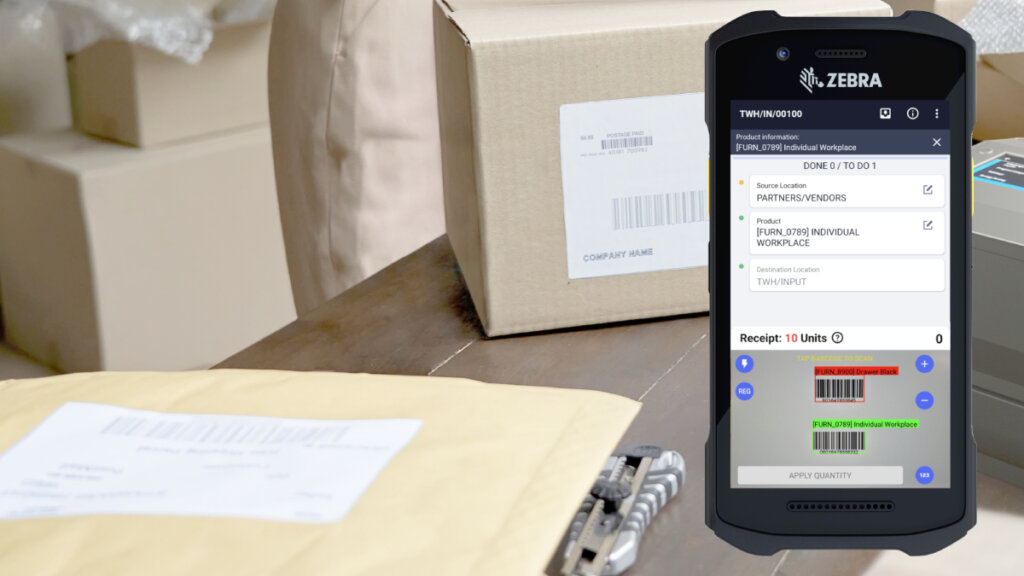
Ventor PRO is the most comprehensive barcode scanner application for warehouse management for the Odoo ERP system; it integrates with Odoo to streamline warehouse tasks. The app provides instant access to all product details in your Odoo ERP from the warehouse scanner, allowing you to receive goods and take inventory faster. Operations supported by this application include processing and shipping of goods, product information, lot management, inventory control, internal movement of goods, and receiving and delivery.
The application allows you to record barcode-related data, such as quantity of goods, date manufactured, or expiration date. The main advantages of Ventor PRO are improving the accuracy and efficiency of product accounting while avoiding errors in product inventory management.
Ventor, as a client-based mobile application, provides a bridge between warehouse operators and the Odoo ERP system, facilitating real-time inventory management. It enables tasks such as retrieving picking orders, navigating product locations, and updating Odoo with order fulfillment statuses. For instance, when a picker receives an order, the app guides them through the warehouse to complete the task. Once finished, the application sends confirmation back to Odoo, indicating that the order has been shipped.
Given this structure, integrating AI directly into the mobile app isn’t necessary. Instead, AI logic should stay in the Odoo ERP (server-side), where it can provide intelligent decision-making capabilities. From our experience, AI can significantly enhance Odoo Inventory efficiency by:
Optimizing product placement – Determining the best storage locations for goods based on demand patterns, retrieval frequency, and warehouse layout.
Improving picking strategies – Selecting the most efficient picking method (single order, wave, batch, or cluster picking) based on workload and operational needs.
Prioritizing tasks dynamically – Assigning priority levels to orders based on urgency, customer preferences, or stock levels.
By implementing AI within the ERP system, warehouses can achieve higher efficiency, reduced picking times, and smarter inventory management. If you’d like to explore these benefits further, feel free to reach out to us for an in-depth discussion.
Future of AI in Warehouse Management
The world of modern logistics technology expands its boundaries with each passing day. Various innovations will continue to fill the logistics space with a huge number of warehouse management tools, simplifying all processes and making them more efficient. Robotics, machine learning algorithms, and predictive maintenance are key aspects to watch.
For example, due to machine learning algorithms, transportation management systems respond quickly to changes, thus improving the overall performance of transportation logistics. Robotics are used in logistics to automate different processes, such as loading and unloading trucks or performing warehouse tasks. In the near future, companies will rely on AI to significantly increase operational efficiency, lower costs, and further improve service quality through supply chain automations. Predictive analytics in warehousing will play a role, as forecasting future logistics requirements further enables efficient supply chain resources management.
Using modern tools that can evolve with these trends, such as Ventor PRO, is critical for inventory optimization and business success. The real-time inventory tracking provided by this application makes controlling goods much easier. Odoo Warehouse integration will take your business to the next level by simplifying the packaging process, optimizing warehouse and picking operations, and performing regular restocking, faster receiving, quality control, and other storage management functions.
As you can see, modern businesses need AI solutions, as AI is fundamentally changing the way companies approach operations management. AI saves time and money, while modern tools increase customer satisfaction and attract new clients. In all, we are looking toward success; surviving business competition and excelling beyond is what you can achieve with the Ventor app, so find out more about how you can use it to stay ahead in warehouse management.
Today, we will look at how to manage user access and device settings in the Ventor PRO app and Odoo. If you manage a warehouse and want to optimize user management, this guide is for you.
To optimize user settings management and hide menus in Ventor PRO/Lifetime, you can use our free module, Ventor Base (ventor_base). While not mandatory, this module enhances the efficiency of the application.
You can always find it in our repository: GitHub – Ventor Base. Before downloading, make sure to select the correct Odoo version.
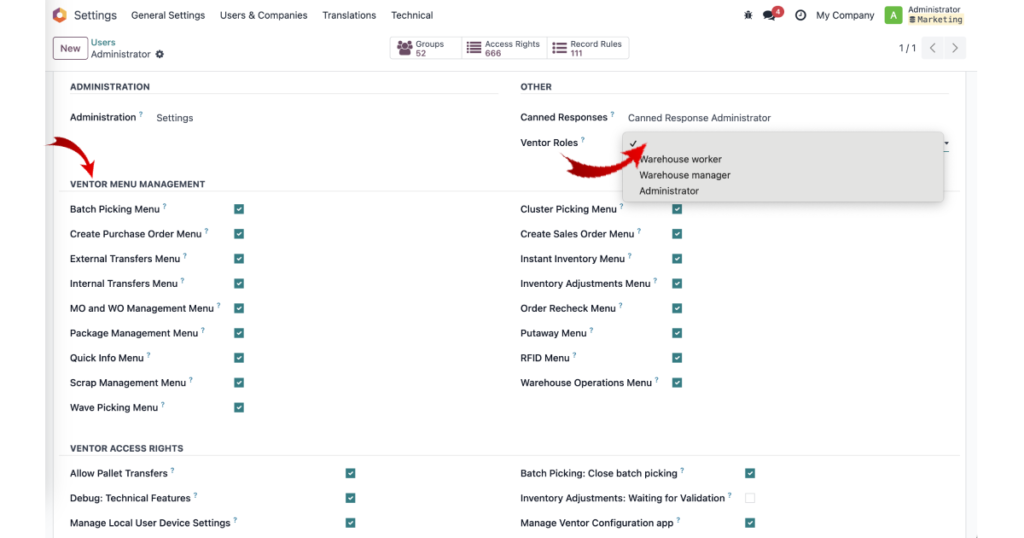
Ventor allows you to control which menus are available to users. Using Ventor Menu Management, you can hide unnecessary sections, leaving only those that are essential. For example, if an employee is only responsible for inventory adjustments, you can leave only Warehouse Operations and Inventory Adjustments.
How to set it up:
Go to Settings → Manage Users → User.
Disable all menus except Warehouse Operations and Inventory Adjustments.
Ensure that Ventor Roles is set to “Empty.” If a predefined role (Administrator, Warehouse Manager, Warehouse Worker) is selected, the menus will be configured automatically.
This reduces distractions and makes work more efficient.
⚠️ Don’t forget to log out and log back in for the new settings to take effect.
Restricting Access to Warehouses
You can configure employees to have access only to specific warehouses. For example, if a worker operates only in Warehouse A, they should not see data for Warehouse B.
How to set it up:
Open Settings → Manage Users → User.
Enable the Allowed Warehouses option and select the appropriate warehouse.
After applying the changes, the employee needs to re-login to Ventor.
Note: This setting only works for the Inventory: User group and does not apply to administrators.
⚠️ Don’t forget to log out and log back in for the new settings to take effect.
Locking Configuration Changes (Key Case)
One of the most in-demand features is the ability to centrally manage settings for all devices through Odoo. With Ventor, there is no need to configure each scanner individually.
⚠️ Don’t forget to log out and log back in for the new settings to take effect↴↴↴
Manage Local User Device Settings
True – users can change settings on the scanner.
False – users cannot change settings on the scanner.
Go to Settings → Select User → Ventor Access Rights → Manage Local User Device Settings (on/off). Ensure that Ventor Roles is set to “Empty.”
Use Local User Device Settings
Go to Settings → Select User → Ventor Access Rights → Manage Local User Device Settings (on/off). Ensure that Ventor Roles is set to “Empty.”
True – the settings configured on the scanner will be applied to the user.
False – the global settings from the Ventor Base module (Ventor Conf → Global Ventor Setting) will be applied to the user.
Manage Ventor Configuration app
To prevent users from changing settings, disable Manage Ventor Configuration – this will remove the configuration icon from Odoo. Go to Settings → Select User → Ventor Access Rights → Manage Local User Device Settings (on/off). Ensure that Ventor Roles is set to “Empty.”
This feature is especially useful if you manage hundreds of scanners and want to maintain unified settings.
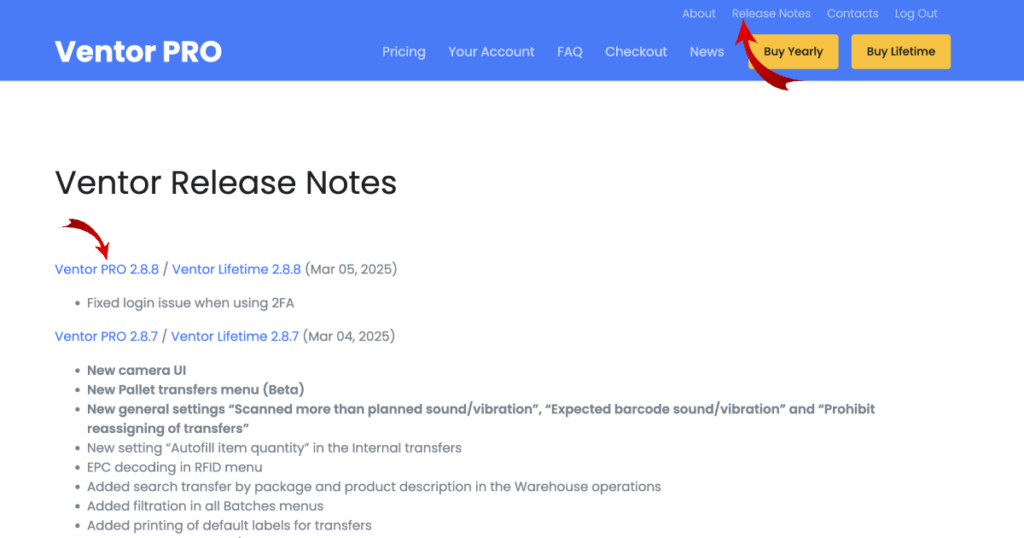
To download, you need to select the version you are using:
Ventor PRO
Ventor Lifetime
How to install the old version of Ventor on your device if you have the latest version installed?
To install an older version of the apk, follow these steps:
Uninstall the current version from your device.
Download the apk to your device.
Install it by clicking on the apk file.
Enabling Inventory Validation for Users
By default, Odoo prevents users in the Inventory: User group from confirming inventory adjustments. However, Ventor has a special group called Validate Inventory, which allows these users to confirm inventory counts without requiring administrator rights.
How to set it up:
Go to Settings → Manage Users → User.
Enable Validate Inventory for the required user.
If Validate Inventory is set to True, a user in the Inventory: User group can perform product counts in the warehouse and confirm inventory adjustments in both Odoo and Ventor. This allows workers to complete essential tasks without elevated permissions, speeding up warehouse operations.
⚠️ Don’t forget to log out and log back in for the new settings to take effect.
By using these features, you can flexibly manage data access and device settings, minimize errors, and make warehouse staff operations more efficient. Ventor settings will help you create a more organized and effective warehouse management system!
For your business to succeed, you must organize your warehouse as efficiently as possible. This step is essential and has many advantages, including optimizing all business processes, controlling inventory, and saving a lot of time that can be used for other business purposes.
Effective warehouse organization significantly improves business productivity: Workers can find the goods they need quickly and easily. Further, automated warehouse systems produce less errors, since all data is accurate and up-to-date. Efficient small warehouse organization also ensures better space utilization, as it prevents unproductive use of limited space.
So far, everything looks simple, but in reality, when it comes to organizing limited space in a warehouse, many people need some help. After sharing the most important steps for an efficient small warehouse organization below, we will offer successful tips as we discuss each step thoroughly.
Step 1. Find suitable premises and buy the necessary equipment. Step 2. Organize your storage wisely. Step 3. Hire employees. Step 4. Organize the process of issuing goods. Step 5. Prevent possible errors. Step 6. Set up the security system.
Read on to learn a lot of useful information regarding these steps and more!
Assess the Available Space
The first step will be to find your warehouse building. Studying warehouse layout is an essential step in the organization of a medium-sized or small warehouse. When inventory space is developed, efficient warehouse operations depend directly on the rationality of layout planning.
Now let’s figure out what a rational layout consists of:
Work areas allocation
Equipment placements that use space as efficiently as possible
Maximum white space exclusion
Using as versatile equipment as possible
Proper warehouse layout speeds up the flow of goods or materials, significantly increasing overall work productivity and reducing packaging time. Warehouse operations are greatly improved by optimizing the warehouse layout. Specific layout depends on your goals and expectations, while several ready-made warehouse layouts are widely used and are quite successful.
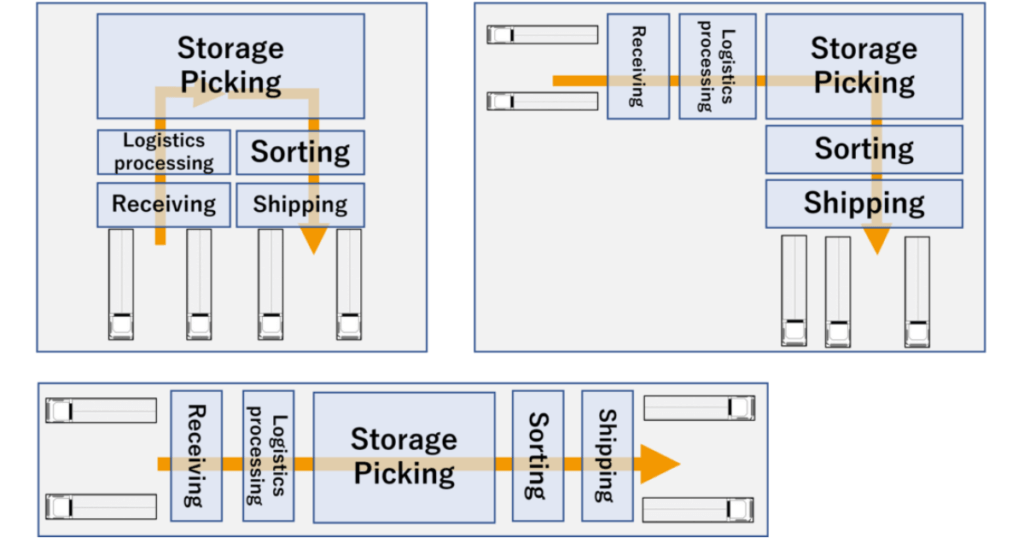
How to Organize a Warehouse Space: 3 Popularly Used Layouts
Source: Plus PM Consultant
U-shaped layout. This type is the simplest. Such a warehouse will have a shape close to a semicircle. Loading and shipping zones are usually located nearby, followed by areas for receiving and picking goods. The rear area is visually split into three compartments: a dynamic storage and two static storages. Dynamic storage is intended for faster-moving items, and static ones are for goods that are stored for longer time periods.
L-shaped layout. The traffic flow of such a warehouse occurs in the form of the letter “L”. This option provides a huge space for storing goods: the loading and receiving areas are located on one side of the premises, and the picking and shipping areas are on the other side.
I-shaped layout. Another name: ‘through construction’. In this case, the storage area for goods is located in the middle, the loading and shipping areas are at one end, and the goods picking area is at the other.
In the following parts of the article, we will look closer at dividing a small warehouse into functional areas.
When working on your warehouse layout, you must take into consideration not only your current business needs but also the potential growth prospects, which may entail space reorganizations. To do this, you will need to calculate future turnover, including periods of peak loads, formulate strategic objectives, and draw up a plan for the future turnover of goods (e.g., projections may include 1 year, 5 years, or 10 years down the road).
Designate Specific Zones
To ensure efficient warehouse operations, it is necessary to designate functional zones.
Receiving area
In this area, goods from the business’s own production workshops or from the suppliers are received, and certain operations take place:
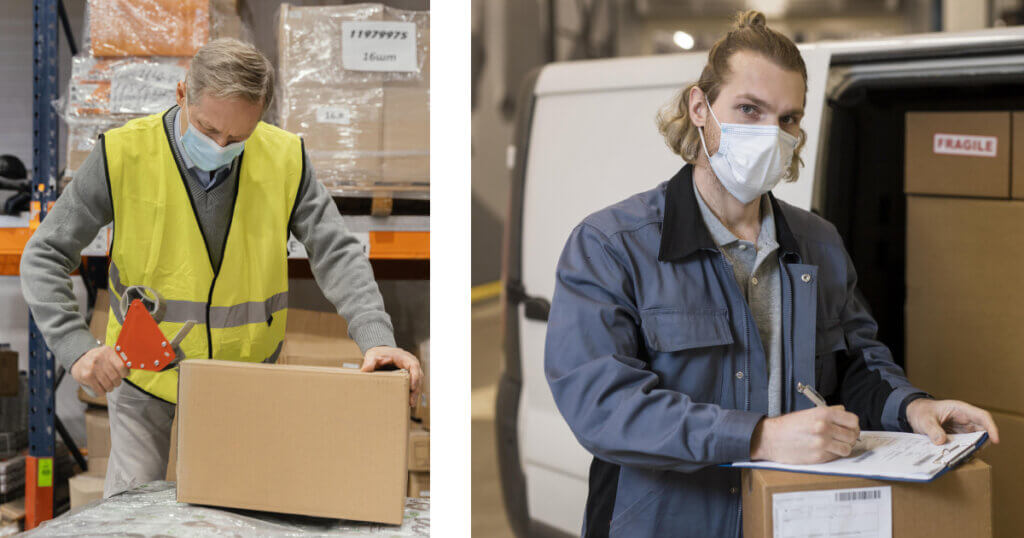
control weighing of goods and placing them into boxes as follows placing diagrams;
stacking boxes on palettes and warehouse labeling of palettes.
Storage area
Prepared palettes with goods are stored here. The technological operations are as follows:
moving palettes from the receiving area;
placement of palettes with goods onto racks (i.e., special warehouse equipment is used for this);
unloading palettes with goods from racks (using special warehouse equipment);
moving palettes to the picking or shipping areas;
internal technological movements of palettes (if necessary).
Picking area
Here goods are picked according to customers’ orders. These technological operations are carried out:
control weighing of goods that come from the above areas;
selection of boxes with goods and customer labeling attached to boxes;
placement of selected boxes on palettes and customer labeling attached to palettes.
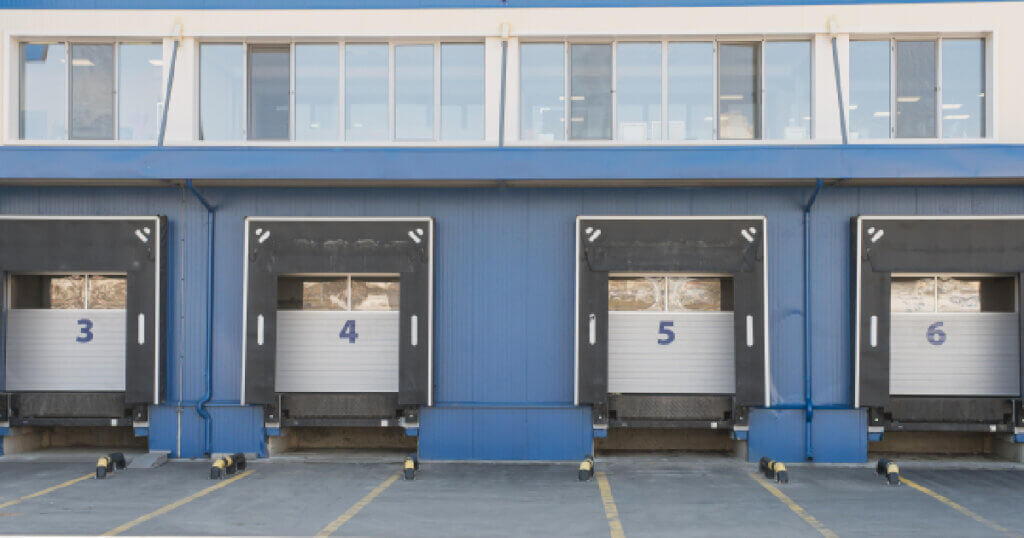
Packing and shipping area
This area is intended for packing and loading of goods into vehicles for subsequent delivery to customers. The technological operations that are carried out here are:
control weighing of goods coming from the picking area;
placing palettes with goods at the warehouse gates;
loading palettes into vehicles.
If your enterprise has a smaller turnover, you can combine the areas for receiving and picking goods. The safety of goods must be ensured in all areas.
The packer’s workplace may be divided into three parts: a place at the conveyor, a work table for packing goods into the boxes, and space for empty boxes when folded.
One more area that is not mandatory yet important for a warehouse is the office space. Typically, such an area is intended for working with documents and information systems, but it may also include a dining or break room, a conference room, and a locker room. Sometimes, if possible, such office spaces are located outside the warehouse—this protects employees from warehouse noise and allows them to work more efficiently. The size of this space often depends on the number of people working there.
The Importance of Clear Labeling and Signage
Clear labelingis a key point, especially if your warehouse is small. It simplifies order processing, packaging, and shipping of goods, and it also helps maintain order in the warehouse. Product labeling includes a logo (indicating that the product belongs to your company), the end-to-end number (examples include the date of receipt or a unique product number), and a barcode.
There are several inexpensive ways to label goods:
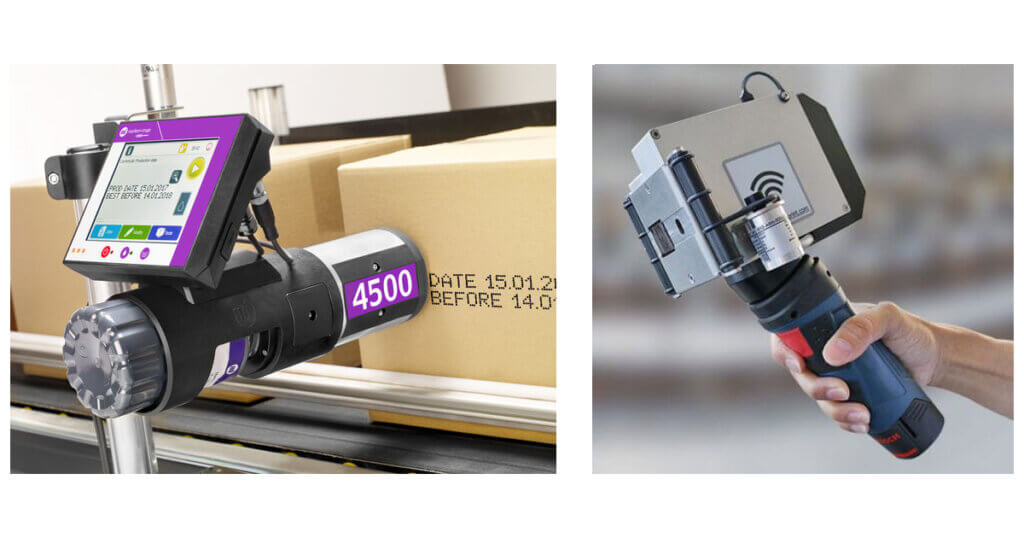
Label printer is a widely used method. This way, information about a product is applied to a sticker and glued directly to the product. The benefits of this method are that stickers can be applied to absolutely any surface, and new models of such printers even allow you to apply signs or logos.
Laser markers are not so universal, but they are also very useful. They allow for the application of information on metal, plastic, and glass surfaces. The benefit of this method is that it is economical, as no consumables are needed.
A drop jet marking machine will be an excellent choice if the storage conditions of the goods are not ideal. This labeling is quite durable and is suitable even for goods that are stored outside.
Markem-Imaje 4500, Markoprint X1JET
Labeling and signing goods in the warehouse will prevent confusion when moving goods, in cases of theft, and difficulties with reflecting objective data in electronic form.
Optimize Storage Solutions
The correct goods storage system in the warehouse is crucial for your company to make a profit. If this system is chosen correctly, taking into account the types of goods and the dimensions of the warehouse, then there will be no need for you to hire a large number of employees. Accordingly, money that you would spend on paying salaries may be used for additional business operations. There are several types of systems for storing goods in small warehouses, and below we share details about the most widespread ones.
Shelving vs. Racking vs. Bin Systems
Shelving is one of the most effective methods, since this way the goods are organized and the space is engaged to the maximum. This storage system keeps goods within easy reach, making work smoother for warehouse operators and enhancing overall productivity. You can also place goods depending on how they are to be stored, thus significantly lessening the risk of damage. When storing goods on shelves, the resulting inventory process is fast and not complicated; differences in data are identified quickly, and the chances of lost goods are close to zero. However, you must keep in mind that this system is not suitable for heavy goods, while it is rather suitable for light and small items.
Racking is a special system created for storing heavy goods; these are multi-tiered structures for storing a variety of goods and materials. There are several types of such racks for warehouses depending on specific needs.
Palette racks are used to store goods on palettes. Their benefits are that they are quite high (up to 14 meters), and their stands are attached to the floor. As a result, they can withstand heavy loads.
Mobile racks are systems for storing that allow access to all rack cells, and they can be moved by using a control panel.
Mezzanine racks are metal racks that are located on different tiers; they also have floor panels. Usually, the tiers are connected by stairs.
Cantilever racks are great for storing long items. They may be single- or double-sided, depending on where they are located. The system is a collapsible structure consisting of a support, stands, and a console.
The bin system is perfect for storing small similar items. The system helps to manage inventory efficiently, as it is arranged in exact spaces. It would be great to label bins, as this extra step will better the organization’s process even more.
Vertical Storage
Efficient usage of warehouse space has many significant benefits. By utilizing the entire space, the need for additional space is reduced, inventory management is improved, and associated costs are minimized. It also simplifies the implementation of automation and promotes scalability, allowing businesses to adapt to changing requirements without immediately expanding their territory.
A vertical system for storing goods in the warehouse is an ideal solution for warehouses with a small area as it maximizes space in a small warehouse. In this case, the height of a room is used as efficiently as possible while the floor area is occupied to a minimum. The aforementioned mezzanine racks perform this task easily. They increase warehouse capacity and storage density of goods.
How to Store Different Types of Goods Efficiently
Storing goods is not as simple as it might seem at first glance; there are many nuances. Storage management depends on the type of goods (perishable or not), their size, and the presence of special storage requirements.
Heavy vs. light items
If items are heavy or bulky, they should be placed closer to the exit and order-picking area. It is also important that heavy goods are placed no higher than waist level. Thus, the likelihood of injury or damage to goods will be minimized.
For small and light items, it is better to store them in lower bins or containers, since they usually need to be selected manually.
Frequently vs. rarely accessed items
To correctly prioritize when placing goods in a warehouse, many companies use ABC analysis. It involves dividing inventory into three categories according to how frequently they are accessed, where A is the most frequently accessed items, and C is the most rarely accessed items. ABC analysis makes it possible to rank the range of goods in the warehouse according to various parameters. The drawback of this analysis is that it does not consider the introduction of new products and seasonal demand, and such products may sometimes have low sales volume. In order to ensure accuracy, you will need to regularly conduct ABC analysis.
Organize Inventory by Accessibility
The main consideration with storing inventory in the warehouse is the convenience of its further accessibility and use. One of the most useful tips is to place goods by priority: the most necessary goods should be stored near the aisle, and the rarely needed ones should be stored in the back of the warehouse. On the top shelves, it is better to store the goods that are needed extremely rarely, while goods that are always in great demand should be easily accessible
Implementing the FIFO method
The FIFO (“First In, First Out”) method ensures smooth inventory turnover. It means that goods are written off in the order that they are received at the warehouse. This method accurately reflects the cost of purchasing goods, even if it is increased later.
The huge benefits of the FIFO method are the reduction of obsolete inventory, increased customer satisfaction, and reduced costs for warehouse logistics. However, this method is not ideal. Its disadvantages include the need for accurate accounting of goods and the likelihood of higher taxes. Also, properly organize the warehouse space is crucial. For example, goods that arrived a long time ago should be placed closer to the shipping area.
Grouping Similar Goods and Using Bins and Containers
Grouping similar goods involves their distribution into groups according to certain characteristics. This method helps to use your space economically, quickly manage inventory quickly, and reduce clutter in your warehouse.
Different containers and bins are a perfect option, whether storing small items on racks or on the floor. With a wide range of sizes to choose from, you will fill the space as tightly as possible and customize any depth or shape for all types of small items. These steps will speed up the process of finding each product and optimize your warehouse.
Streamline Receiving and Shipping Areas
An orderly and clean warehouse is one of the requirements for efficiency and safety. Cleanliness in a warehouse is important not only because it gives the warehouse a neater appearance but it also maintains the company’s positive image. There are strict standards for storing goods and they must be followed, especially when it comes to receiving and shipping areas. These areas must always be clean and well-organized to ensure fast processing and avoid errors when issuing goods.
Loading and unloading processes are extremely important stages in warehouse operation. Such processes should be planned in ways that take as little time as possible, while clean pathways play the most significant role in directly influencing operational speed. To keep the pathways clean, simply put all the goods in their places at once.
Quick access to packing materials and shipping labels must be provided, as it influences the quality of the services and customer satisfaction. Packing materials should always be at hand, as this will save time and speed up the packing process. The shipping label plays a crucial role in the shipping procedure. It contains information about the contents of the package, its characteristics, and handling rules during transportation. The shipping label improves efficiency and safety while reducing risks of damage and loss.
Even though your goods are of high quality, sometimes the customer may return them, and their reasons may be different each time. For such situations, it is mandatory to have space in the warehouse for returned goods; this will prevent clutter and confusion. This space may also be used for damaged items.
Use Appropriate Equipment
Warehouse equipment is critical to success; it makes warehouse operations more efficient and helps to properly organize important processes in the enterprise.
Palette Jacks and Hand Trucks
Palette jacks are equipped with two forks that go under each palette; they greatly facilitate the transportation of heavy goods that are placed on the palettes. Hand trucks also serve to make transporting heavy goods easier; they consist of a footrest, handle, and a metal frame. Unlike jacks, they do not use hydraulic action and are suitable for small-sized goods.
Ladders and Step Stools
When goods are stored vertically, the warehouse must have ladders and step stools, as they greatly simplify access and speed up the work process. Most step stools have handrails and wheels, and to work at the upper level, the worker climbs onto a platform with a guardrail, which significantly reduces the risk of falling or injury. Ladders may be folding or not, depending on the purpose of their use. The huge advantage of this type of equipment is that it can be moved to any point in the warehouse and the height may be increased arbitrarily, which makes it possible to get close and convenient to goods at any height.
Foldable Tables and Mobile Workstations
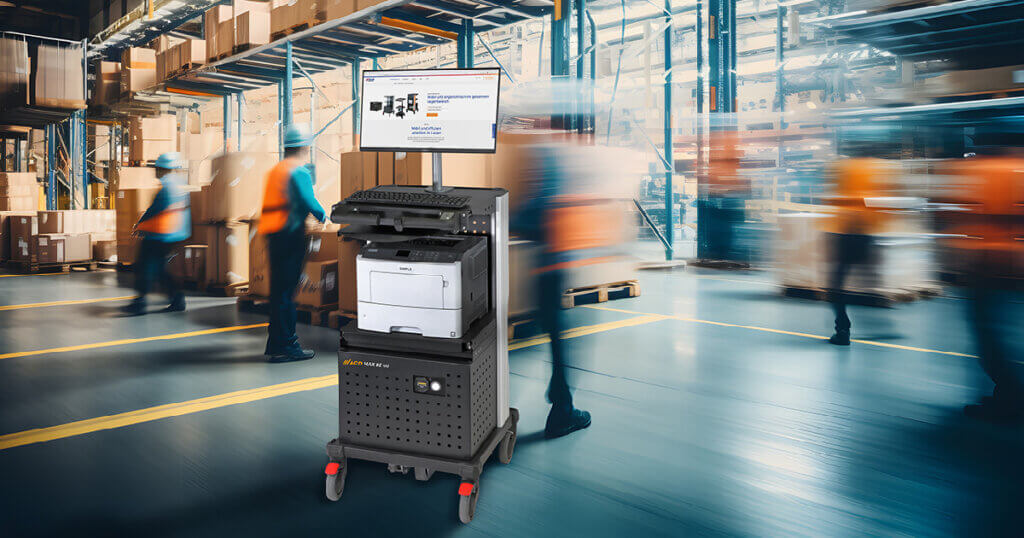
The MAX BE Mobile Workstation
This equipment is a must-have in a small warehouse. They save a lot of space and are worth investing in. Foldable tables are easy to install and can be quickly moved to any location in the warehouse. Also, they do not require much space for storage. They will be an excellent choice for the goods packaging area. Mobile workstations are a great tool for reducing errors, as they speed up inventory processing and improve work efficiency.
You will definitely need to invest in warehouse equipment; if selected correctly, it will ensure safe and productive work.
Implement a Labeling and Signage System
As you already understand, warehouse facility management is quite difficult, especially at the beginning, when not all processes have been established and many different questions arise. To stay on top of everything, you must first implement a labeling system: All goods that enter the warehouse must be marked.
Two main functions of labeling are information and identification. The first is one of the means of transmitting information about the item. As a rule, this data coincides with the data in the product’s accompanying documentation. The second function is also very important, since it provides the ability to track goods at all stages. There are several ways to create an effective labeling system.
Using barcodes and color codes for different product categories
Barcoding makes both large and small warehouses alike more efficient and responsive; it allows you to reduce costs and eliminate the chaos that is sure to arise without such a system. Its principle is quite simple: Each storage location in a warehouse must be assigned a unique code. This label must be affixed to each rack’s beam. The information can be read by using a PDT scanner, which transmits data about the product to the inventory management system (such as Odoo ERP).
Color coding saves a lot of time when looking for specific goods. If it is clear, it significantly reduces the risk of finding the wrong product or putting it in the wrong place. Such encoding speeds up order processing and increases overall productivity by several times.
Clearly marking zones, aisles, and storage bins
Color coding improves warehouse logistics. Visualization of zones and aisle markings helps workers quickly navigate the site and reduces the risk of errors. This, in turn, increases productivity and reduces operating time. Setting up zones can be done by using paint or adhesive tape.
A benefit of marking aisles, working areas, and storage bins is that during intra-warehouse transportation, the goods reach their exact destinations along the designated route. Conventional signs show how to properly handle a specific product.
Signal marking of hazardous areas is extremely important to maintain workers’ safety and avoid accidents; this is done with special wear-resistant paints.
Conclusion: Setting Up for Future Growth
Organizing a medium-sized or small warehouse is a very responsible task, and it requires work on all operations, as well as automation of routine processes. For your warehouse to work smoothly and be organized, you need to remember the following important points:
Be sure to divide the space into zones based on inventory turnover.
Implement a product labeling system as early as possible to prevent errors.
Store large and heavy items closer to the shipping area.
Make the most of your space with vertical storage.
Keep the warehouse clean.
Purchase or rent decent equipment.
Mark warehouse zones to simplify logistics.
When our business develops and grows, you will need to update and maintain your warehouse layout. When the amount of inventory increases enough, it will be necessary to change the zoning of the space. For example, you may need to separate your receiving and shipping zones if they had been grouped together before. Be ready for such changes, as they mean that you are doing everything right.
As you can see, improving productivity and efficiency does not mean that you must change everything. It will be enough to start with small steps that will definitely lead you to great success. The main thing is to never stop improving and learning new ways to increase your profits. By introducing changes step by step, it will be much easier to get used to new conditions, and as a result, maintain a well-organized warehouse.
Once the physical setup of your warehouse is optimized, the next step is to implement software to streamline processes such as inventory management, order tracking, and restocking. For example, Odoo ERP and the Ventor PRO app are great solutions for warehouse management. Maximizing space in a small warehouse is not enough to ensure that all processes work perfectly. Warehouse management systems, like Odoo, will further enhance organization and automation. Such a system will simplify the work at all stages: from the receiving of goods to the shipping and their movement throughout the warehouse. Process automation is a crucial step in organizing a warehouse, so you should learn as much about it as possible.
About this blog
We invite you to contact us for more information. Our customers have benefited greatly from the customized Odoo implementations we provide, especially those with specific warehouse optimizations that our customers need. We also have completely customizable, ready-made solutions for all warehouse operations in Odoo. Reach out to us and let us know what you need, so you can try our products to successfully organize your warehouse.
Unsure about Odoo ERP? Try our personalized consultations
Data Matrix codes make a huge impact in situations when not much space is available and are useful within various sectors. Their peculiarity is that a considerable amount of information is located in a rather small space. Such codes are very often used in logistics and manufacturing, as they perfectly encode numeric data as well as text.
Data Matrix codes are essential for business. After such a code is scanned, the buyer sees the path of their item from the producer to the shop, and the number of counterfeit goods is significantly reduced.
If you have ever been interested in business topics, you have probably heard about Odoo—a package of business applications that are fully integrated with each other. This system completely covers all aspects of your company, including coding goods with Data Matrix codes. When you simply scan the code, Odoo immediately distinguishes the correct product and inserts its batch number and best-before date into the fields.
Data Matrix codes significantly simplify many business processes and become a key constituent of modernized companies. Therefore, you should also be aware of modern product coding in order to achieve success and overtake your competitors. Read on and you will discover plenty of useful information!
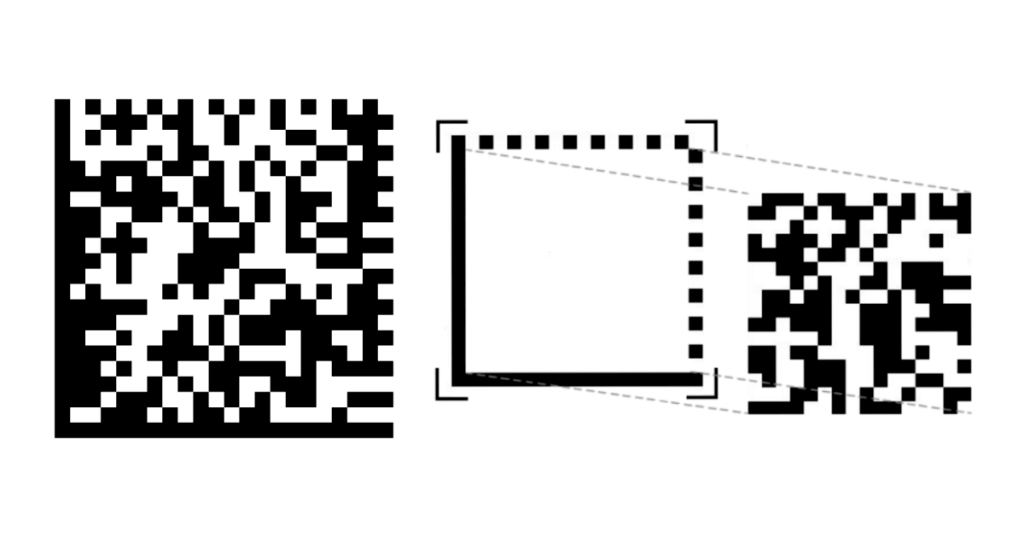
Data Matrix Codes: What Are They?
This is a two-dimensional matrix barcode that consists of black and white cells.
As a rule, it is arranged in the form of a square, but it may also be rectangular. Data Matrix code uses the lower structure: on the left and bottom it is bounded by solid lines that form an “L”. Such a code may accommodate a maximum of 2335 alphanumeric symbols; its visual extent may be 10×10 pixels, and this property provides a huge advantage.
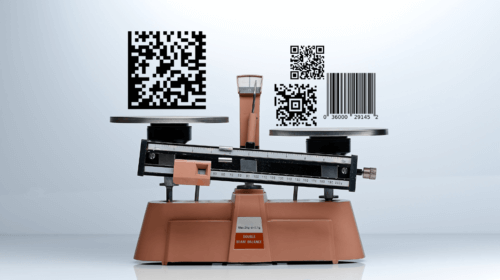
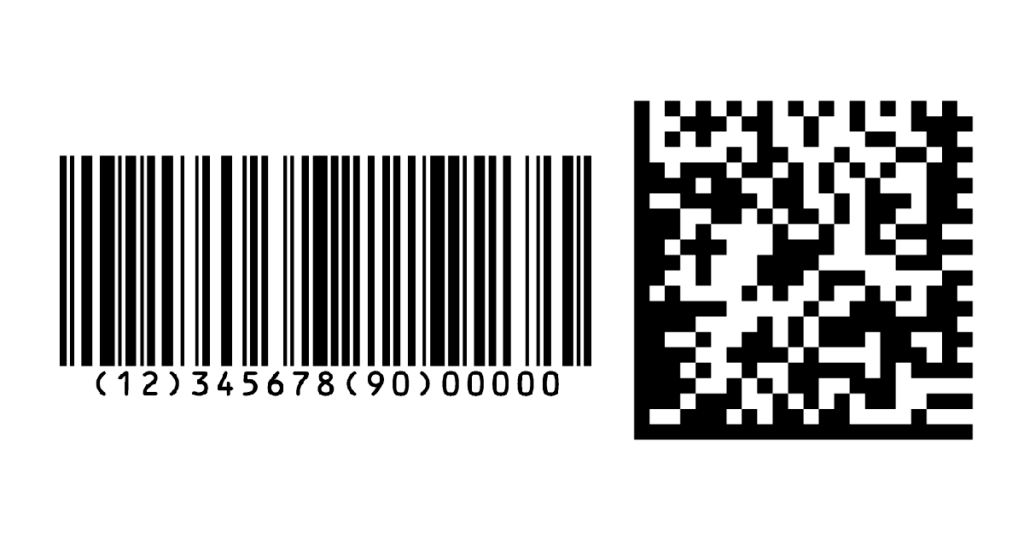
Traditional Barcodes vs. Data Matrix Codes
Traditional barcodes are 1D (one dimensional), and they are presented in the form of a rectangle that is comprised of parallel black stripes and white spaces, which may have different widths. The most widespread type of a traditional barcode is EAN, which is composed of 13 numeric symbols, containing a country code. EAN barcodes, in comparison to Data Matrix ones, accommodate significantly less data and comprise only basic information, which is their drawback. Traditional barcodes are actively used in asset tracking, healthcare, and logistics.
QR Codes vs. Data Matrix Codes
QR codes are two-dimensional codes (2D), as well as Data Matrix ones. Normally, they look like squares with black and white cells and have a characteristic arrangement of three large squares in three corners. QR codes are able to reserve a lot of data (a maximum of 4296 alphanumeric symbols), which is why they are perfect for connecting URLs, text, and data. In contrast to Data Matrix codes, QR ones are not compact enough, and this often becomes their drawback, making them unsuitable for encrypting small goods.
There are benefits and drawbacks to these types of barcodes, but each are effective in their own ways. Which one to choose depends only on your purpose. To come to an ideal decision for your production needs, you will want to consider:
the data specification (QR codes will be great for encoding URLs, whereas Data Matrix codes will be suitable for compact data storage)
the capacity that is allocated for the code (when it is small, the choice should definitely be on the side of Data Matrix codes)
spheres of application (QR codes are more common in marketing, entertainment, or goods packaging, and Data Matrix codes are actively used in manufacturing and healthcare)
Aztec Codes vs. Data Matrix Codes
The Aztec code is a 2D barcode and is shaped as a square that contains a matrix of square parts. In the center of this matrix is a bullseye, which, in turn, consists of concentric squares. It may contain a maximum of 3067 alphanumeric symbols and is actively used for encoding numbers, text, and binary data.
Data Matrix codes exceed Aztec codes with reference to coding efficiency when there are more than 298 symbols in the text.
Data Matrix Codes: Key Features and Benefits
High data volume: Easily encode a large quantity of symbols in a really small space, which is crucial for small-sized items.
Economy of space: Use up less space, as these codes have a high data concentration. Moreover, sometimes Data Matrix codes are so tiny that they may be noticed only when looking closely. In view of the fact that these codes are compact, they are quite economical: less ink is wasted and smaller labels can be used.
Correction of errors: Data Matrix codes are quite fault-tolerant as they provide automatic error correction up to 30%. Just imagine, that if ⅓ of the code is corrupted, you will still be able to read it. A huge benefit of such codes is their readability, which is possible with a contrast of only 20%. As a consequence, some manufacturers allow themselves to experiment a little with colors and enrich packaging design.
How Do Data Matrix Codes Work?
You have probably at least once wondered how Data Matrix codes work. In fact, the process is not so simple, and complex coding is used here. Code characters are composed of modules that are located within the boundaries of the search pattern. The data areas that make up a symbol have modules in the form of a periodic array. Interestingly enough, there are no standards for the form of the module, so they may be either square or round.
The latest variant of the Data Matrix codes, ECC 200, uses Reed-Solomon codes to prevent errors or restore erased information. The majority of characters are square, and their size fluctuates from 10×10 to 144×144 modules.
Scanning barcodes is necessary at different stages of the logistics network, for example, during receiving or sale. Two-dimensional scanners are suitable for reading Data Matrix codes.
They are capable of recognizing 2D encoding and transmitting data to the online cash register. Fortunately, many modern scanners have already been created for such codes. They recognize a code at a distance of 10–20 cm and have minimal contrast, high reading speed, and a broad scanning angle.
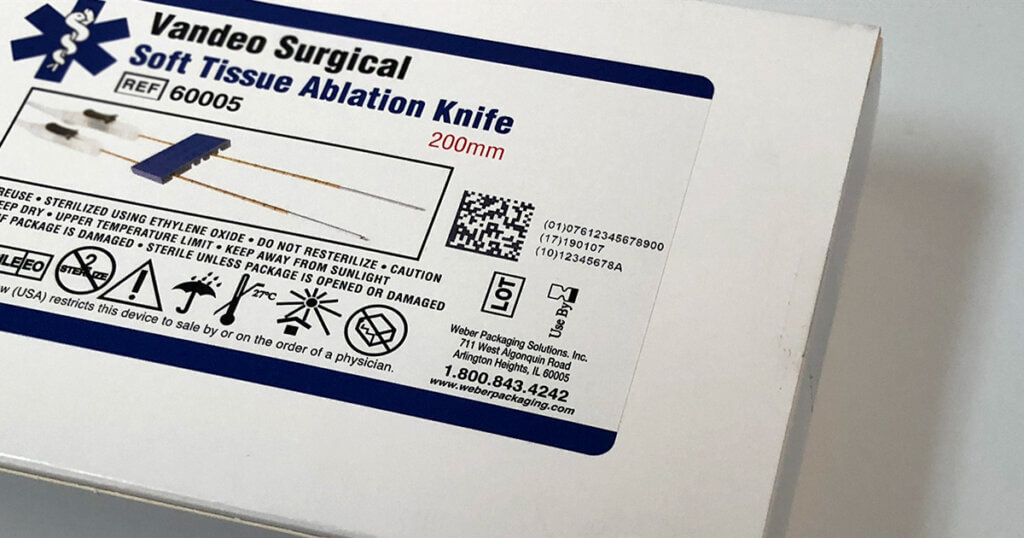
These codes are actively used in many different spheres, and Data Matrix code examples are widespread in retail, manufacturing, and logistics. However, they are most useful and widespread in the field of pharmaceuticals.
As a rule, medicine packages are quite small, and other types of barcodes may simply not fit on them, while up to 2 KB of information may be entered into the Data Matrix code, saving much space in the packaging. Moreover, such codes were introduced in the medical field in order to protect medicinal products from falsification. The labeling of medical drugs includes the name of the product and dosage, serial number of the product, batch number, product code, and the drug’s shelf life.
The Place of Data Matrix Codes in Business
Modern businesses are increasingly utilizing Data Matrix codes and are gaining huge benefits from this: The codes are economical, but at the same time they contain all the important information.
You may be surprised, but such codes are actively used even in the banking sphere. They are applied to payment documents in order to later enter the information into their database. Corporations that manufacture electronic elements, such as personal computers or microprocessors, also benefit from Data Matrix codes, as most often such products are tiny in size while encoded information is still required.
A huge benefit of Data Matrix codes is that a unique code is issued for each unit, thus eliminating all inaccuracies. Another reason why modern businesses choose these codes is their ease of use. They can be read at different angles as well as in mirror form.
Many companies use these codes as their business card. For example, Data Matrix codes are often seen the entrances to restaurants, shops, and even hotels. As a rule, they encode the name of the establishment, telephone number, and sometimes the website address. Other examples of Data Matrix code usage in real life include clothing and footwear labels, cigarette packaging, cosmetics, and food products. Because of such widespread usage, Data Matrix codes are much closer to you than you might first think!
How Odoo Supports Data Matrix Codes
Odoo is a system used by a great number of various modern companies as it easily covers all their needs. By the way, barcodes are not the exception. They help to significantly speed up processing for many goods. The Odoo system assists in automatically generating barcodes, along with downloading them from other systems.
Data Matrix codes considerably simplify and accelerate the identification of goods at almost all stages of processing. For example, Odoo Inventory supports these codes, and then inventory processes are much smoother and more automated, which makes for well-managed warehouse activities. The process is simple: scan the code and see all the details about the item; no need for seeking it out manually.
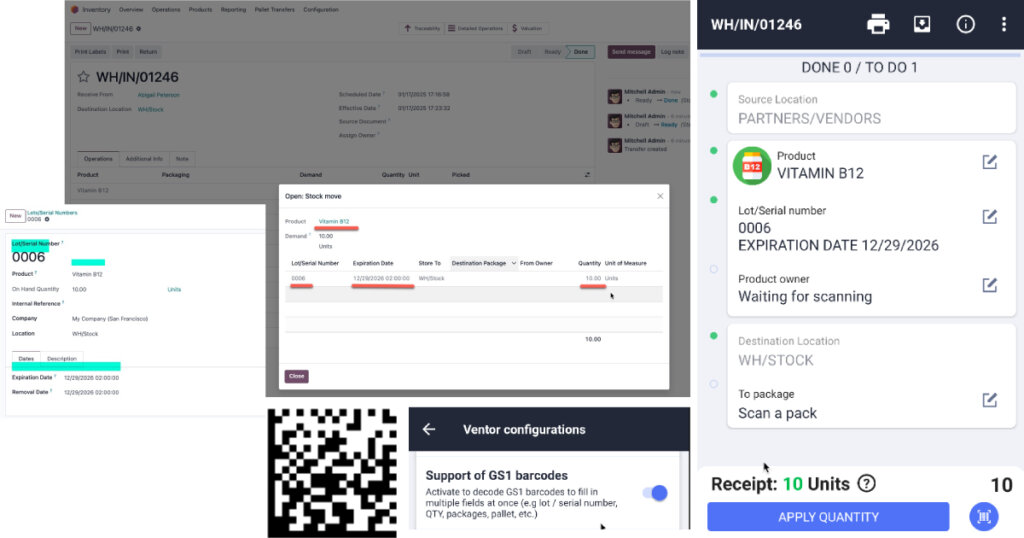
Data Matrix in Odoo and Ventor PRO. If you’re using GS1 in your Data Matrix codes, make sure to enable GS1 support in the Ventor PRO app configurations.
Also, operations at the manufacturing stage, as well as at the retail module, are more fluid due to the fact that Odoo supports Data Matrix codes. As mentioned before, each product has an individual code, and retailers can watch the entire journey of a particular product while making sure that it is original and meets all standards.
If you want to start using Data Matrix codes in Odoo, you will need to set up barcode readers. This process is easy and doesn’t require much time. Three types of barcode scanners exist in the Odoo system, and you need to choose the most suitable one.
USB scanner
This type is an ideal option for scanning goods on the computer. All you have to do is to connect it to your computer.
Bluetooth scanner
This type allows you to move freely throughout the room and scan the desired goods. You simply connect this scanner to a mobile phone or a tablet.
Mobile scanner
This type is considered to be most convenient and has a wide variety of models. Used through a computer with a barcode scanner in it, this is a perfect option for heavy use.
It is highly important to note that with USB scanner usage, the scanner keyboard layout must match with the layout of your operating system; otherwise, there is a risk that the characters will not be translated correctly.
Practical Example: Implementing Data Matrix Code in Odoo
Implementing Data Matrix code in Odoo will give your business many benefits, but it is important to do it correctly. Below, we are sharing a step-by-step guide on creating and managing these codes.
Step 1. Open “Inventory” Step 2. Go to “Configurations” Step 3. Open “Settings” Step 4. Click “Operations” and then “Barcodes scanner”. Step 5. Click “Save” and then return to the previous tab to click “Configure products barcodes”
By the way, you should be highly attentive to adding the code to the item itself, but not to the template—otherwise, differentiating between them will be impossible.
Remember that to read the code correctly, the default nomenclature must usually be “GS1”. In “General Settings”, the Developer mode needs to be activated. Then open “Configurations” and go to “Barcode Nomenclatures”. You will be able to open the list of rules after you click “Default GS1 Nomenclature”. Keep in mind that the rules can be modified or added, depending on how the data is encoded on the barcode. The most useful rules in GS1 Nomenclature include:
Rule Name
Type
GS1 Content – TypContent – Type
GTIN
Unit Product
Numeric Identifier
Expiry
Expiration Date
Date
Batch
Lot
Alpha-Numeric Name
Serial Number
Lot
Alpha-Numeric Name
Data Matrix in Odoo: Product Tracking
Remember that in the Odoo system, there are two main ways to monitor products: by using serial numbers or lots. As a rule, lots display a certain batch of an item that was received, is still stored, or was delivered from a warehouse. Serial numbers exclusively differentiate the exact product from other items.
Advantages of Using Data Matrix Codes in Odoo
This ERP system is a wonderful key to a profitable business in general; it helps to run all the business processes efficiently and significantly increases a company’s profit. In this part, we will focus on the key advantages of using Data Matrix codes in Odoo and prove that they are really worth implementing.
Improved Traceability
As we already mentioned, this encoding system allows for the ability to seamlessly trace the entire path of the product from the moment of its production to its final sale. For better traceability, the Odoo system allows for independently grouping items by serial numbers or lots. The first step is to reset all the default filters by clicking on the search field in the top right corner of the screen. Then, open “Group By” and choose “Add Custom Group”, and you will see a mini pop-down menu—this is exactly what you need. Next, choose “Lot/Serial number” and “Apply”, and you are all done!
Enhanced Inventory Management
Implementing Data Matrix codes greatly speeds up the identification of goods at the Inventory stage and beyond. The Odoo system allows for automatic barcode generation and for transferring existing codes from other systems. This makes inventory management better and easier, as all necessary product information is seen immediately by simply reading its unique Data Matrix code.
Error Reduction in the Scanning Process
The format of these codes is standardized; thus, they may be read easily by barcode scanners. The Odoo system uses GS1 barcodes for items identification and workflow automations, as are useful for receiving, packing, and shipping. Each code contains all important item data and considerably reduces errors.
Challenges and Limitations
Implementing a Data Matrix in Odoo is a complex process, and sometimes some problems may occur. The point is that the barcode must be formed in accordance with clear requirements. If some errors were made during the code-generating process, you will definitely see information about them on your screen as soon as you complete the scanning process. The most widespread errors may be as follows:
Insufficient data in the scanned code
Accidental use of another barcode instead of the Data Matrix code
A GS symbol instead of FNC1 at the beginning
Sometimes it happens that everything is fine with the code, but the scanner doesn’t read it. To avoid such situations, you should study in detail the types of scanners that are designed for such codes.
But, of course, there are also great solutions to the implementation problems. First of all, in order for process management to be fast and problem-free, employees must know how to use the Odoo system and Data Matrix codes. When training employees, it is important that they know the benefits and purposes of implementing codes. You also need to provide them with a detailed training plan, so they understand the main stages and full scope of the new material. Remember, conducting assessments before and after training is crucial in order to monitor the improvement of employees’ knowledge and skills in the field of Data Matrix codes in Odoo.
There are many barcode scanners available, and each one has advantages for specific use cases. To read barcodes in Data Matrix format, you will need a classic scanner with the technical ability to recognize two-dimensional codes.
Conclusion
As you can see, Data Matrix codes are a great option for any type of goods, and nearly every successful company uses them. Proof of this may be the huge list of advantages of this type of coding, despite the fact that it is only gaining popularity.
One of the most important features of Data Matrix codes is the ability to read information even if up to 30% of the code is damaged. In addition, such codes take up little space and can fit even on the smallest packages, making them universal. They are used in almost all areas of activity from advertising and industry to entertainment. In everyday life, you can most often find Data Matrix codes on medicines, shoes, fur, or tobacco products.
Data Matrix code usage in business is becoming extremely widespread, as these codes save not only space but also a company’s money. Additionally, text encoded in this type of coding may be also include a web page, email address, SMS, or phone number.
These codes are supported by the Odoo system, and this is great news! Odoo ERP is a program solution for businesses that have different modules integrated into each other. As an ideal solution for companies, all business processes can be gathered in one place.
Having studied in more detail the features and properties of the codes, we can confidently say that these are the codes of the future. They fit a large amount of information into a very small area, and this is what modern businesses need. Moreover, in some countries, Data Matrix codes have already been announced as mandatory, so it doesn’t look as though they will become less popular anytime soon!
Manage your Data Matrix codes in Odoo using a barcode scanner
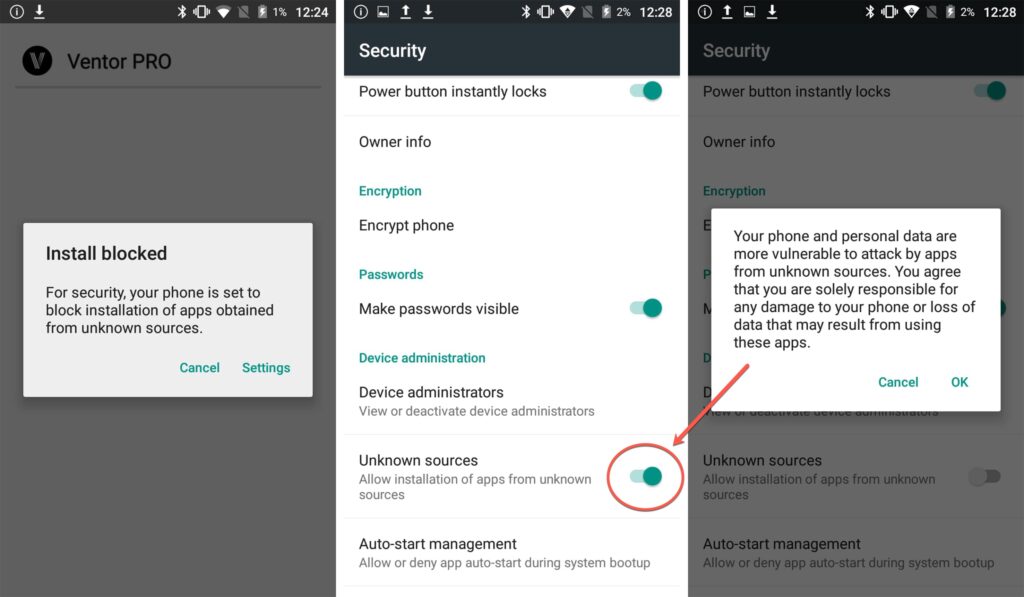
First of all download the app using a link from the confirmation email (click on the “Download here” button). During installation on your phone or tablet, you may be asked to allow installation of applications that are not from Google Play. The next step – insert your server URL, then user login and password (database name is needed only if you have multi-databases). Use the “Contact Us” button to drop us an email or get support.
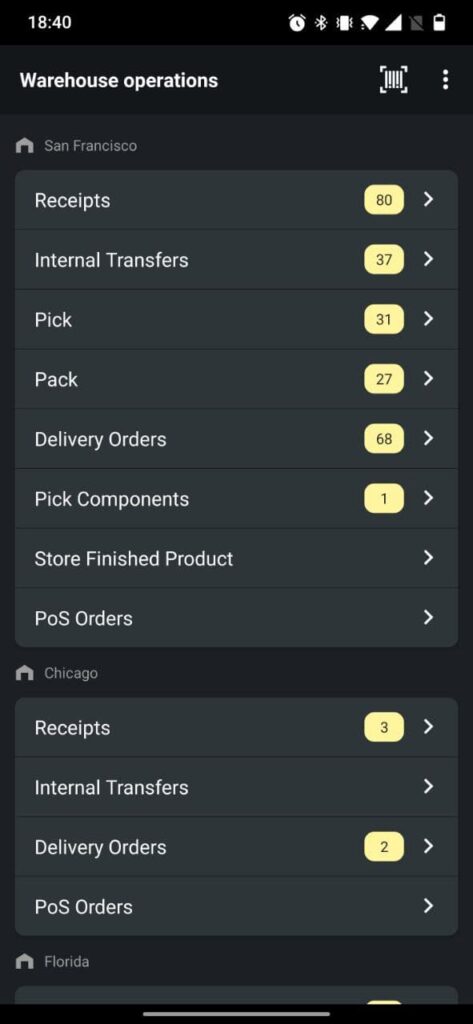
Warehouse operations
This menu represents a full copy of the Odoo Inventory Dashboard. The menu shows all available warehouses and their operations types (Receipts, Pick, Pack, Delivery, etc). The number of operations zones depends on your warehouse configuration. You can see the numbers of available pickings ready to be processed next to each zone (operation type). Click on a zone to see the list of all available transfers.
You can use filters inside any of the operation types by clicking a special button to add additional parameters, such as status, contact name, or schedule date. You can also find whatever you need using a search button. Click on any document (transfer) to start picking or use the scanner to scan internal references of the document (e.g., “WH/IN/0000234”) and quickly open it.
Find instructions below for all frequent operations.
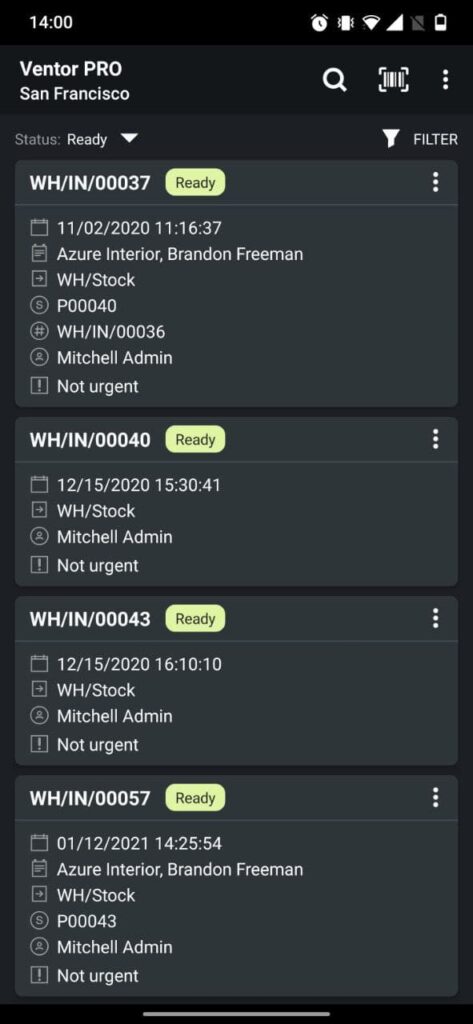
Choose a warehouse and open the “Receipts” operation type. You can use your scanner to search a document right from this screen.
Click on the needed transfer to open the related document. You can also scan a barcode of the PO/Reference to open the needed transfer by clicking on a special barcode icon (on phones) or simply scan using the scan button on your handheld device.
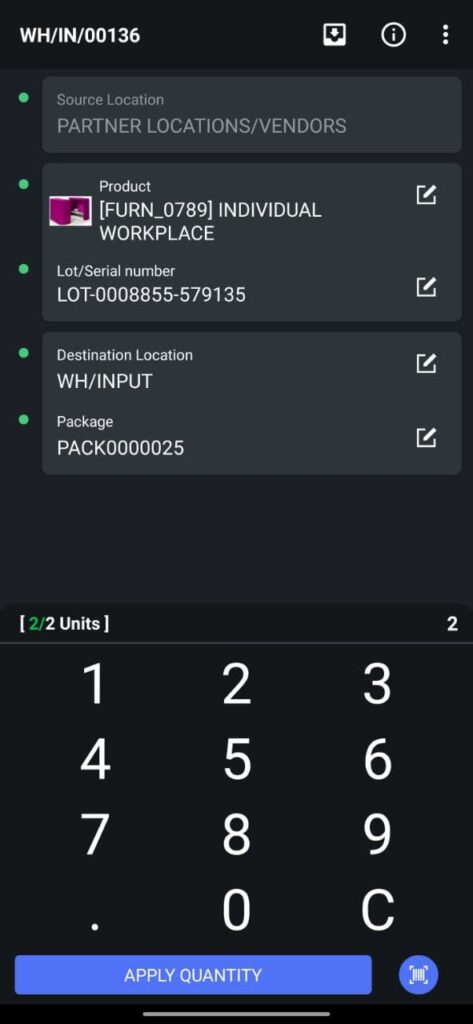
By default, you need to scan the product barcode using a scanner button or use manual input (pencil icon) to find a product manually (same for any other field).
Add QTY of the product and change destination location (if needed), then click on the “Apply Quantity” button to move the product. The next item will appear automatically (if any are left).
You can also scan GS1 barcodes, and the app will instantly fill in QTY, Lot / SN, Package, weight, and so on.
Title for This Block
Description for this block. Use this space for describing your block. Any text will do. Description for this block. You can use this space for describing your block. Description for this block. Use this space for describing your block. Any text will do. Description for this block. You can use this space for describing your block.
Delivery (Pick / Pack / Delivery orders)
Watch how to pick orders in Odoo:
How to pick orders in Odoo efficiently
Or follow these instructions:
Open the “Warehouse Operations” menu.
Choose a warehouse and open the “Delivery orders” (“Pick” or “Pack” if any) operation type. You can use your scanner to search a document right from this screen.
Click on the needed transfer to open the related document. You can also scan a barcode of the PO/Reference to open the needed transfer.
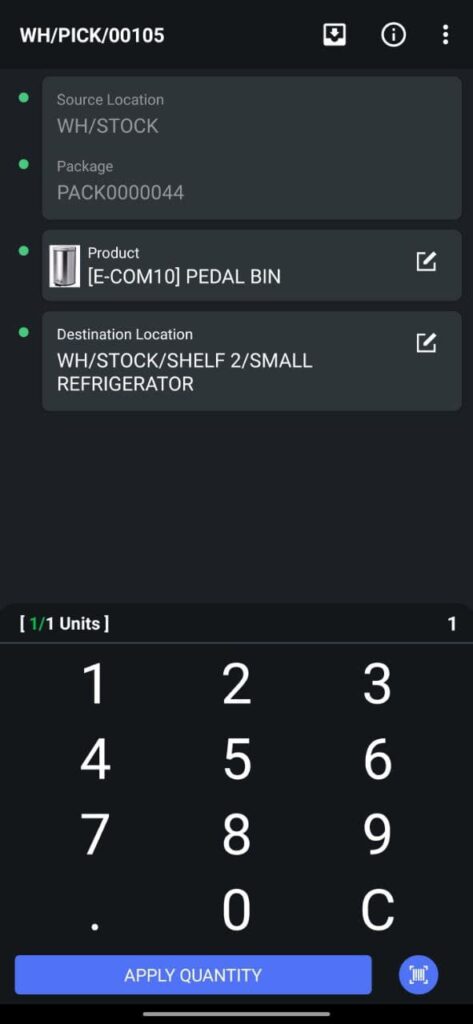
By default, the app shows the product to pick. Scan its barcode to confirm the product or use manual input (pencil icon) to find and confirm a product manually.
Add QTY of the product and pack products if needed using a pack button, then click on the “Apply Quantity” button to move the product. The next item to pick will appear automatically (if any are left).
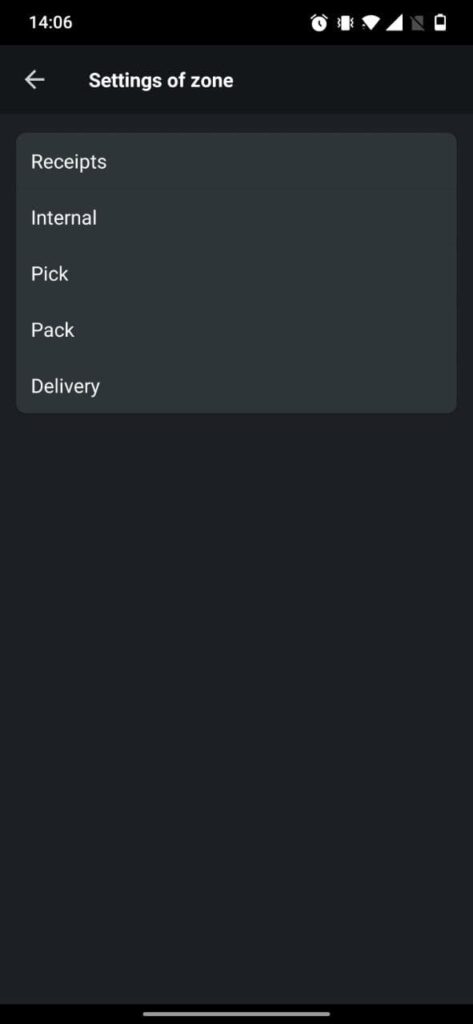
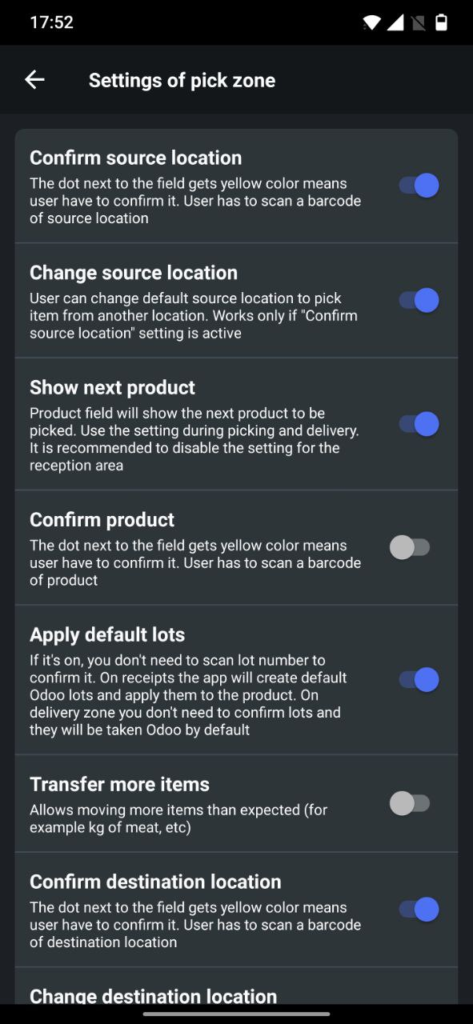
Warehouse operations settings
Each zone (receiving, internal transfers, pick, pack, and delivery, etc.) has its own specific settings. Go to the top right corner, open the additional menu, and click on the settings button. Configure any zone to follow your business procedures.
The app can suggest the next item pick or force you to scan source/destination location, serial/lot, or packages/consignments. You can adjust only needed fields to validate or even allow moving items without additional scans. All settings are described well; you can open each of them and read the description to understand if you need to activate some of them.
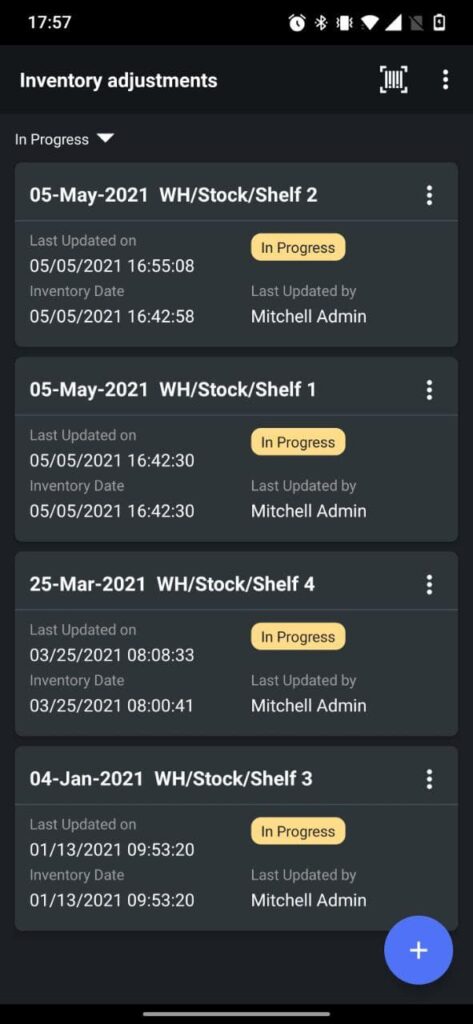
Inventory Adjustments
The Inventory Adjustments menu is for the regular inventory process. You can make an inventory by product or by location (or a combination of both). Note that you can always create a new inventory inside Odoo and use the app only for running it. This way users need only process inventory rather than create them on their own.
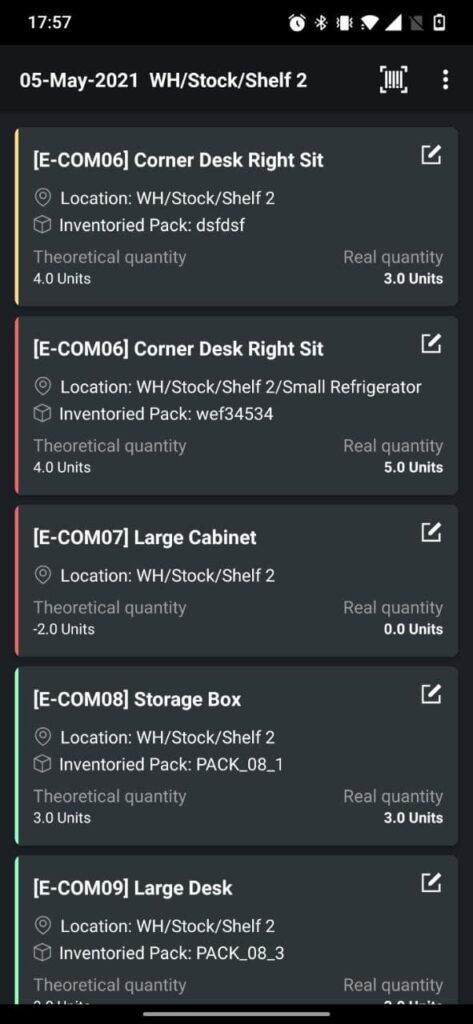
After creating (opening) a new inventory, you will be able to see the list of items you have to scan and the QTY of items you expect to see (theoretical quantity). Every item has its own card with a color marker on the left side:
The yellow line means that the app is still expecting you to scan more items.
The green line means that expected QTY is now equal to the QTY you have scanned.
The red line means that you found more items than expected (it might be OK to find more, just pay attention to such cases).
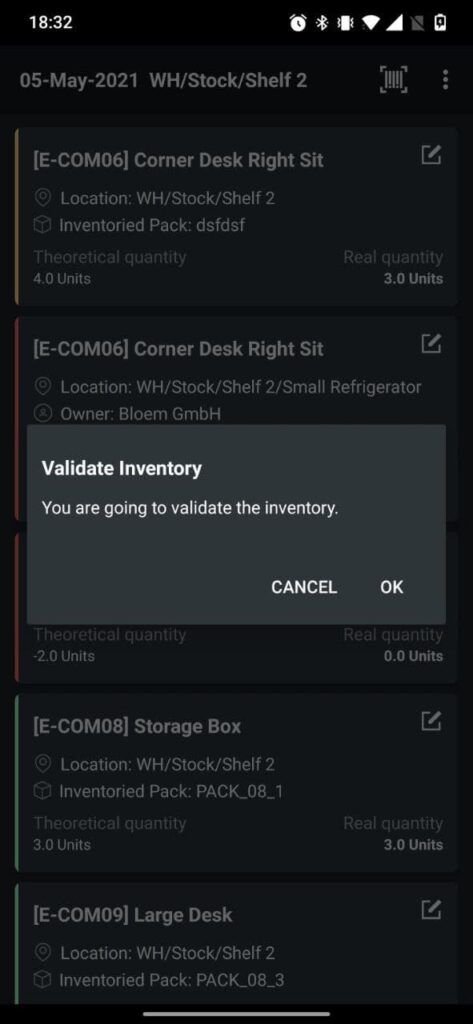
After all items are scanned, the inventory can be validated. Click on settings (3 dots at the right top corner) and then on the “validate” button.
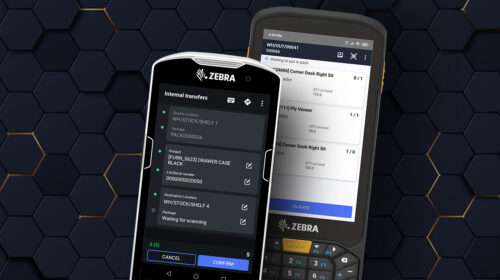
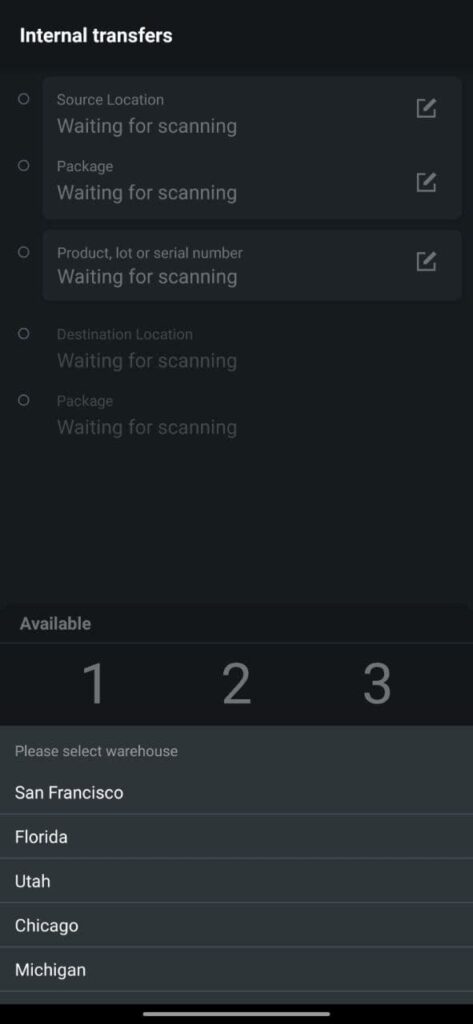
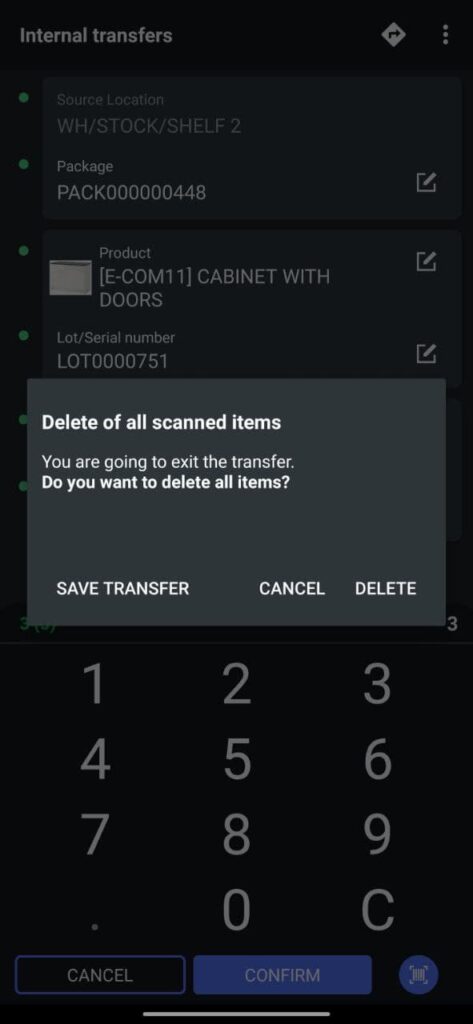
Internal transfers
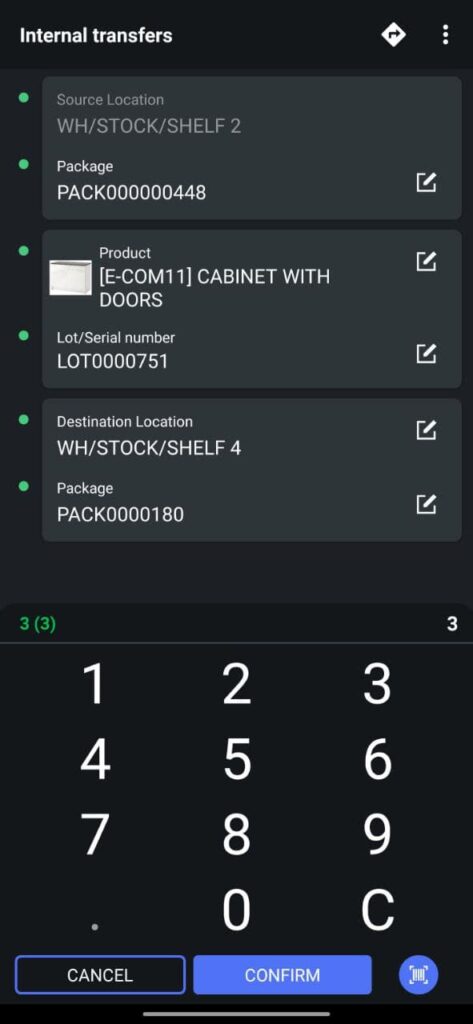
This feature allows moving an item from one location to another, in just a couple of scans. Scan the item, scan the location where you are going to move the item, and then confirm quantities. It’s very convenient to rearrange stock or simply to move items/packages from one location to another.
You can define from where to move in an item by scanning a source location. You can specify a needed lot or a serial number of the item you want to move by simply scanning it. You can also specify the product owner (use consignments settings) or even move the entire package.
Just scan the package barcode and then move it to a new destination location. All items inside the package are moved as well as the package. Use the internal transfers menu to unpack any package just with one tap.
After scanning any item, you can immediately get information about its location in other storage cells throughout the warehouse. Thus, you know in advance where else (and in what quantity) this product is. All this will help you to correctly and quickly redistribute your inventory, directing products to where they are lacking.
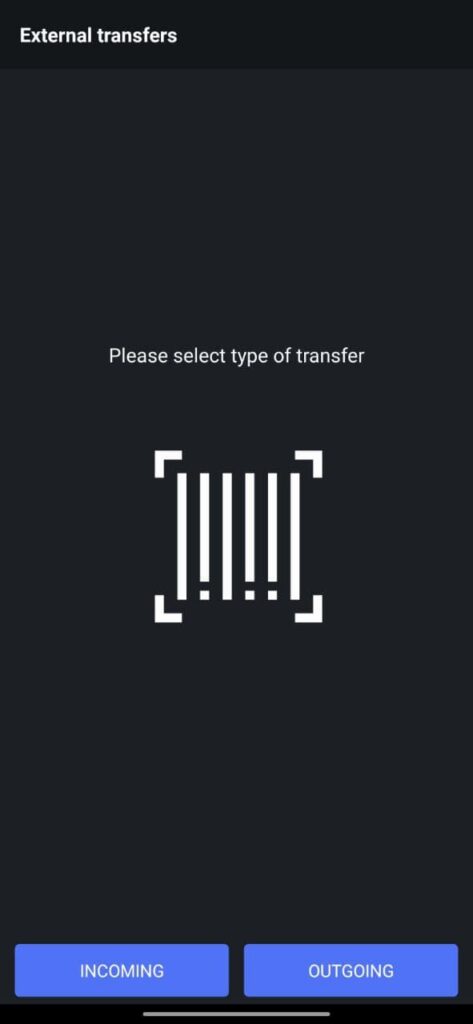
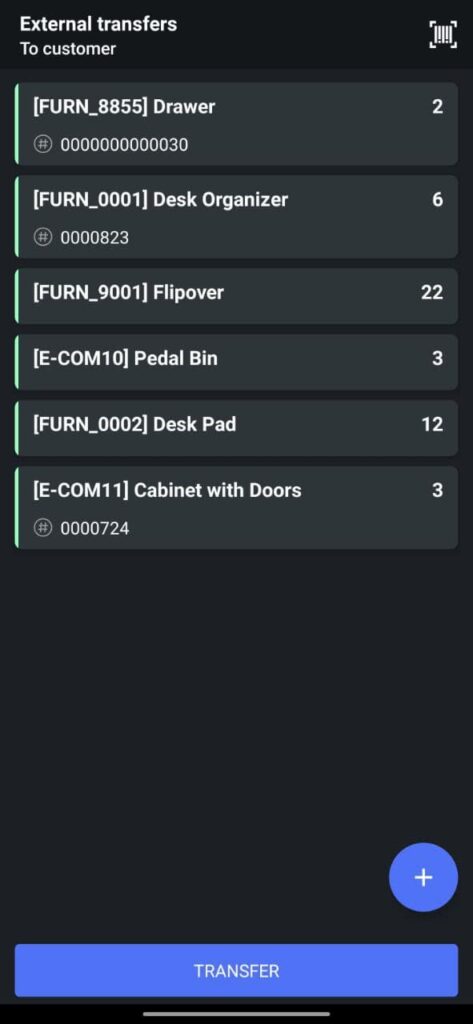
External transfers
This menu creates incoming or outgoing shipments without a need to create a sales or purchase order. The steps are simple.
Choose what you want to do: receive or send products.
Scan products one by one to set QTY.
Specify LOT or Serial numbers (if any).
Validate the transfer to register incoming (or outgoing) movements.
The logic is similar to the internal transfers menu, but here we move items in or from the warehouse.
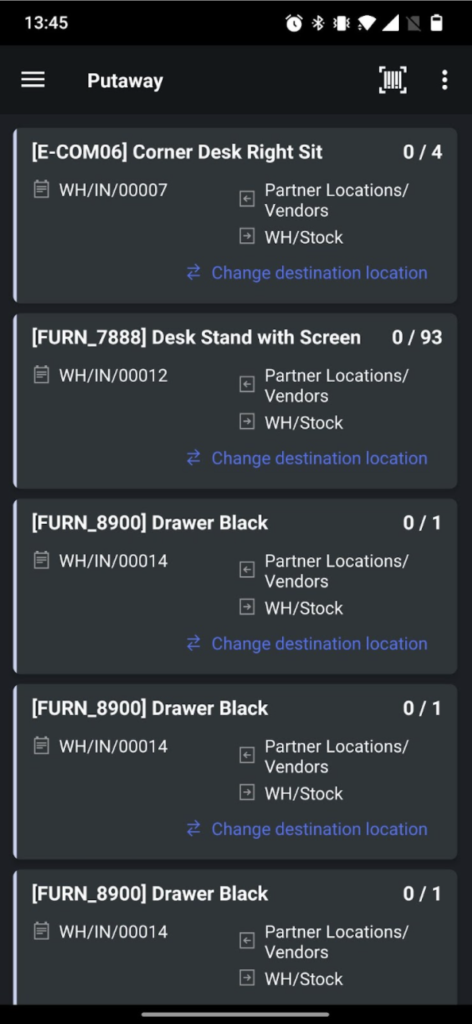
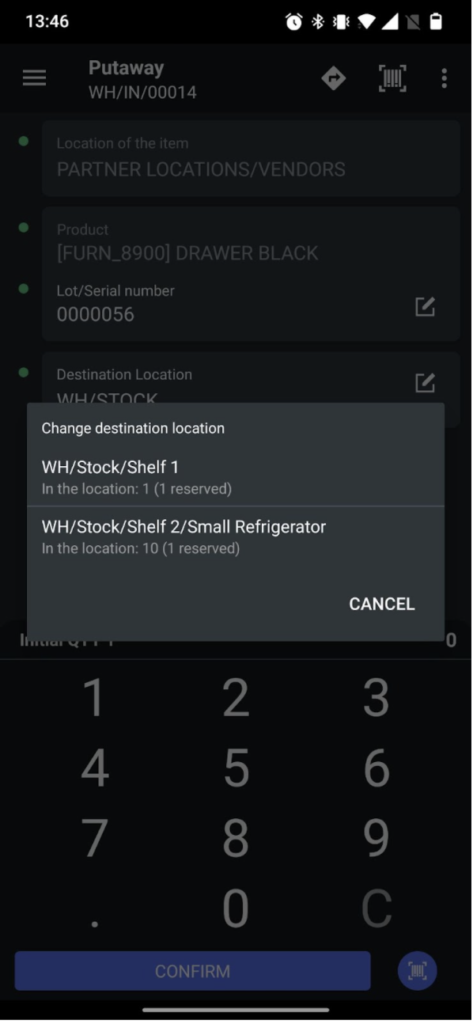
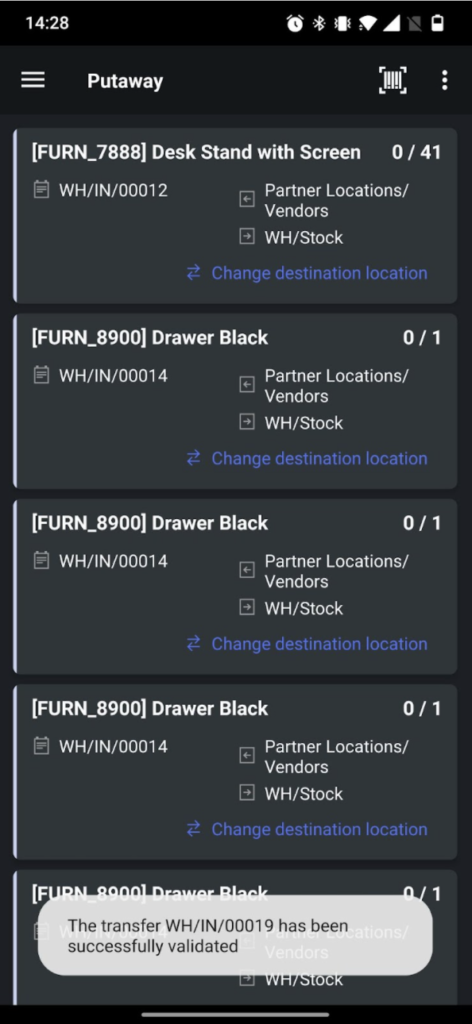
Putaway
After the goods have been taken to the warehouse in the input zone, these goods must be moved to the appropriate storage locations. You can instantly place items from different purchase orders into their permanent storage locations by using the Putaway menu.
The Putaway menu automatically analyzes your settings and shows all products ready for placement depending on these settings:
Receive goods directly (1 step)
Receive goods in input and then stock (2 steps)
Receive goods in input, then quality check and then stock (3 steps)
If a putaway rule has been created for a product, the application will offer to place it there. In addition, the Ventor application will show where else this product is in the warehouse. And besides that, you can still replace recommended places to any available on your own. Note that with the Ventor app, a few users can do putaway at the same time.
Products placement
Take any product from the batch into your hands and scan its barcode.
Get information about all the putaway rules and locations where you can find this product.
A warehouse worker can decide where to place the product based on all the information above.
The worker goes to the desired place in the warehouse, puts this product there, scans the final location of the product, and then enters its quantity.
The placement of the goods is completed, and the distributor returns to the input zone for a new item.
As soon as all items in one document will be moved to shelves, the transfer will be confirmed automatically.
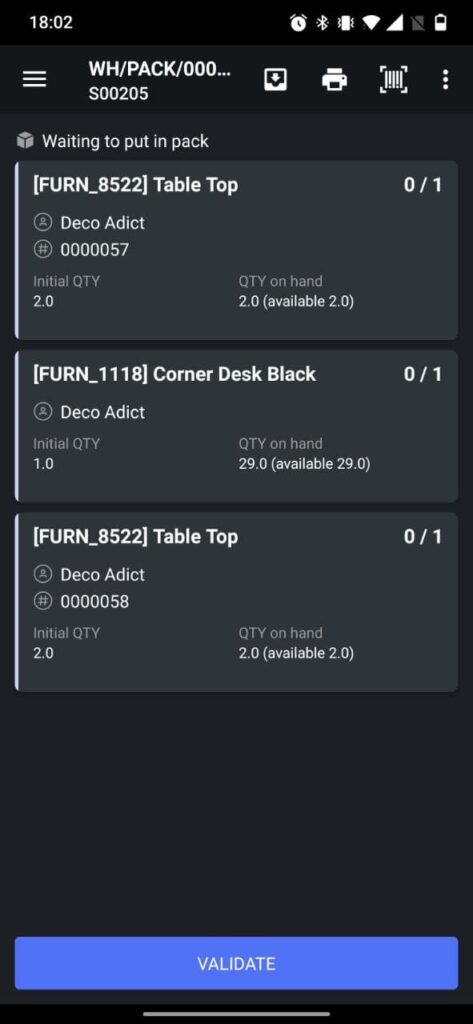
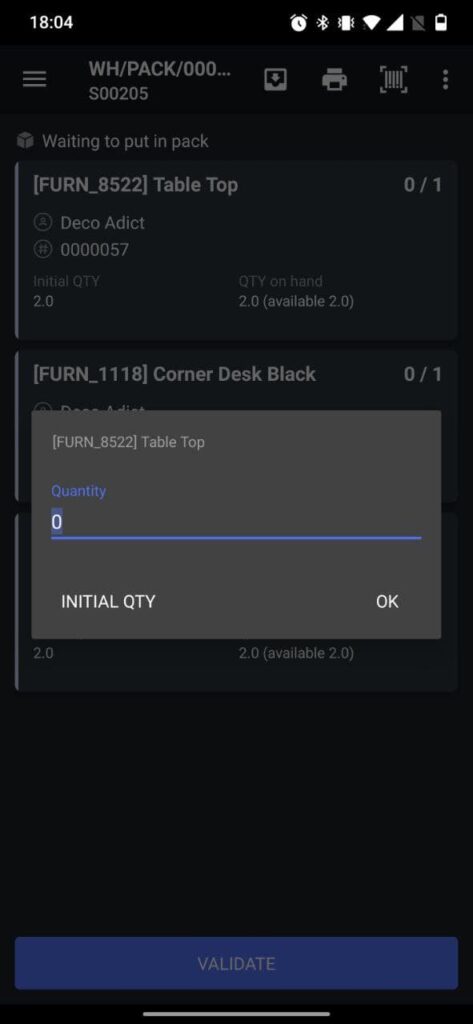
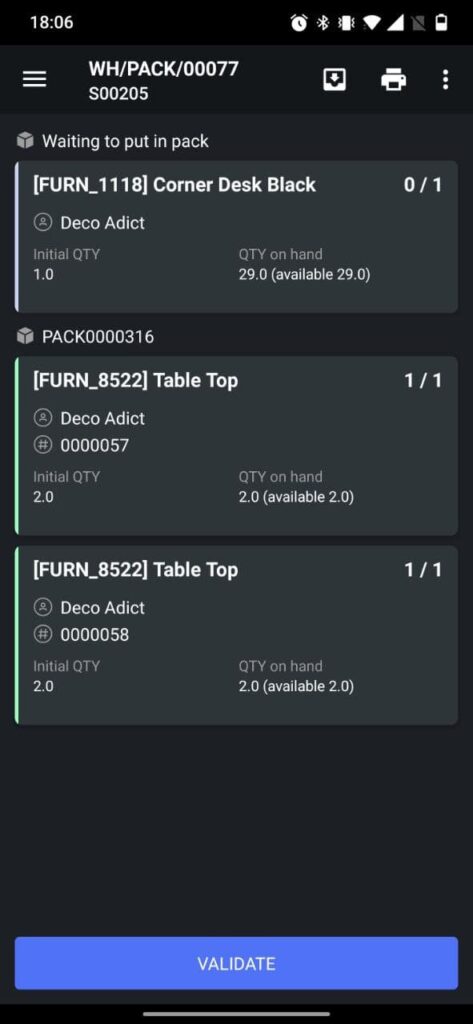
Packing
A dedicated menu for the easiest packing management. Open a needed transfer (stock picking) with items ready to be packed. Scan line by line to confirm QTY and click the “put in pack” button to add a new package. Afterward, you can continue scanning other items.
As soon as a box is full, you can click on the “put in pack” button to generate the next package. The main difference between the warehouse operations menu and packing is that here you can see the whole list of the products that you need to pack. Moreover, you can scan them in any order and generate a package every time if a box becomes full.
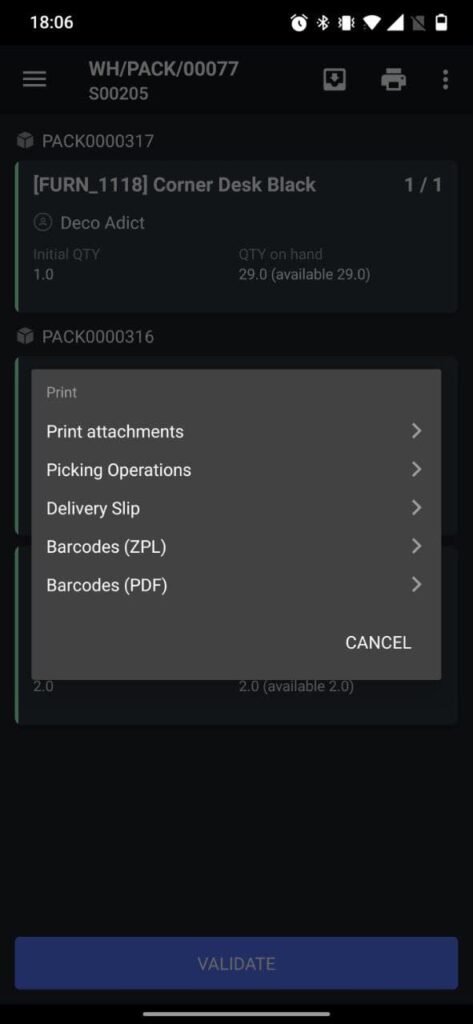
Additionally, you can printall package labels just with one print button. This menu is ideally working for a dedicated packing zone and packing operator. As a result, you make a quality/quantity control of every item and generate a pack at the right time.
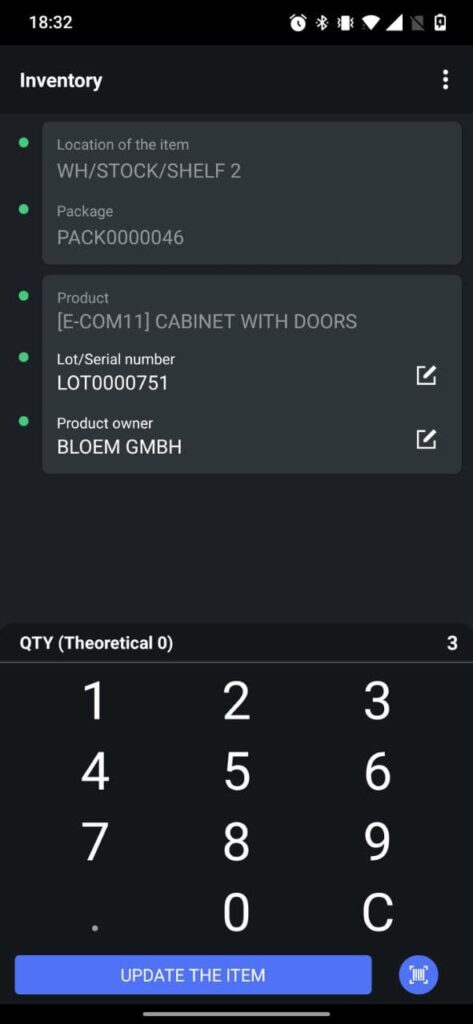
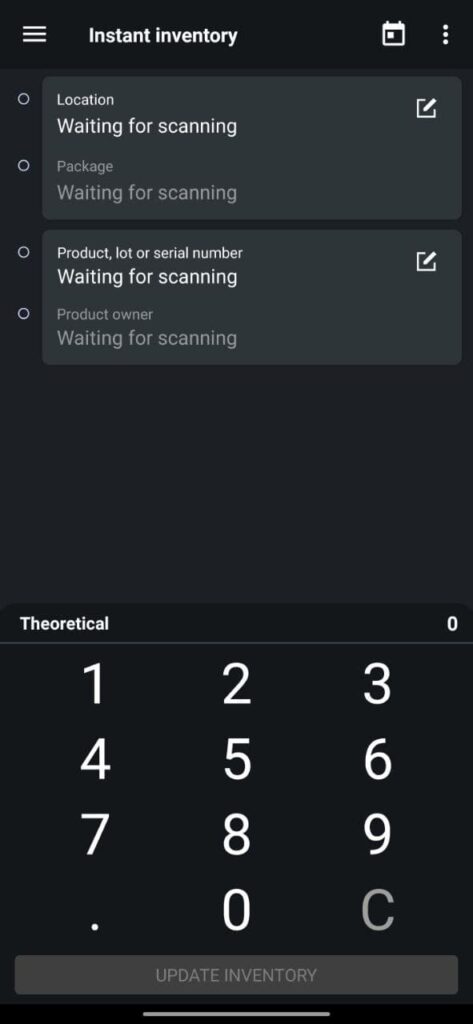
Instant inventory
The menu allows making a quick inventory with one item in one location. This concept is so simple and straightforward that many companies use this menu as the only one for their regular inventories instead of performing inventory adjustments.
Scan the location and the item to immediately update QTY on hand. Don’t forget to specify the lot/serial number or package/ownership (consignments) if you have any of them for the given product. Check additional settings (3 dots at the top right corner) to manage packages or consignments or if you want to activate additional features.
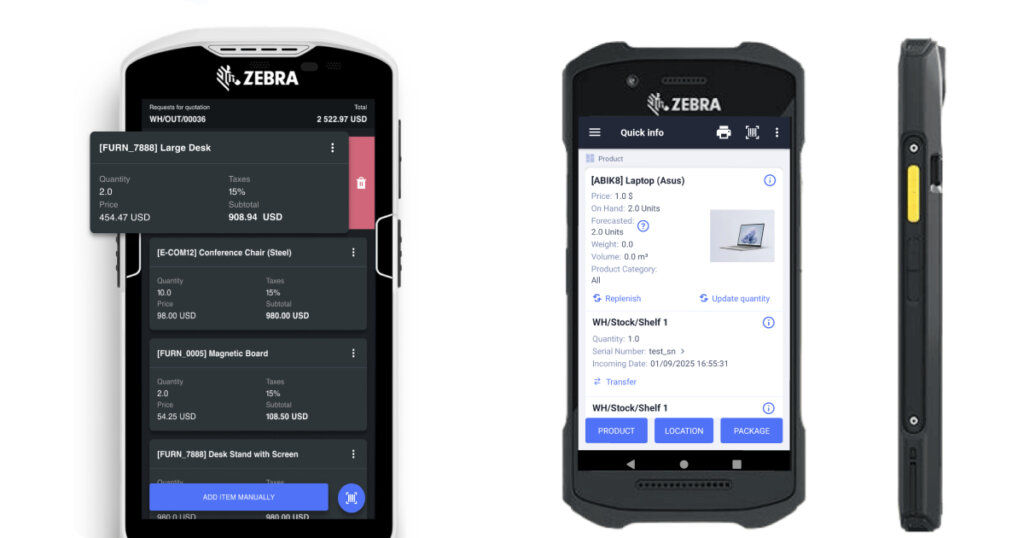
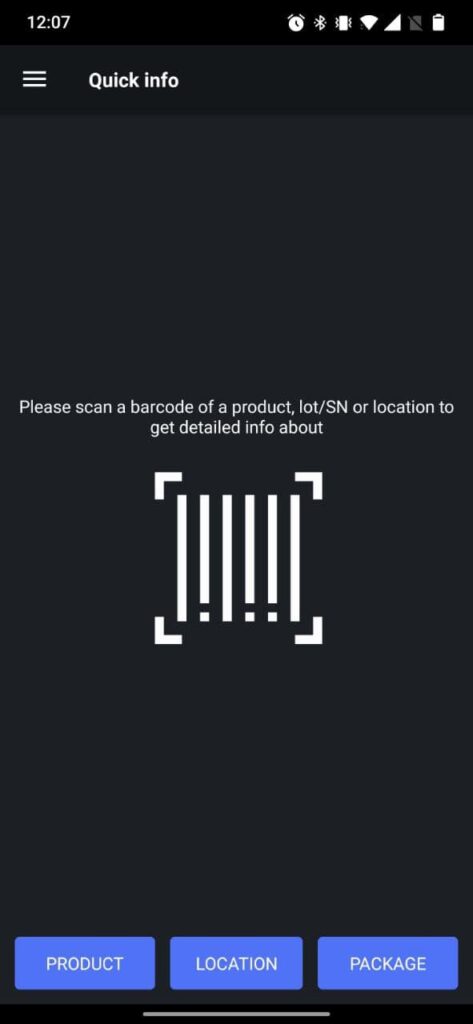
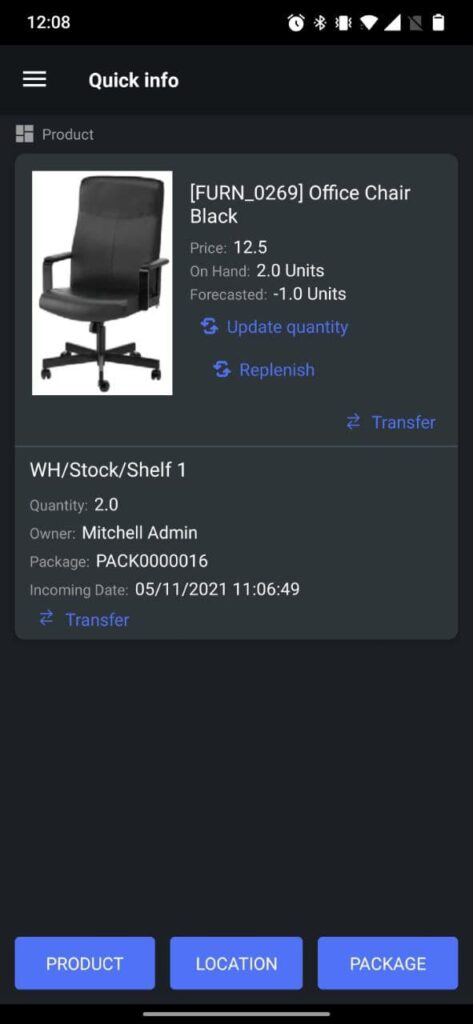
How to quickly check product info in Odoo using a barcode scanner?
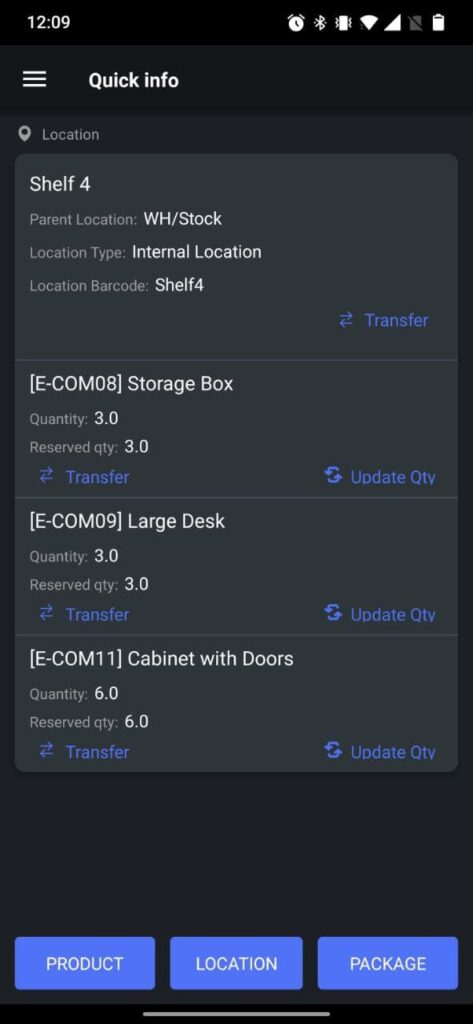
The Info menu can show you all information about products and their lot/serial numbers, locations, and packages. Scan a product (location, package, product owner, etc.) barcode to get comprehensive details about this product or its location.
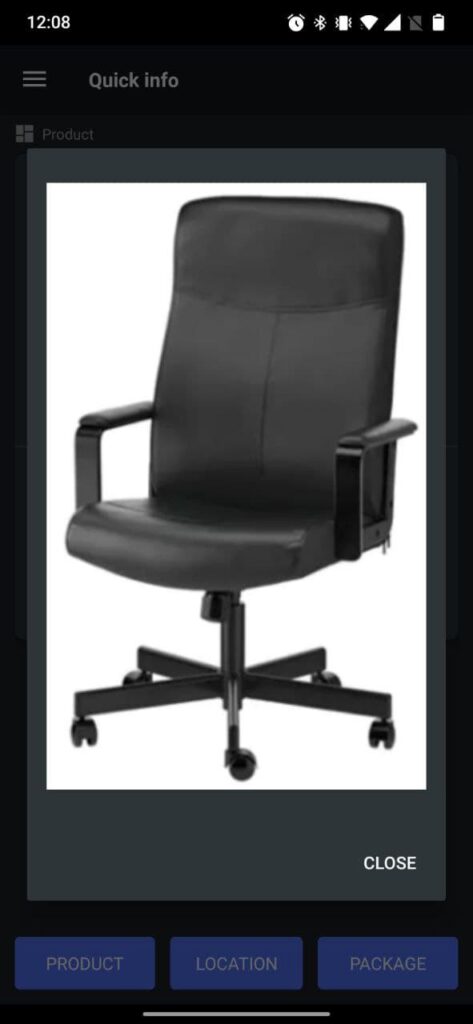
Clicking on the image will make the picture bigger and might be helpful for pickers.
You also can update the QTY of the product by using the “Update Quantity” button or make a product replenishment with the “Replenish” button. Clicking on the “Transfer” button will move you to the “Internal transfer” menu to move the product even quicker.
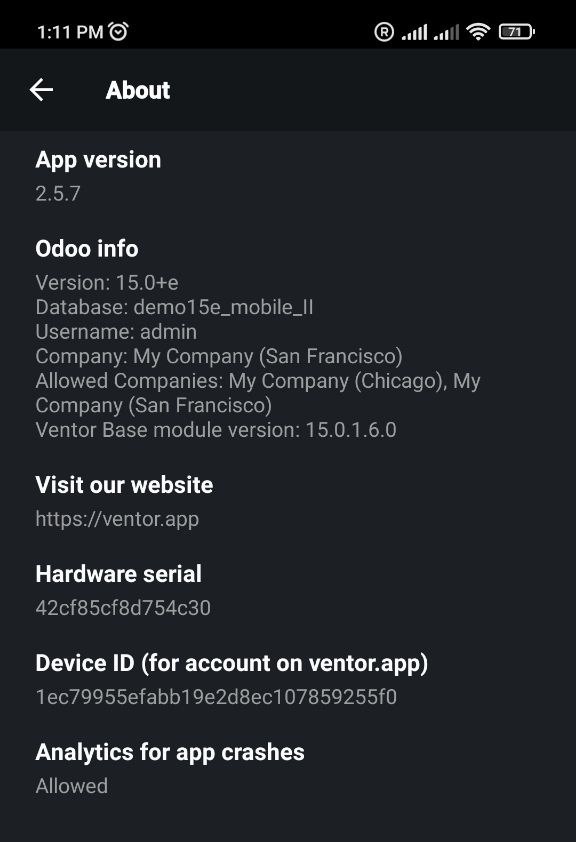
About
In the About menu you can check the app version, Odoo version, database name, user, company and other info.
If you have questions, please feel free to ask them in the comments section below.
For the last five years, Ventor mobile app has been a number one inventory companion to the Odoo ERP system. Each working day, more than a thousand customers around the world use our application for receiving and picking goods, inventory control, and warehouse management. We continually collect feedback about the app and release new features and updates every month.
This is the first in a series of articles about the app and its features. Today we will talk about the application’s interface, main elements, navigation, and functions. We will also show you how to install and configure the application. Let’s get started!
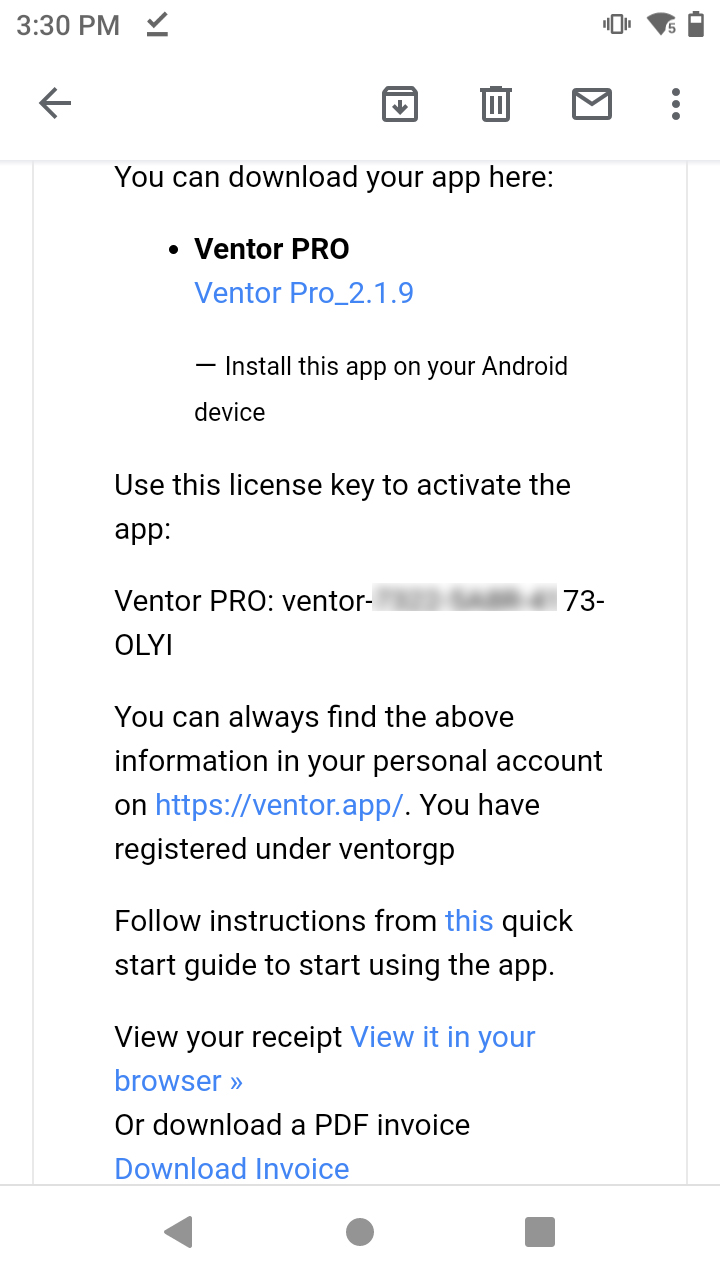
Installing and activating
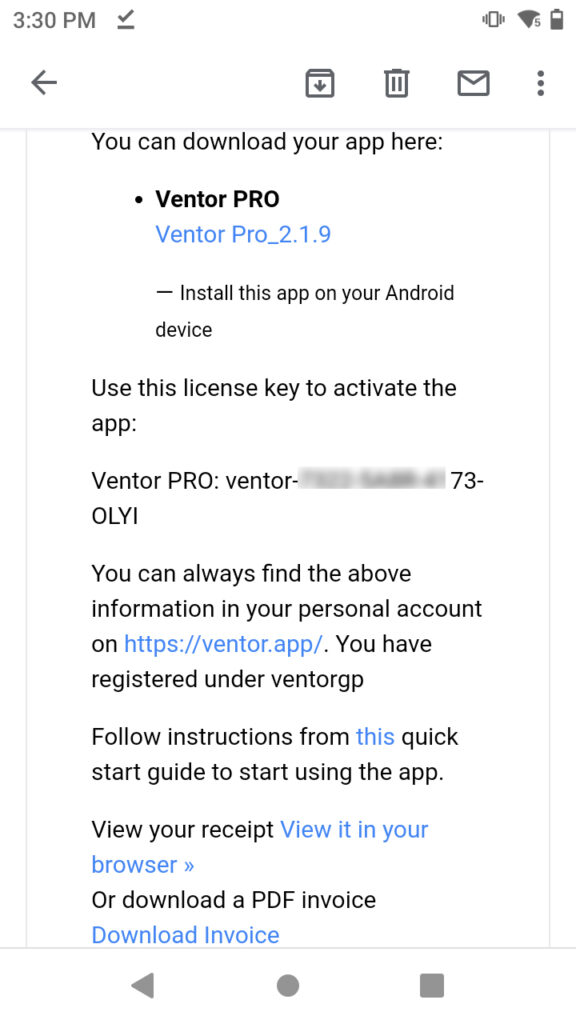
After you have purchased the application, you will receive an email with a key that must be entered into the application. The application itself (installation file) can be downloaded from the link in the same letter or from your account on the ventor.app website.
Note that you can buy the app from the official site or Google Play. There are no functional differences. However, you cannot customize the Google Play version, and you will not get access to license management to activate or deactivate devices remotely for your employees.
So, if you don’t need customizations and you work in a small family business, then go ahead with the Google Play version. You can use the app on up to three devices under the same Google account. However, if you need new features or you have employees, you need to buy the PRO version from our website, not from Google Play.
Download the APK file (installation file) to your handheld device or phone. Alternatively, download the file to your PC/Mac and then move the file to a handheld device connected wirelessly (or by using Bluetooth). Simply open the file using any file manager and install it. Allow installing the app from other resources.
All future updates will be installed automatically with an internet connection. Run the application.
Ventor App will ask you to enter the key immediately on first opening it. You can find the key in your account on ventor.app or in the email you received after purchase. We provide a 14-day trial period for your first purchase (subscription).
You can control your licenses in your account on the ventor.app website.
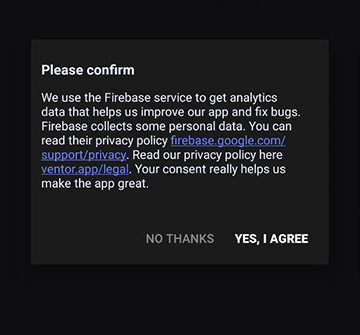
We recommend you also confirm data collection during installation. It helps us improve the app and fix bugs.
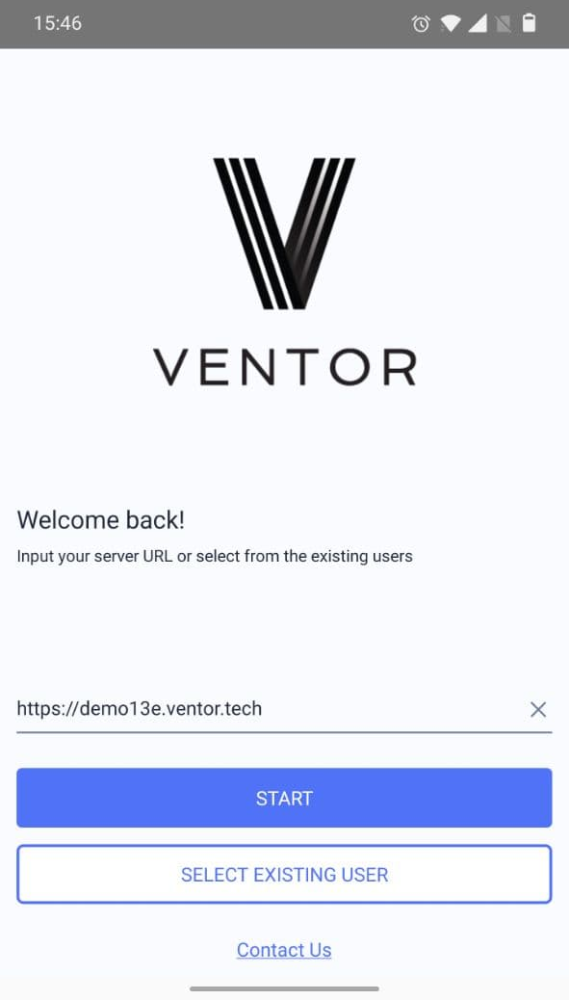
How to connect to your Odoo instance
Open the app and insert your Odoo URL like this: erp.companyname.com. Note that you should have a valid SSL certificate to have a protected connection. Otherwise, the app warns you of an error message or simply doesn’t allow you to connect to the instance. Next, you will need to insert your user login (or email) and password, the same way as you need to log in using your web browser. Note that if you have multiple Odoo databases, you have to choose one needed from the list of databases.
After first login, you can then login by scanning barcode from your Odoo badge ID (need to install Odoo attendances app)
Main menu, navigation, design
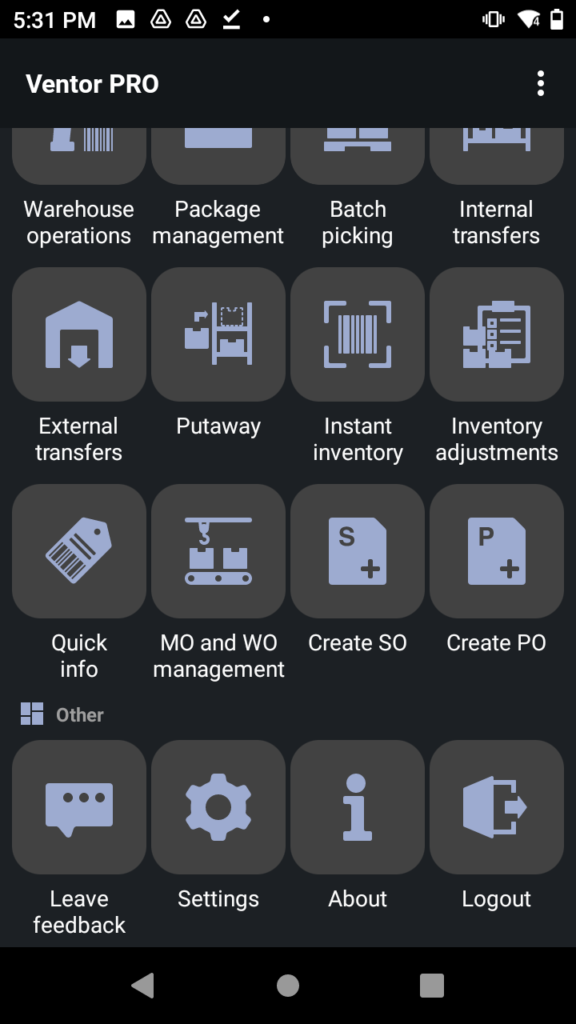
After login, you will see the main menu. It contains different menus (apps), and each of them is responsible for a dedicated business case:
Warehouse operation
Manage incoming shipments, pick, pack, and deliver orders. The main menu manages all transfers at different warehouses and zones.
Package management
Package management for orders in the dedicated packing zone. Useful for packers who checked items after picking, and then the items are packed at the packing zone.
Batch / Cluster picking
Pick multiple orders at once (batch picking) or sort them out in boxes placed on a cart (cluster picking) in an optimal route. Pickings can be created on the Odoo side and assigned to pickers.
Internal transfers
Move items or entire packages, from a shelf to another shelf inside your warehouse in a couple of scans.
External transfer
Move items into or out of a warehouse without the creation of sales or purchase orders.
Instant inventory
Update quantity on hand for an item at one given location.
Inventory adjustments
Planned inventory for all locations and products, or a combination of both.
Quick info
Get quick info about product, location and package, lot or S/N simply by scanning its barcode.
Create sales order
Only available if the user has appropriate access rights in Odoo (Settings > User > Access rights > Sales)
Create a purchase order
Create requests for quotations by scanning items. Only available if a user has has appropriate access rights in Odoo (Settings > User > Access rights > Purchase)
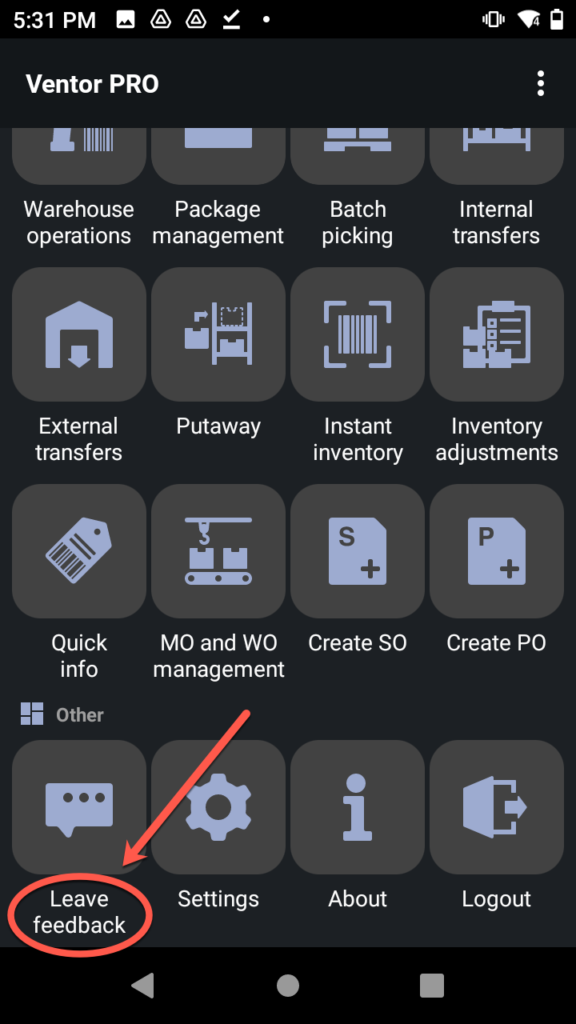
Leave feedback
Send us a bug report or request a new feature. We will fix it ASAP or add it to a backlog to implement in future releases.
Click on any of the menus above to read more detailed instructions. You will be able to check them as soon as we publish them one by one. There you will also find all frequently asked questions.
Ventor settings
There are two main groups of settings in the app:
General settings are available on the main menu.
Individual settings within the menu: individually for every sub-menu (individual settings are available inside the different menus).
The general settings are divided into different categories, as follows:
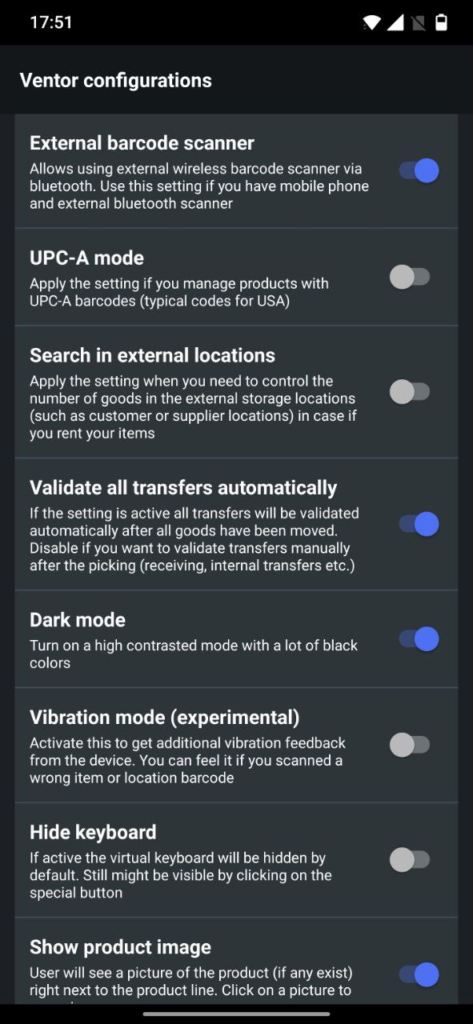
Ventor configurations
Settings have detailed explanations; check them out to set them up properly for your warehouse. Note that these settings are general for the app, and they will apply to the whole operations types and sub-menus.
Data collection
You can enable or disable data collection. We do not share or otherwise disseminate any personal data. The app only collects issues and cases when the app crashes or freezes. All this just helps us to fix problems faster than you think about reporting them.
Update management
Turn on or turn off auto-updates. The app gets new features and fixes every month. Some customers want to update only one device at a time to test it first before a massive release for all devices and users.
License manager
Apply for a license or unlink a device from the key. The menu is only available for the PRO version. So if you bought the app from the Google Play Store, you can use it only for personal usage (one person or a family company). For the rest, please use the PRO version and control connected devices on the site.
Password management
You can ask to insert a password to log in with all the time. By default, users have the possibility to easily log in with a saved user profile.
Advanced Ventor configurations
Simply redirects you to all Odoo apps developed by the VentorTech team for Odoo ERP or Odoo Inventory. Check it out, and you will find a lot of free and paid useful apps for Odoo.
Individual settings are related to specific menus. You can always find them inside all menus. We will discuss them in detail in appropriately related articles. Just do not forget that you can configure and manage your Odoo Inventory app or internal transfers even with more customizable settings.
Fill in a contact form on our website support.ventor.tech
Principles of the support:
Customers get support and feature requests in first
Cosmetics fixes are planned for one time per month
Bottlenecks and big issues with the app are resolved within 24 hours
If you have troubles with the app, please record a video to show the issue. Issues with a video get support priority and usually get resolved faster
If something doesn’t work with the app (e.g., you can’t validate a transfer or get error messages while trying to make internal transfers), please make sure that you have no the same issues on the Odoo side. In most cases, such issues are related to the server-side and not to the Ventor app.
If you have questions, please feel free to ask them in the comments section below.