Make Odoo inventory quickly and accurately using Ventor app

In this article we are going to show you how to do an instant inventory of any product in your Odoo warehouse. This article will be useful if you need to do an initial inventory, cycle count or just update any product on the go.

Also, we recorded a video, and you can watch it on our YouTube channel:

https://youtu.be/YOCLABGWA5I

Table of contents:

Case 1: Initial Odoo Inventory

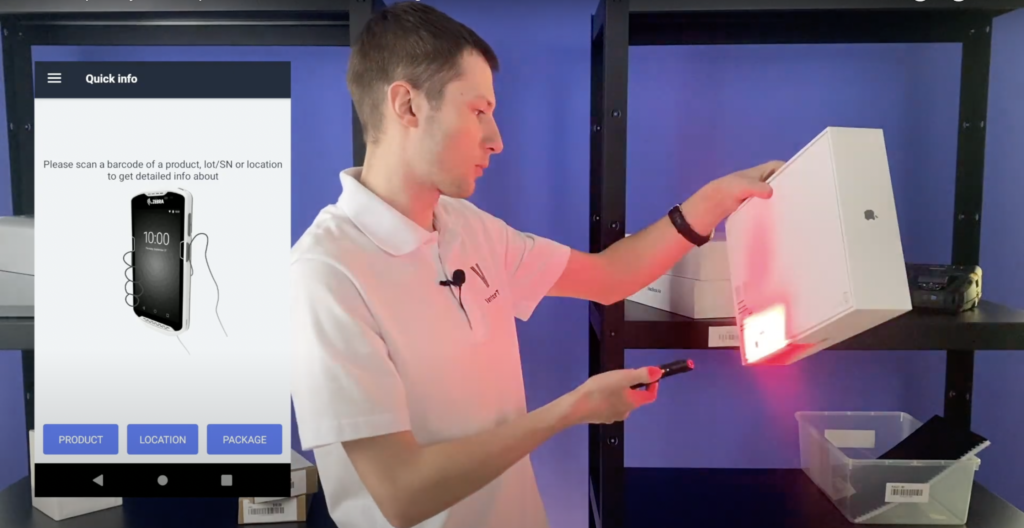
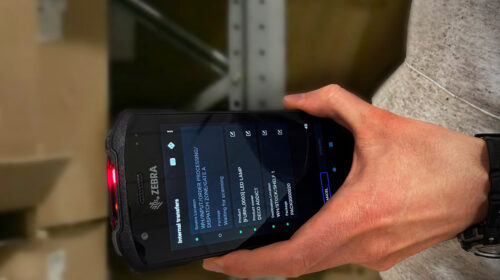
Imagine that we have an empty warehouse in our Odoo inventory, for example we’ve just started our business or have a fresh Odoo installation. Goods are on the shelves, but not in the system yet. Let’s check it. We scan any item.

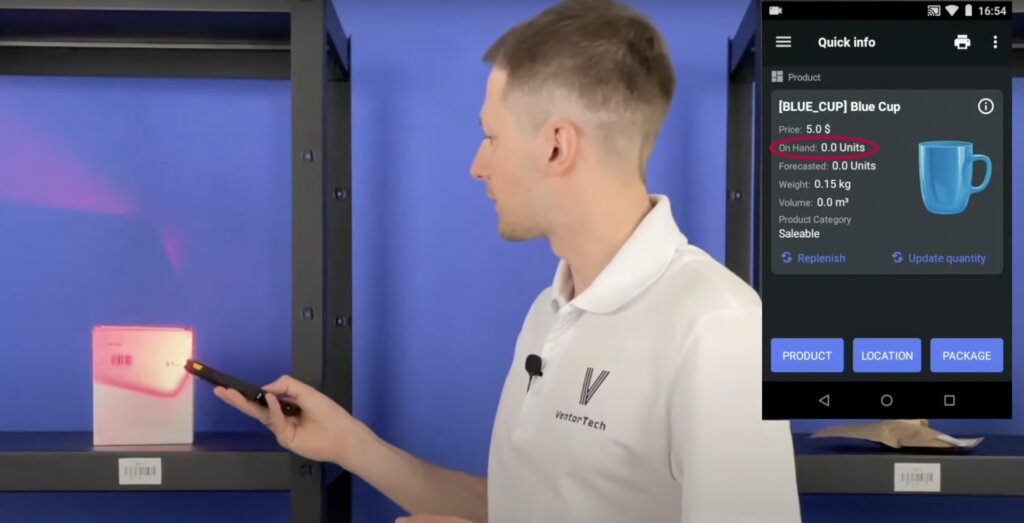
We see the quantity on hand is zero.

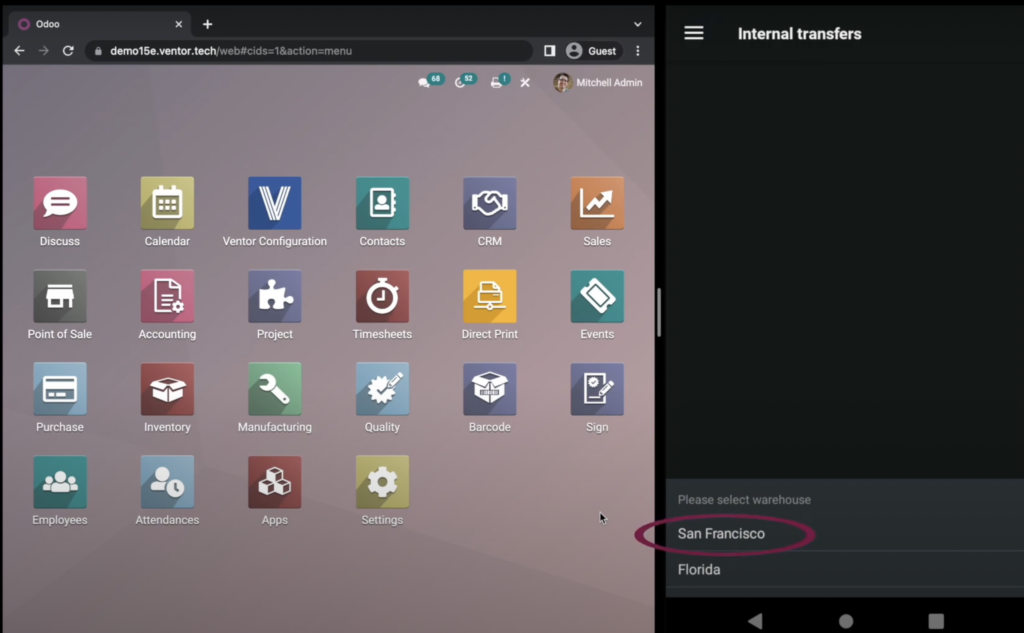
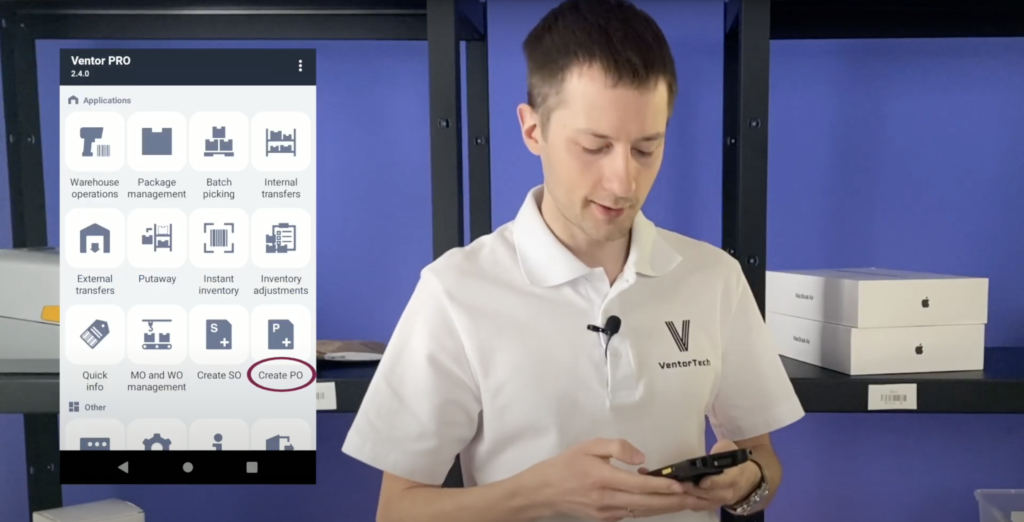
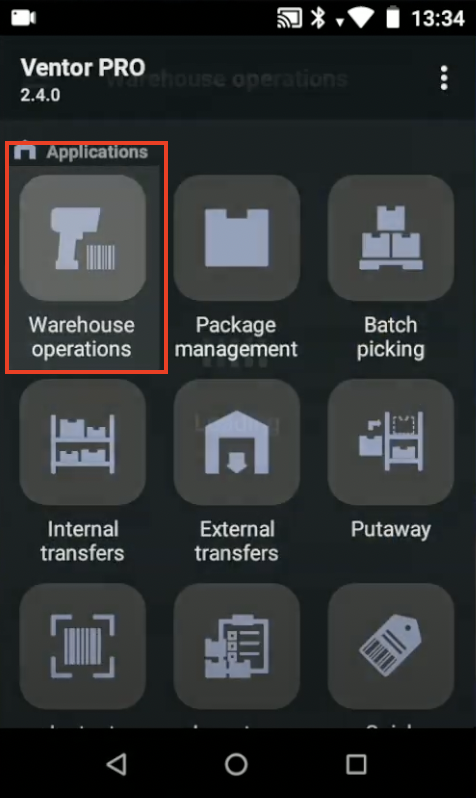
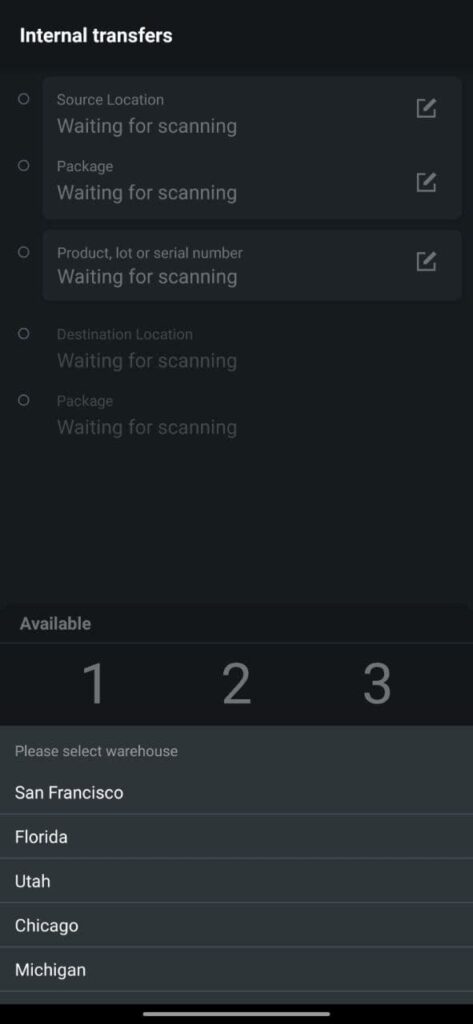
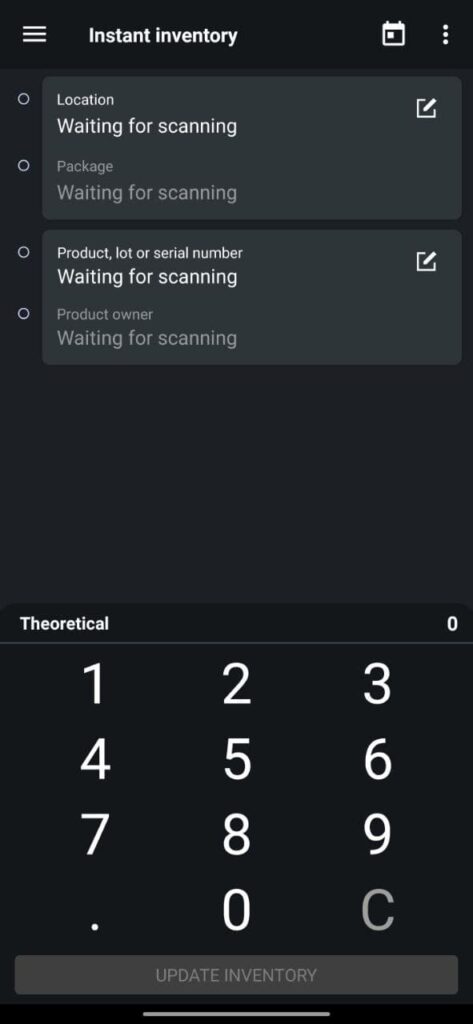
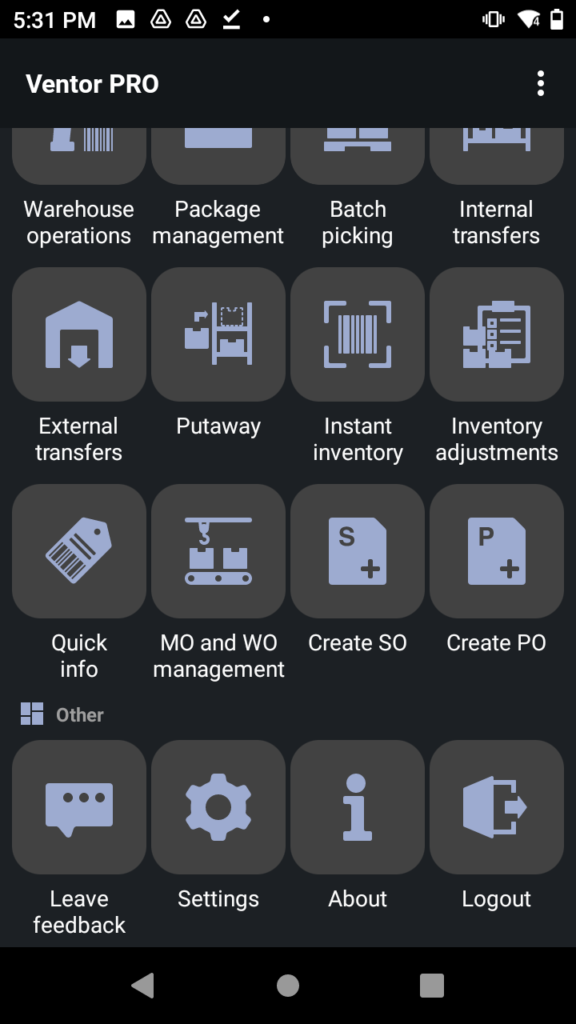
Now let’s add everything to the system. For this let’s open Ventor application and ‘Instant inventory’ menu.

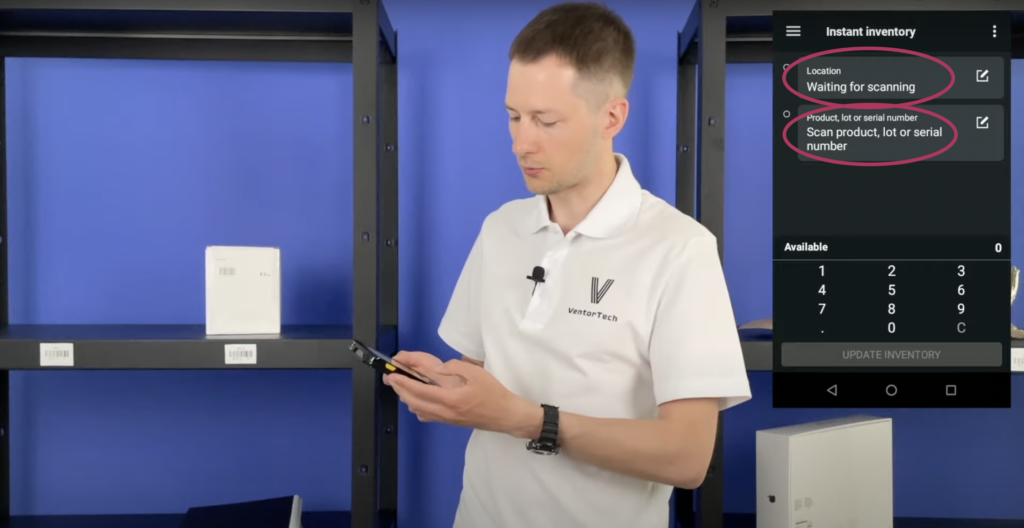
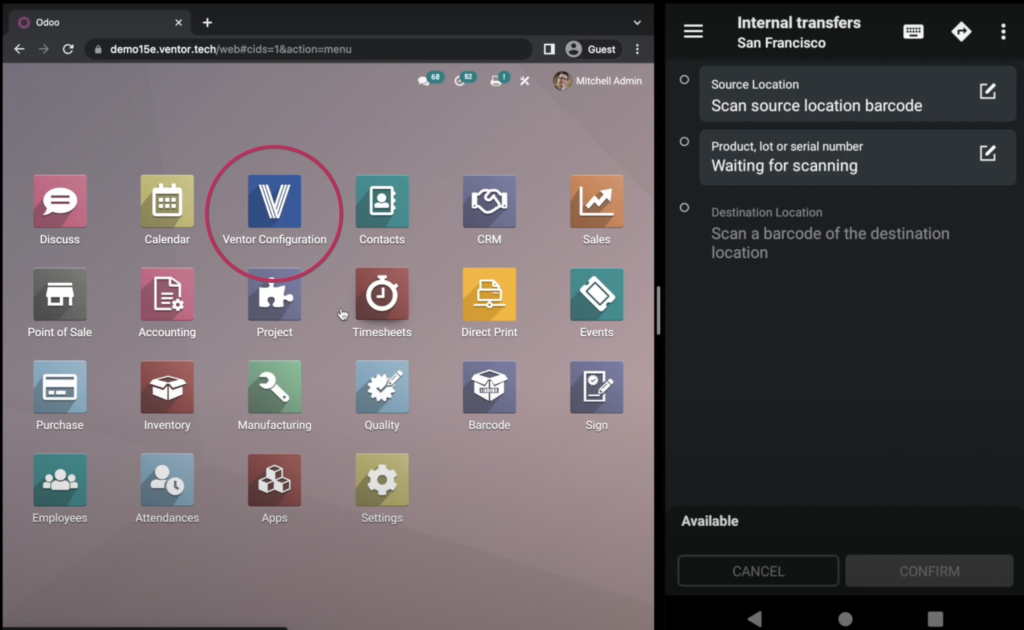
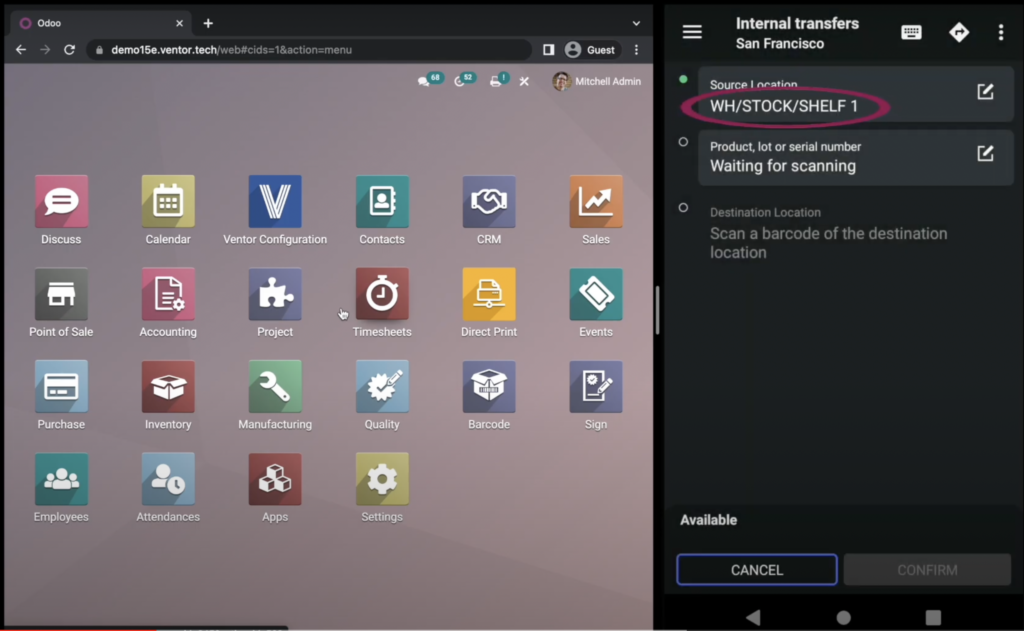
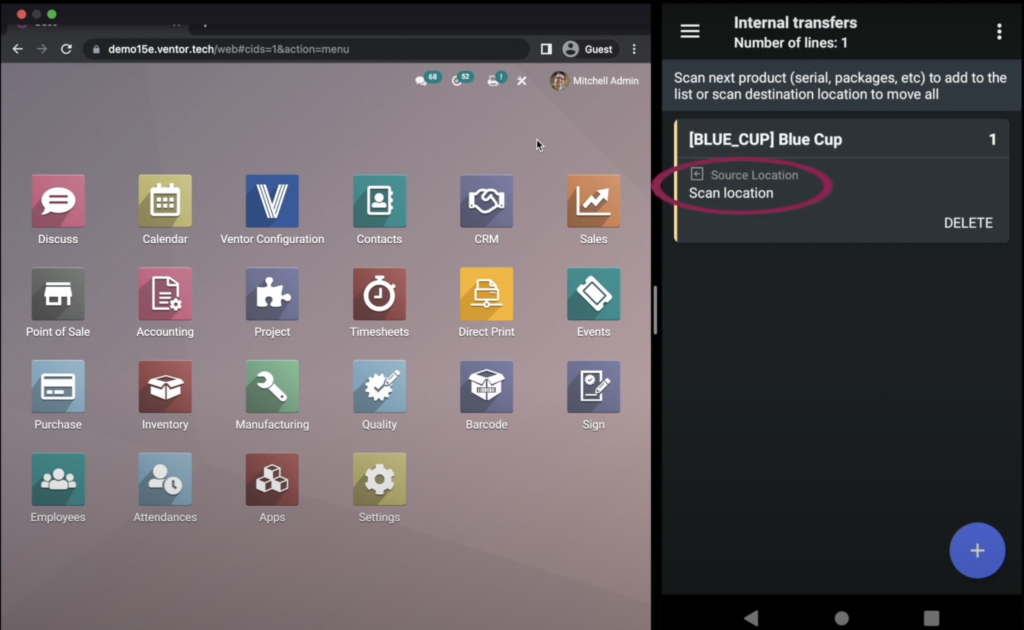
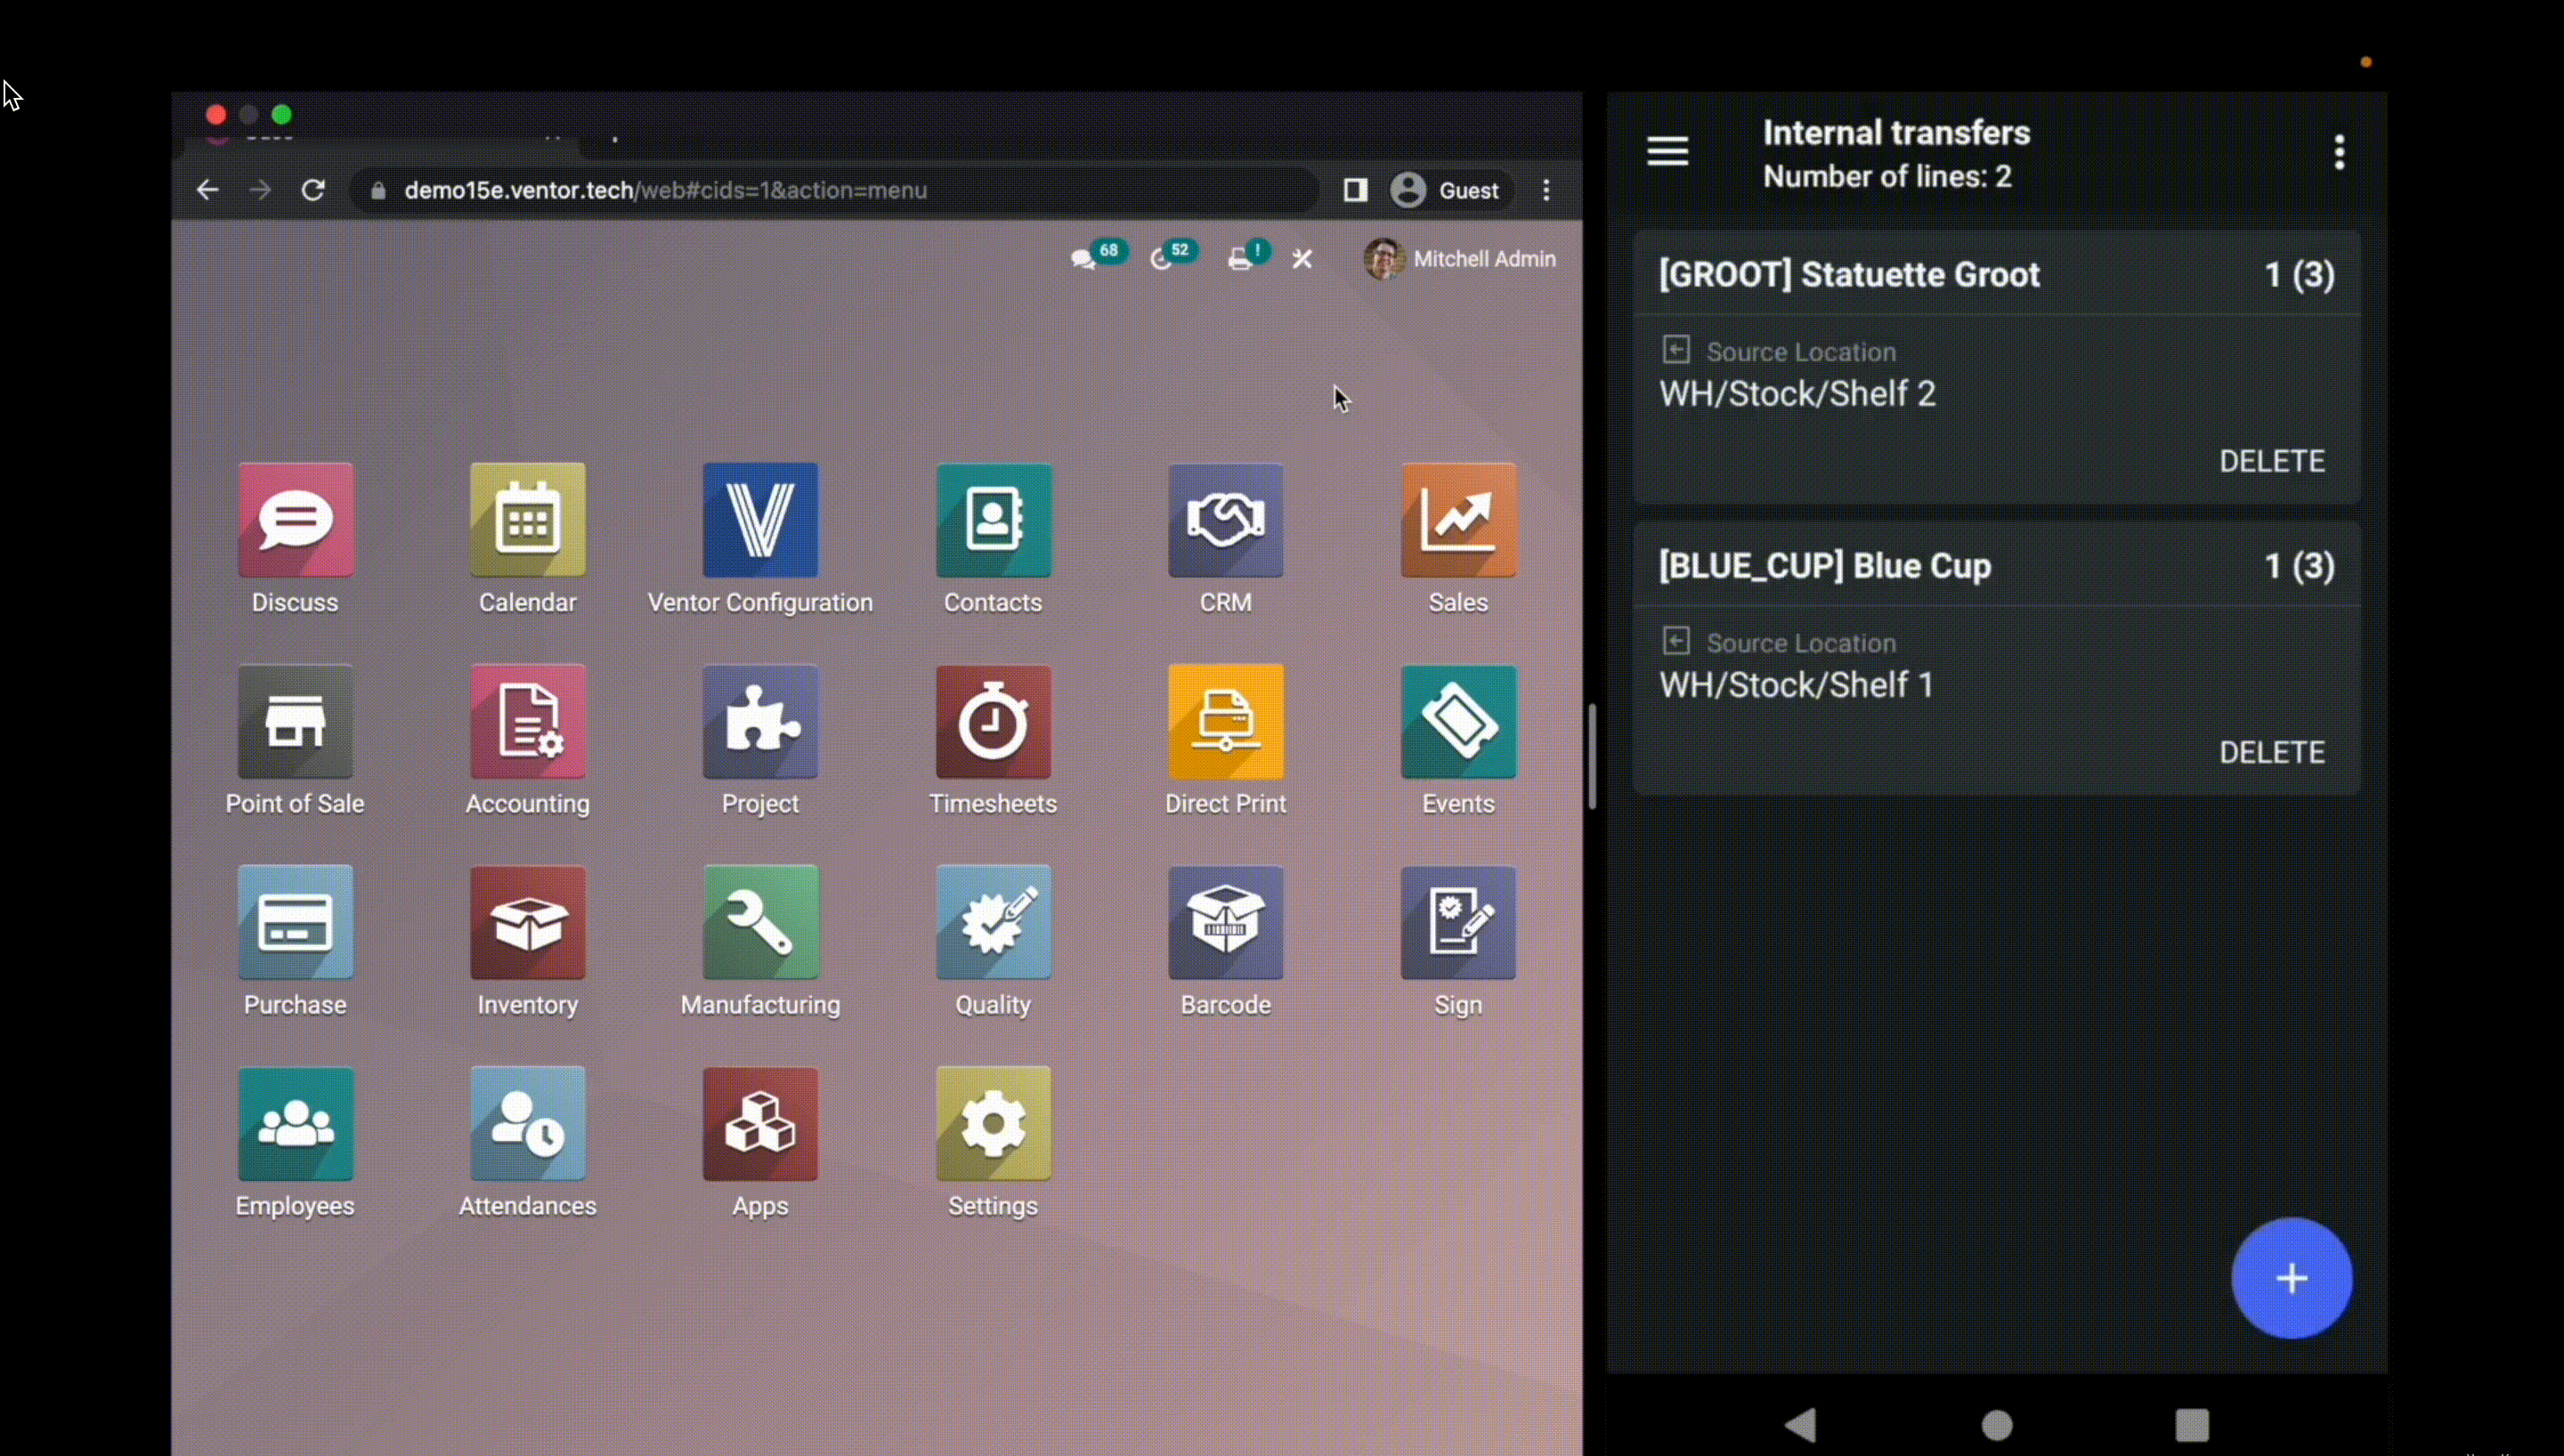
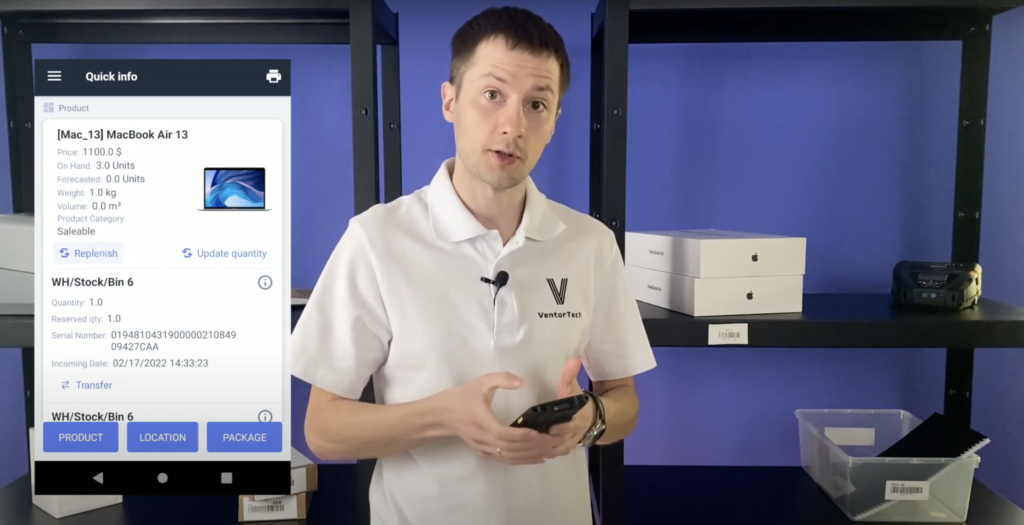
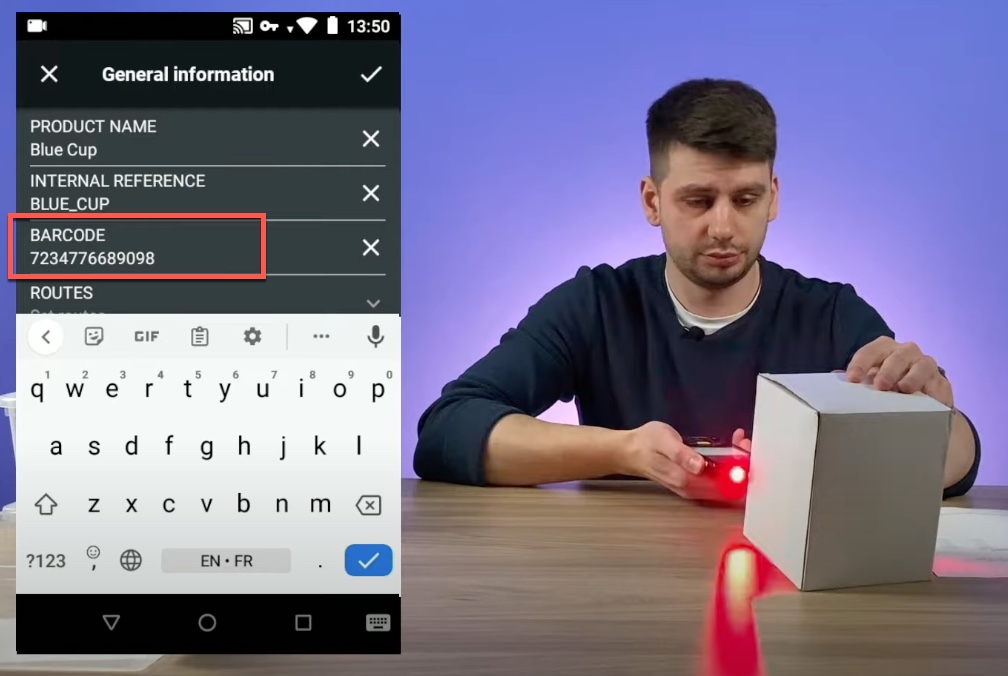
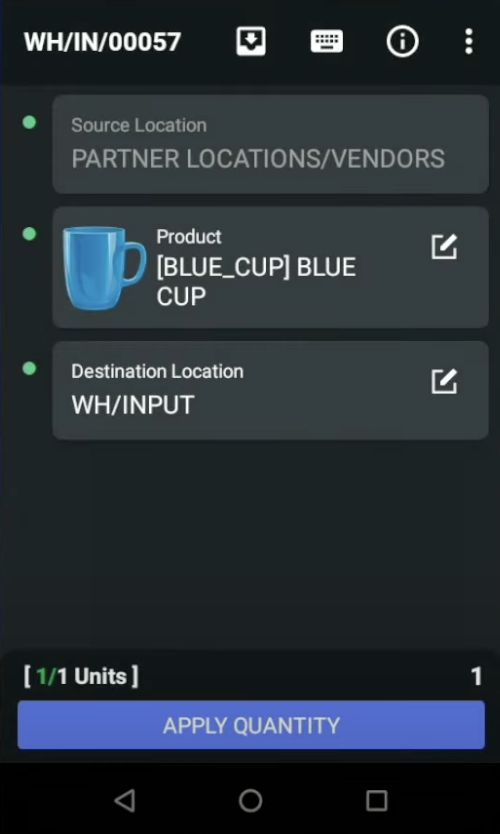
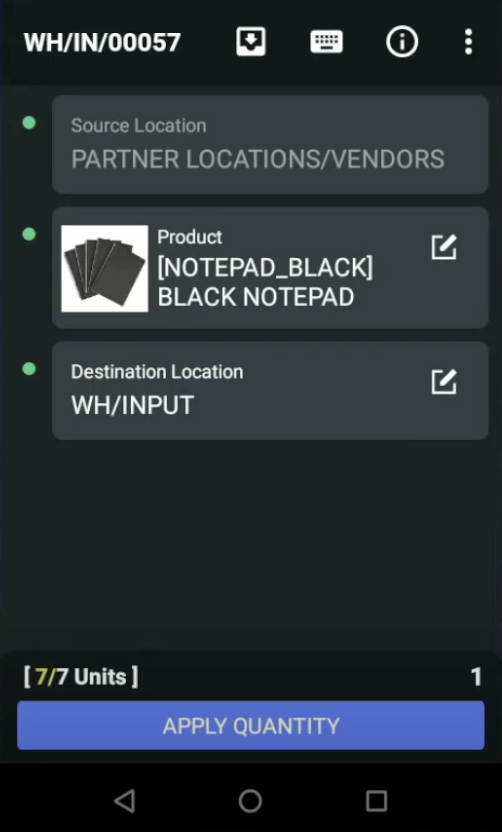
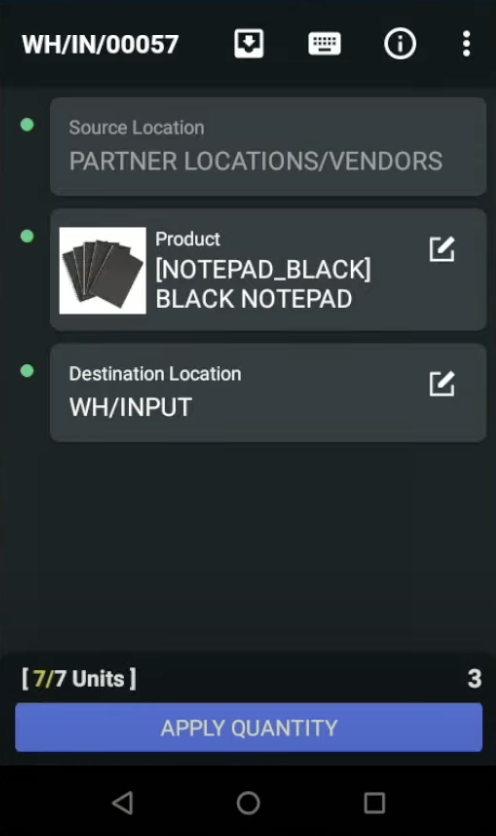
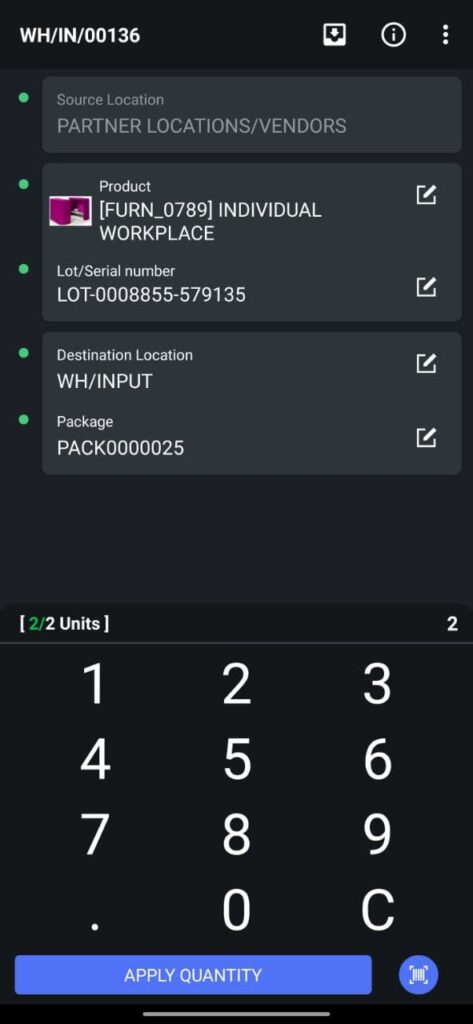
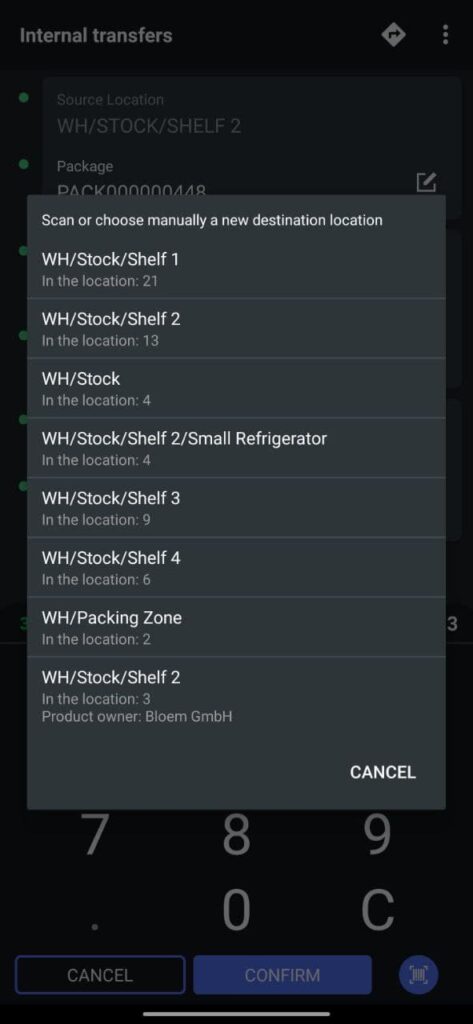
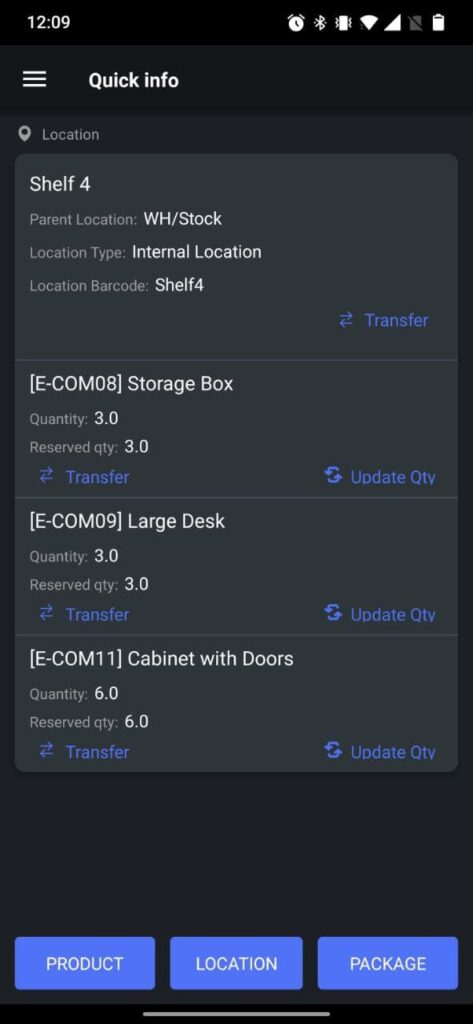
We see 2 lines – ‘Location’ and ‘Product’. Let’s scan the barcode of the product and barcode of the shelf.

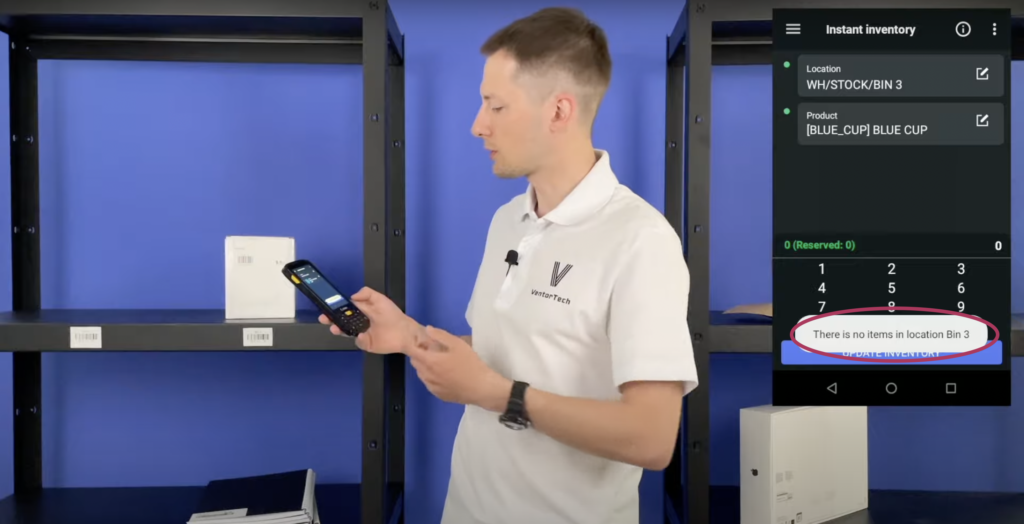
We see a warning, that there is no items in this location, it’s correct because we haven’t added it yet. Let’s add it.

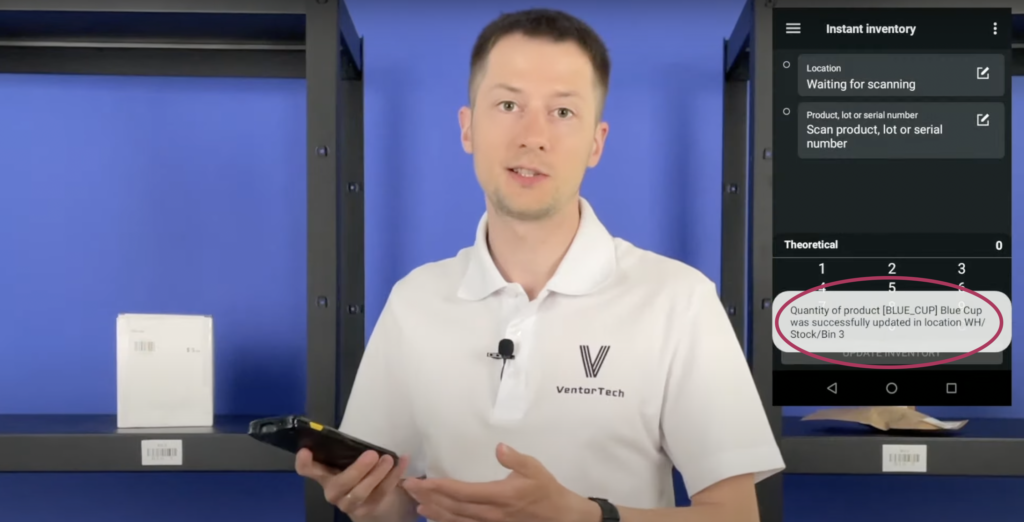
Enter quantity one and apply. After that update inventory. And now you can add other products in our warehouse.

Try Ventor for FREE

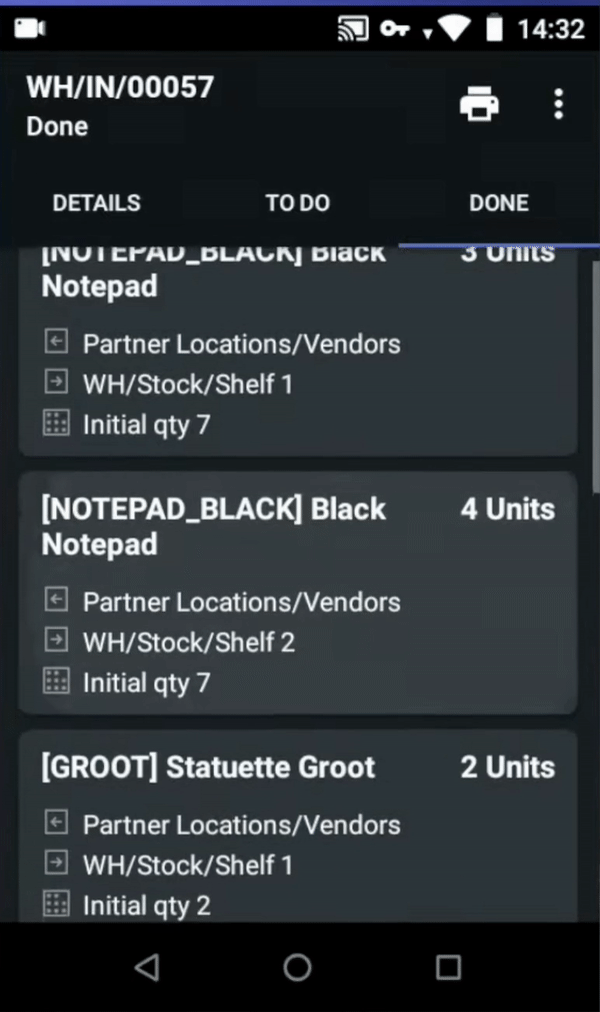
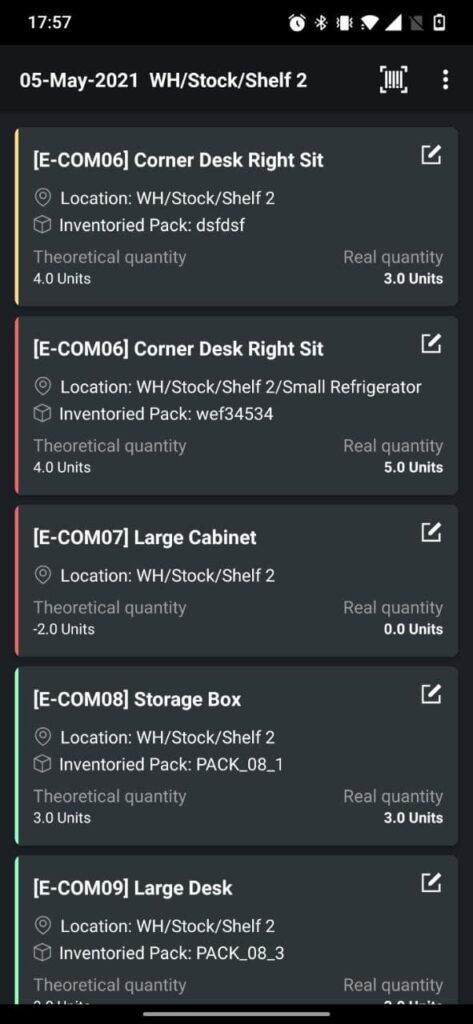
Case 2: Cycle count and Update qty on the go

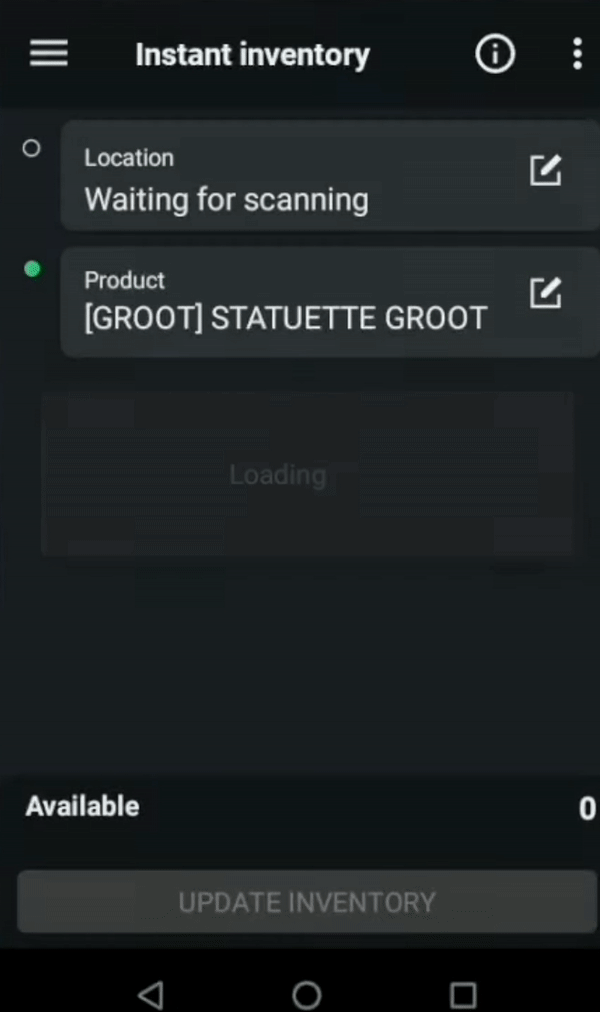
Let’t imagine, you are a warehouse worker. Sometimes warehouse manager just walk into warehouse and checking shelves randomly and if you find difference , you can easily update stock in a few seconds.

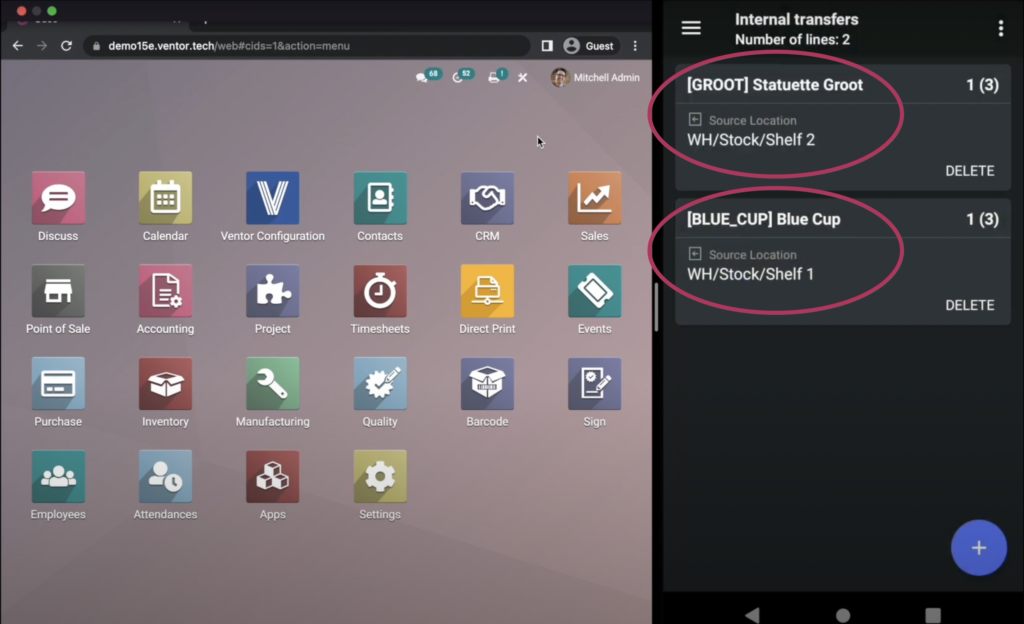
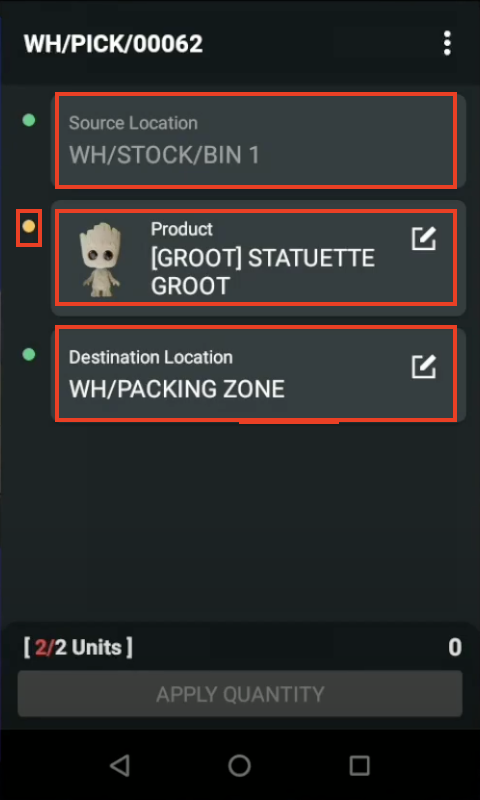
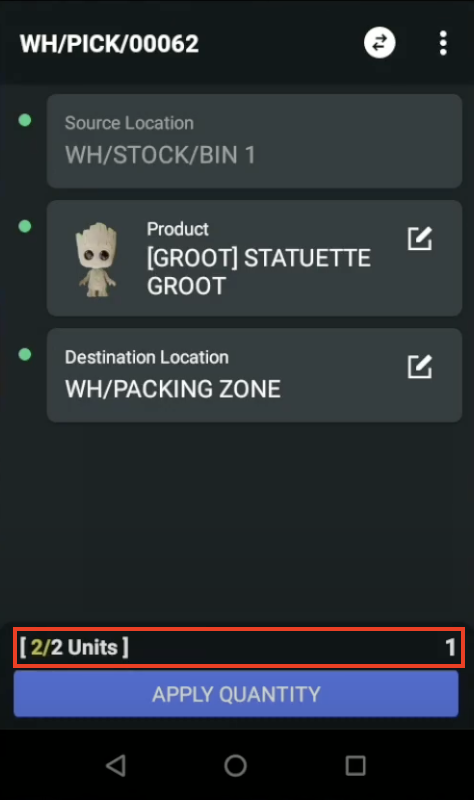
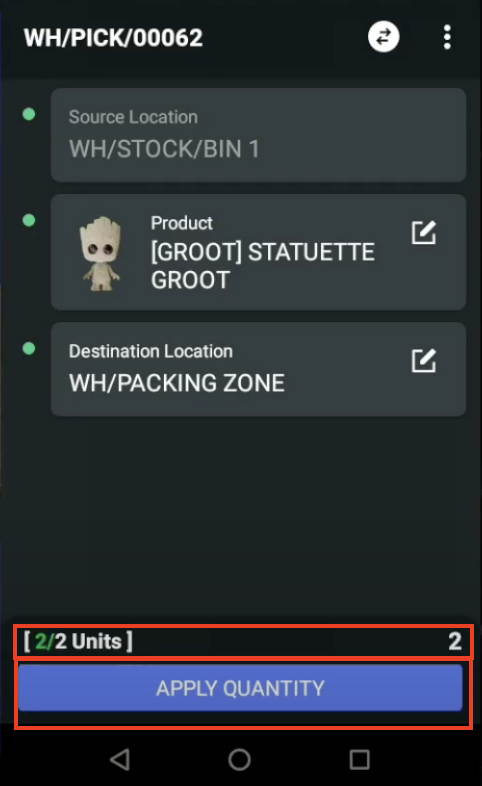
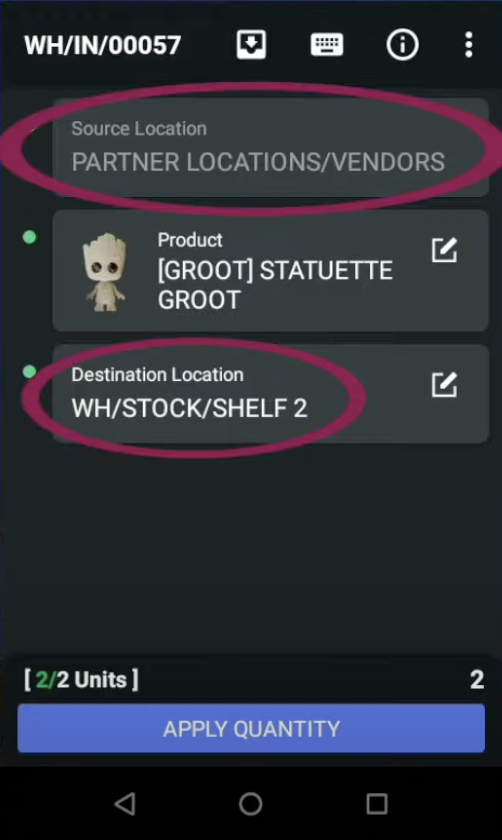
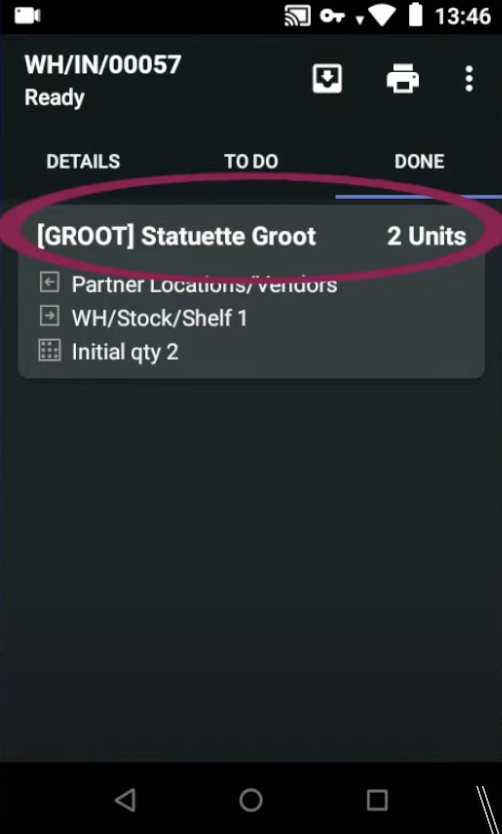
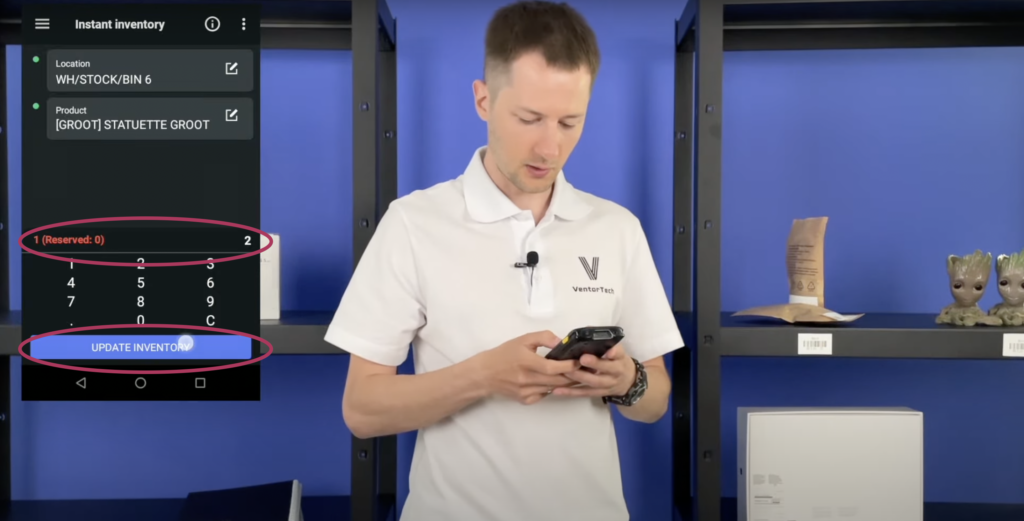
Let’s say you want to check first shelf. Scan it.

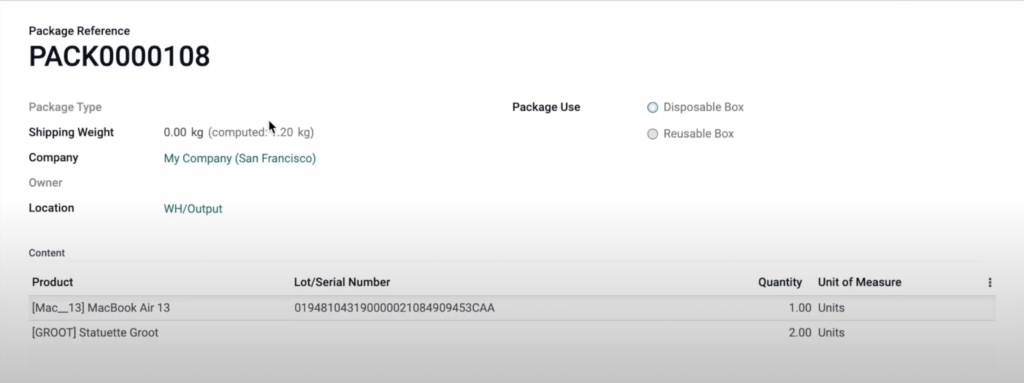
You see that should be only one Statuette Groot but it’s two. Sometimes it happens in the warehouse.

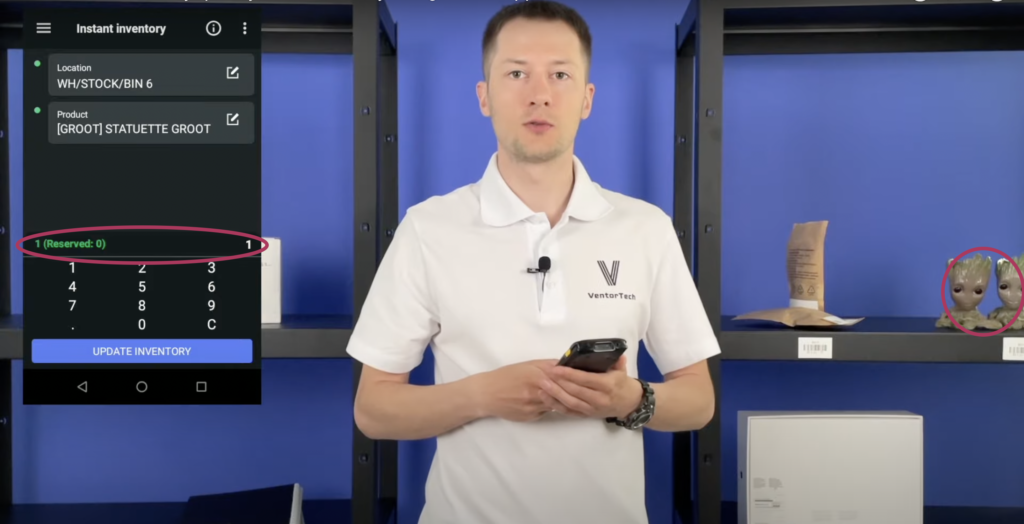
Let’s just update inventory to keep our stock up to date.

This option is also useful if you set cycle count for some location or product. Your workers can go to needed location once a day or once a week and easily update or confirm inventory.

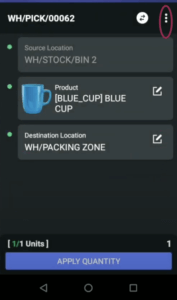
Case 3: Update Odoo inventory while doing other warehouse operations

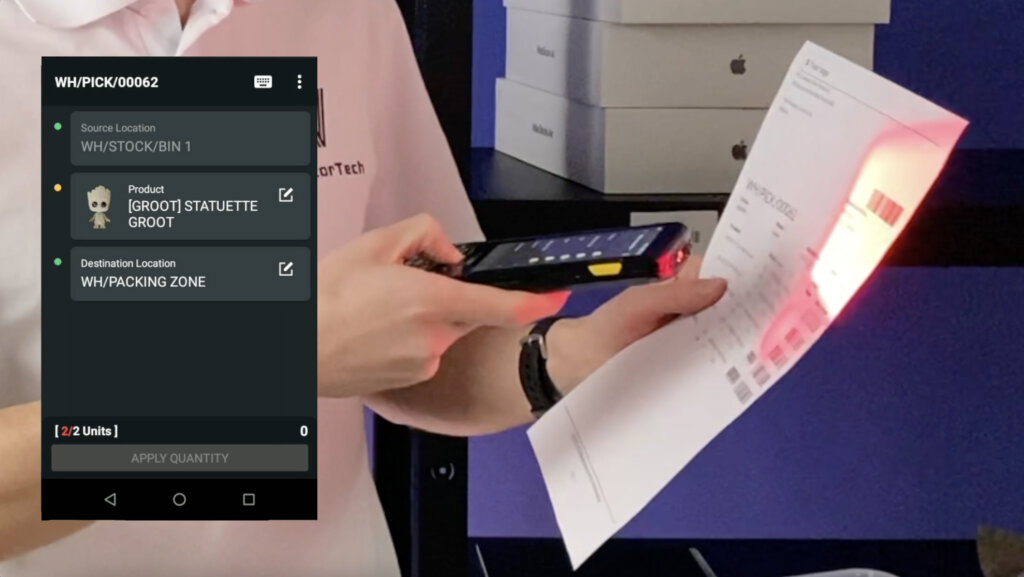
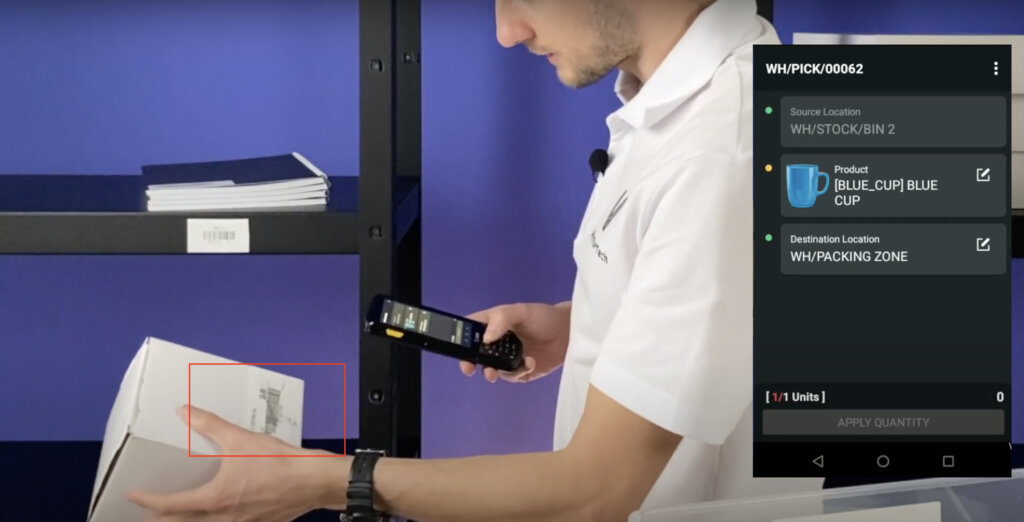
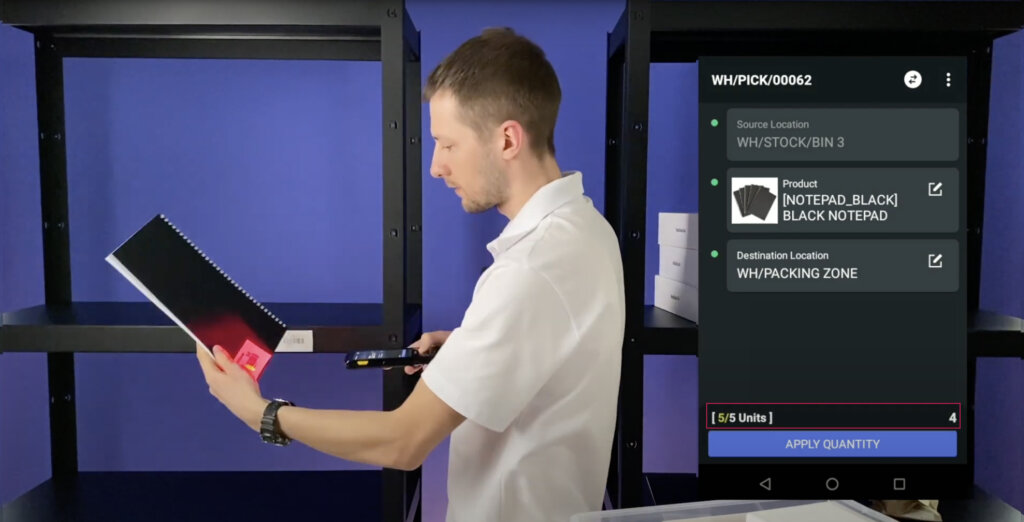
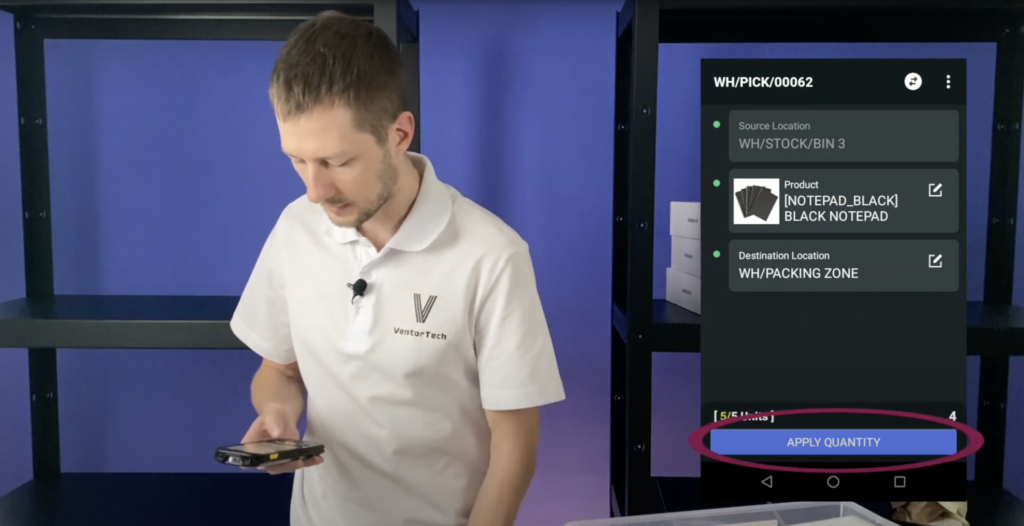
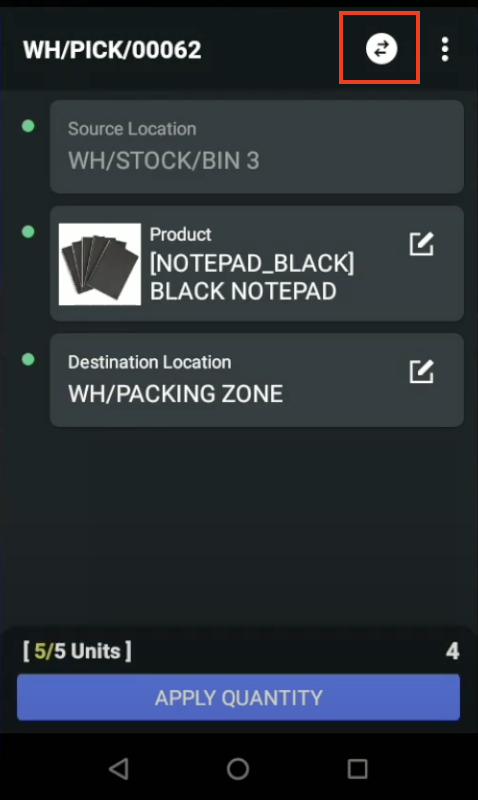
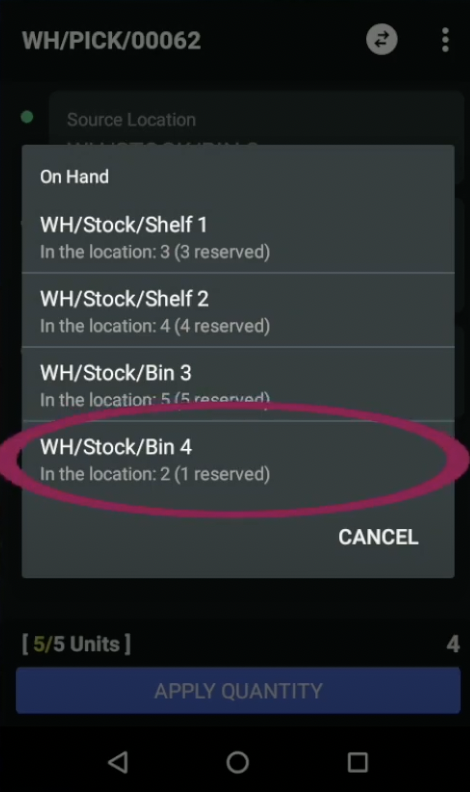
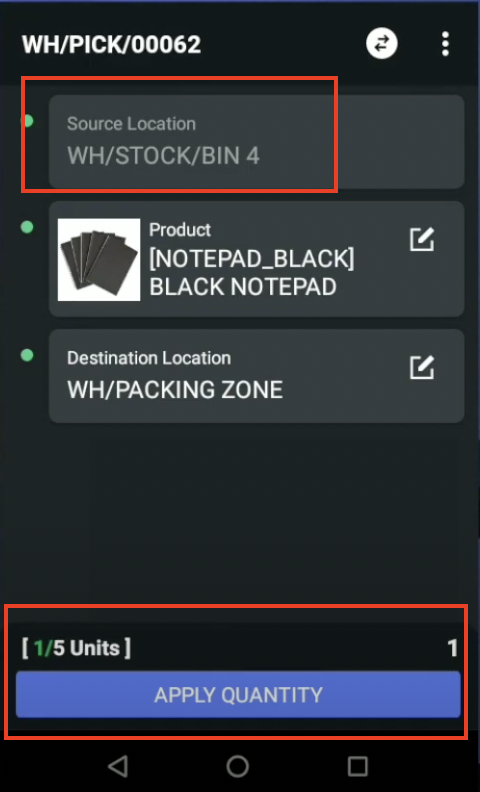
It often happens that pickers can’t find needed products on related shelf, while doing picking .

Related article: How to pick orders in Odoo efficiently ?

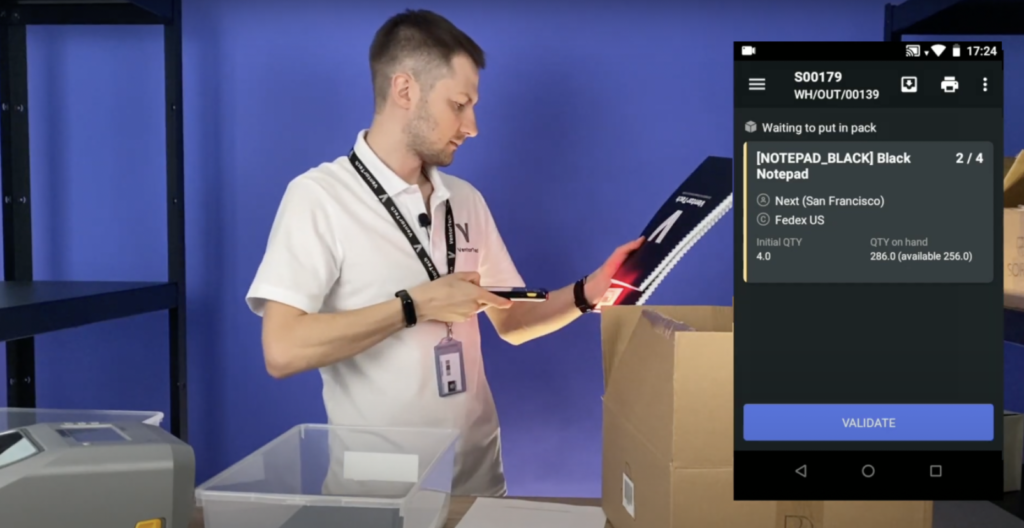
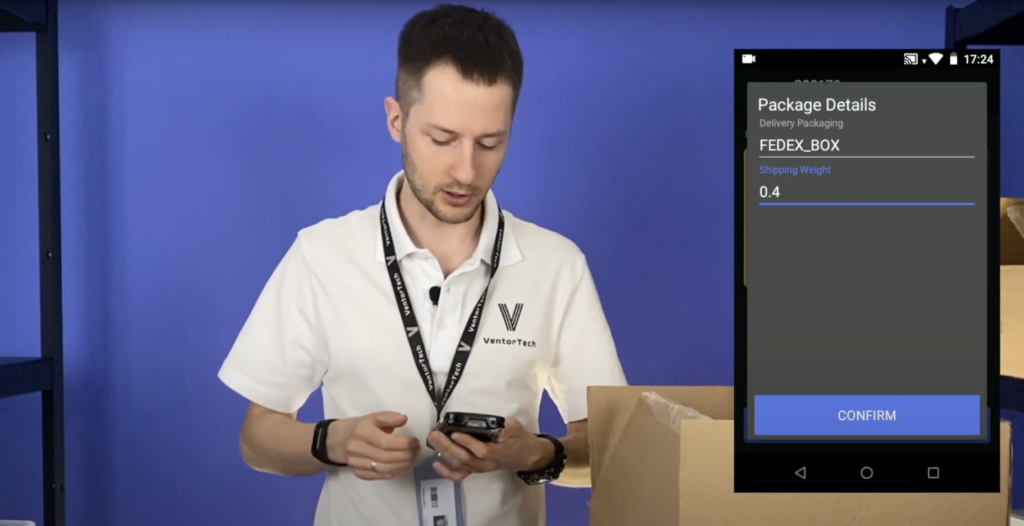
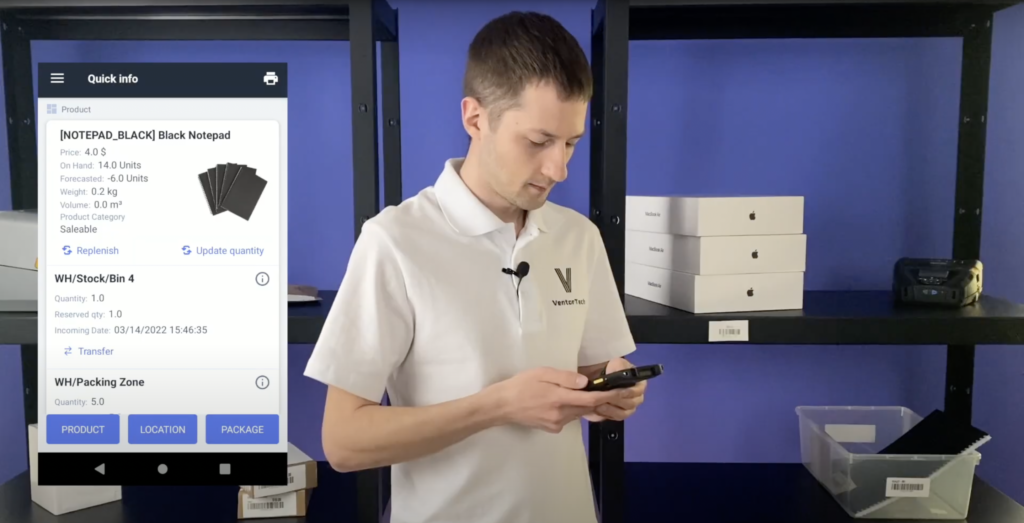
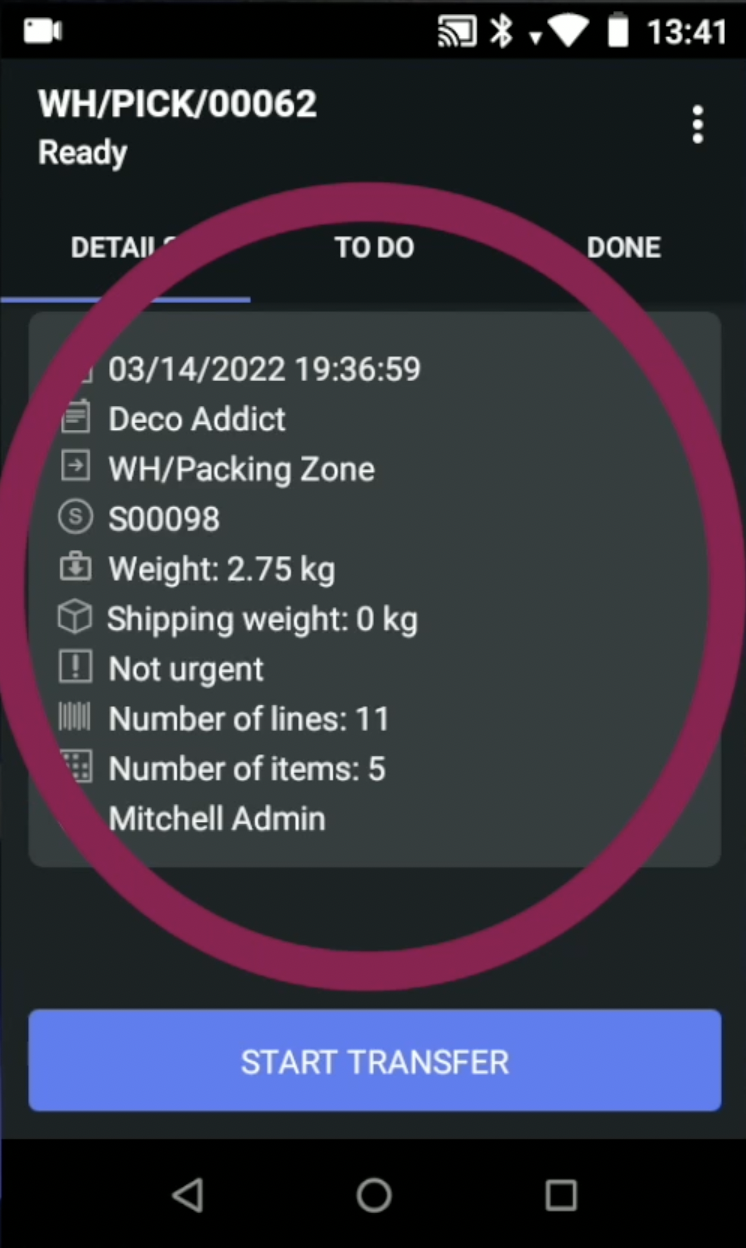
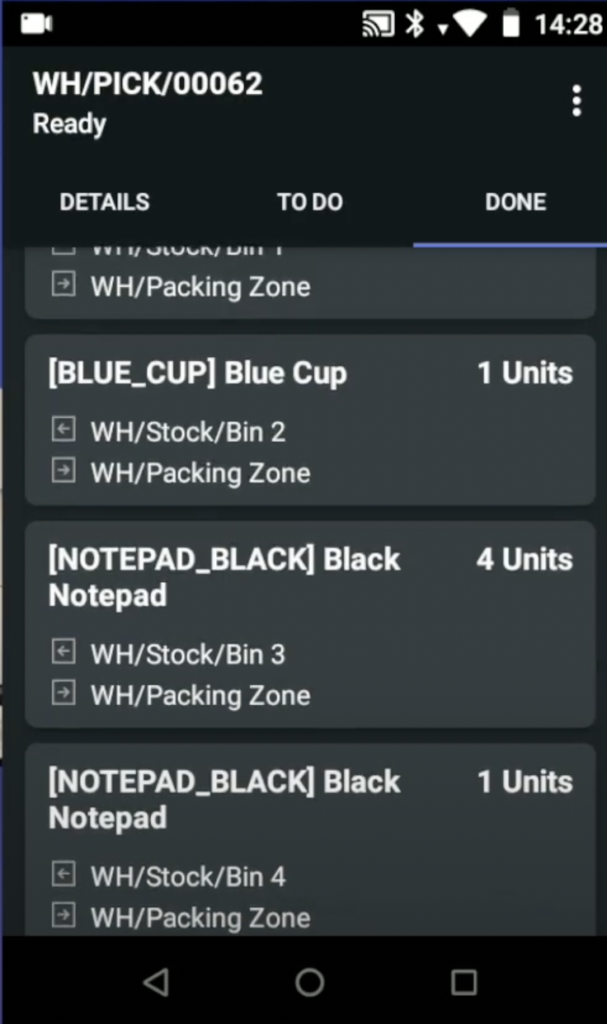
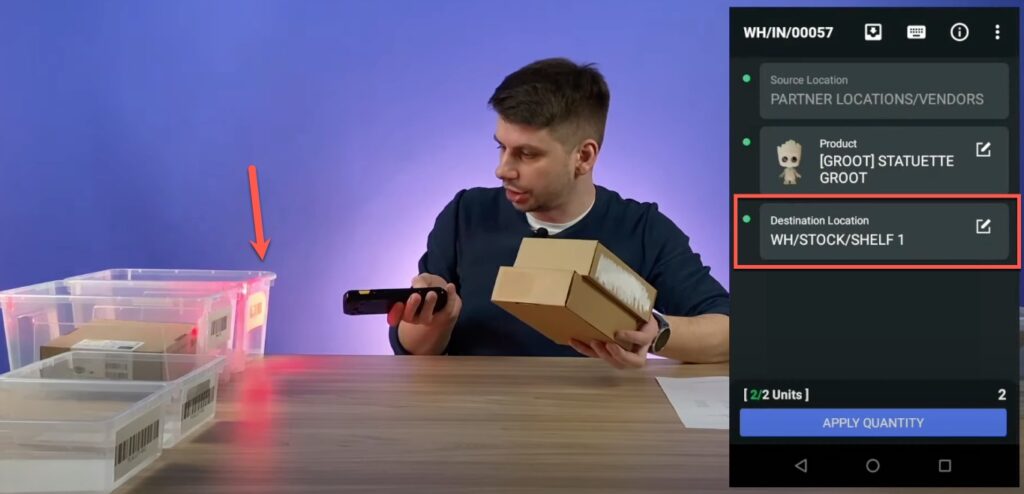
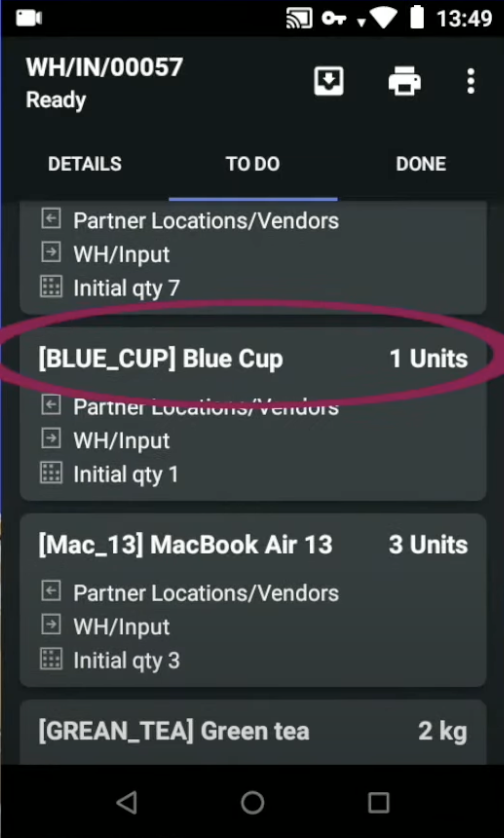
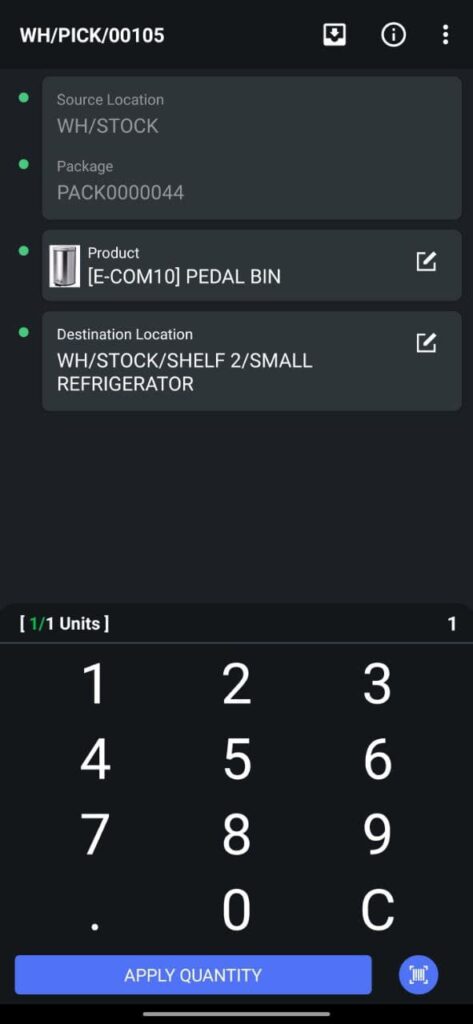
Let’s start picking. The app guides to ‘Bin 2’ to take one notepad.

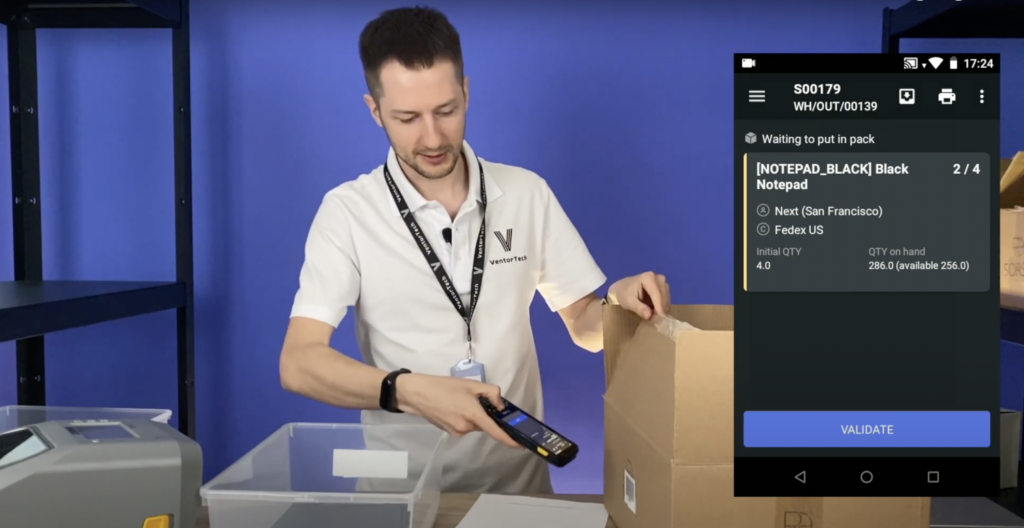
We see that it’s empty, it’s important to update quantity right now, not to waste time in the future. Let’s do it.

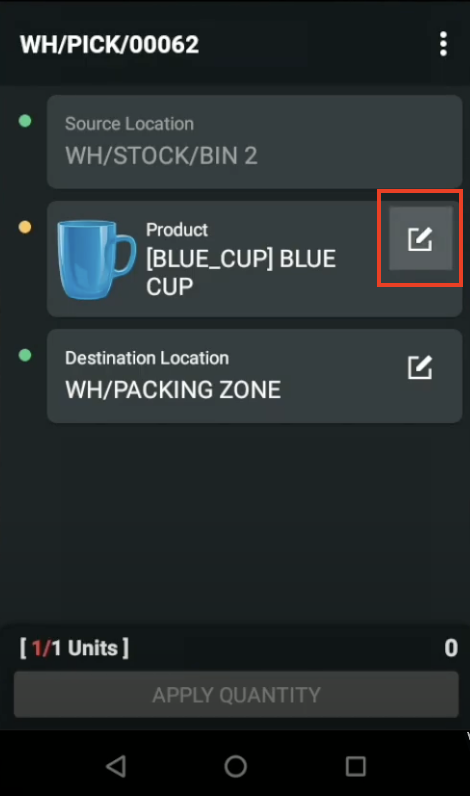
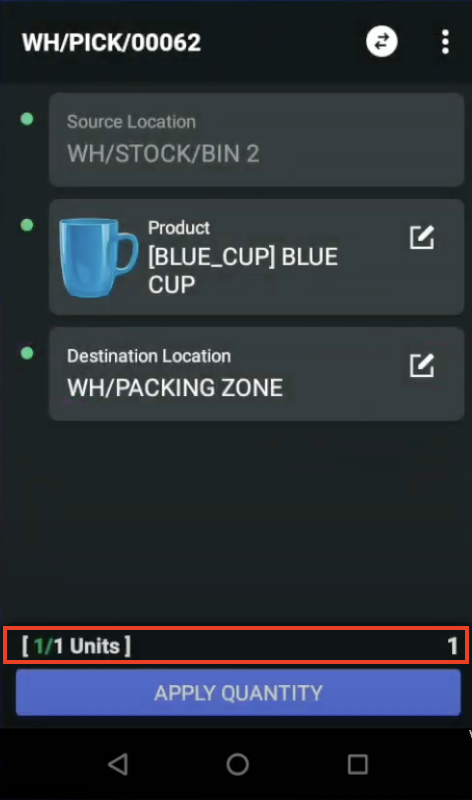
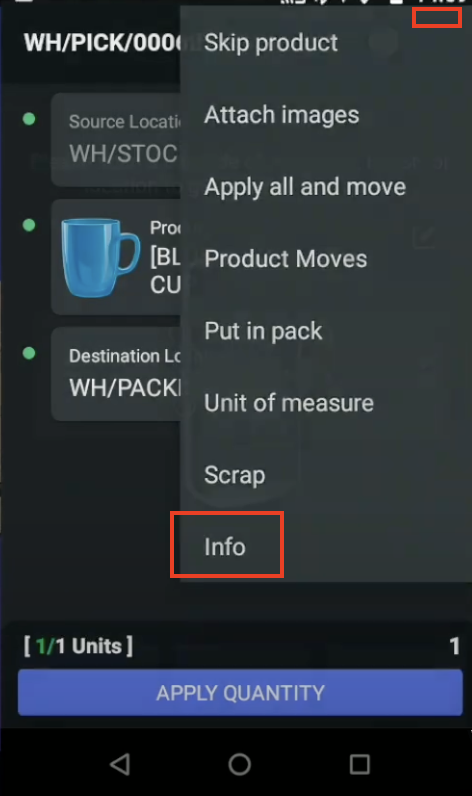
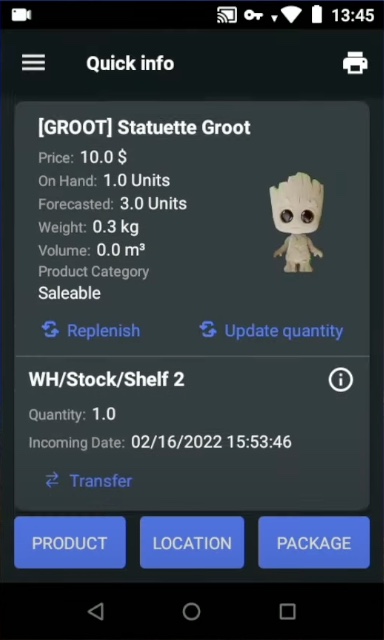
We are going to ‘Product info’, update quantity, choose the location and set ‘0’ for this.

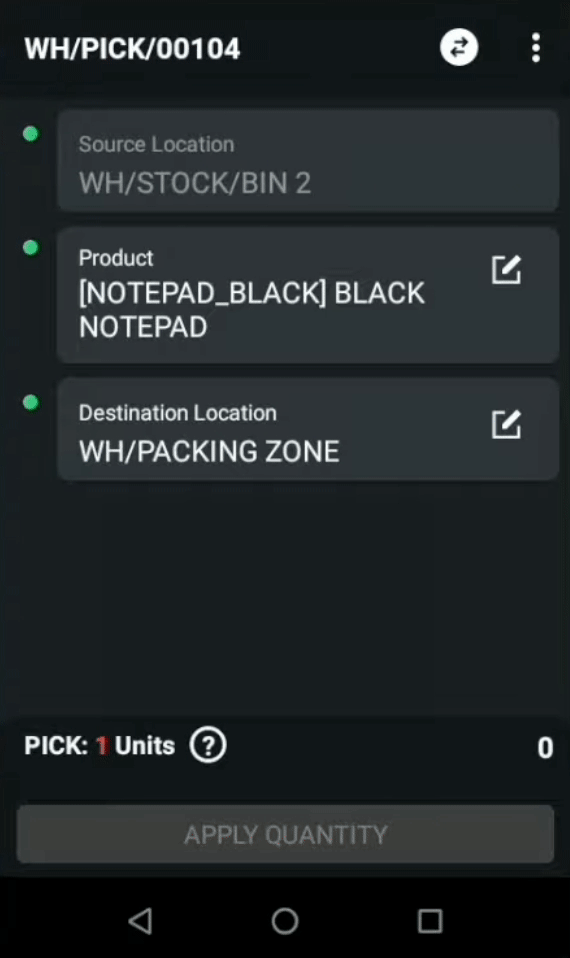
Now we can return to our picking to take product from another location and continue our picking .

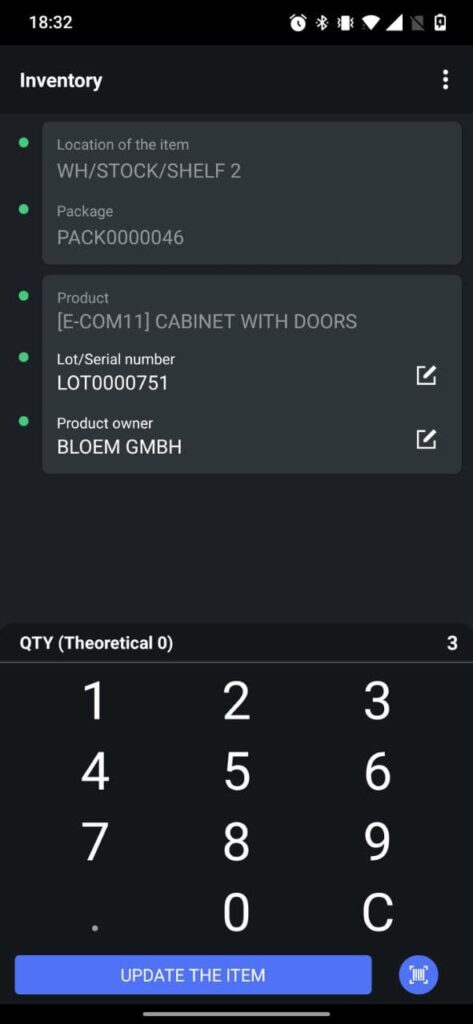
Case 4: Adding Odoo serial number

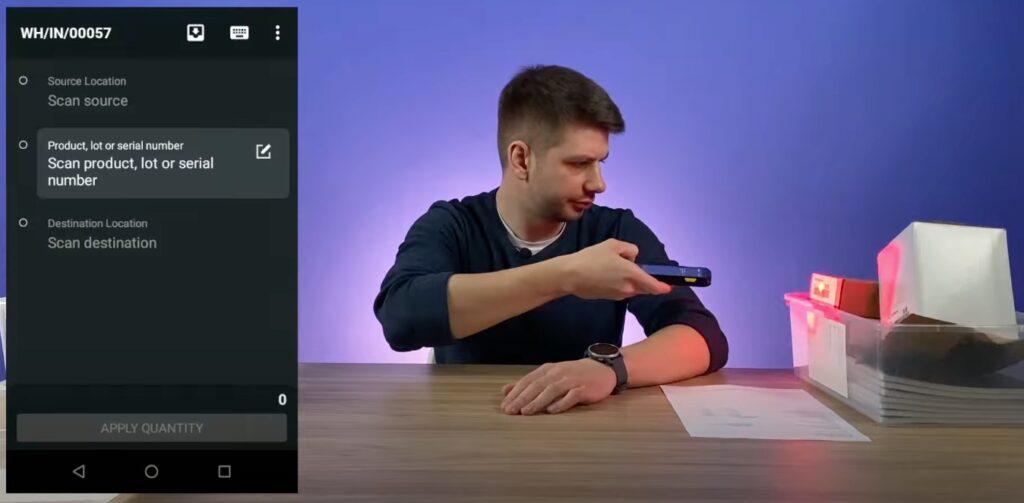
Often serial numbers aren’t added on receiving, but applied on picking, packing or delivery. Ventor allows doing this easily.

Related video playlist: Ventor: Odoo barcode app for your inventory

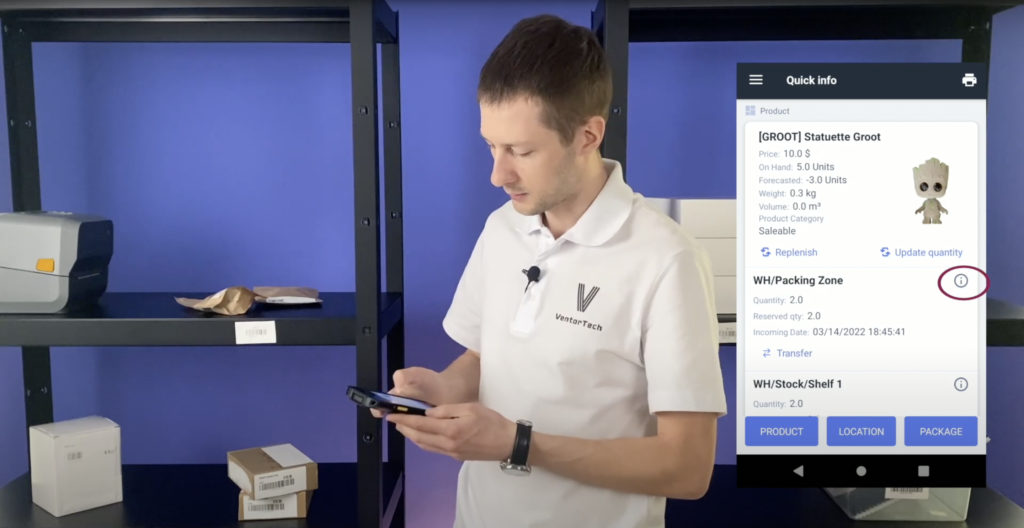
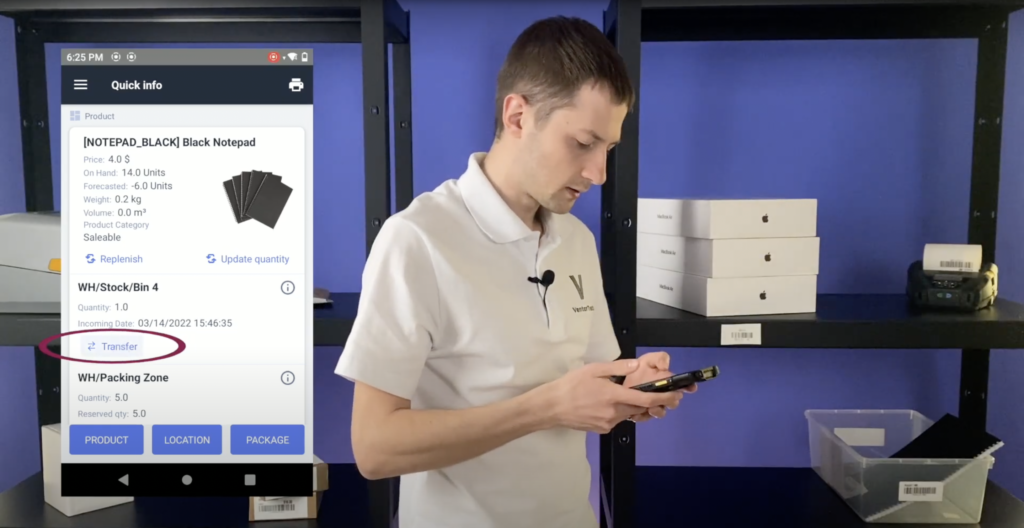
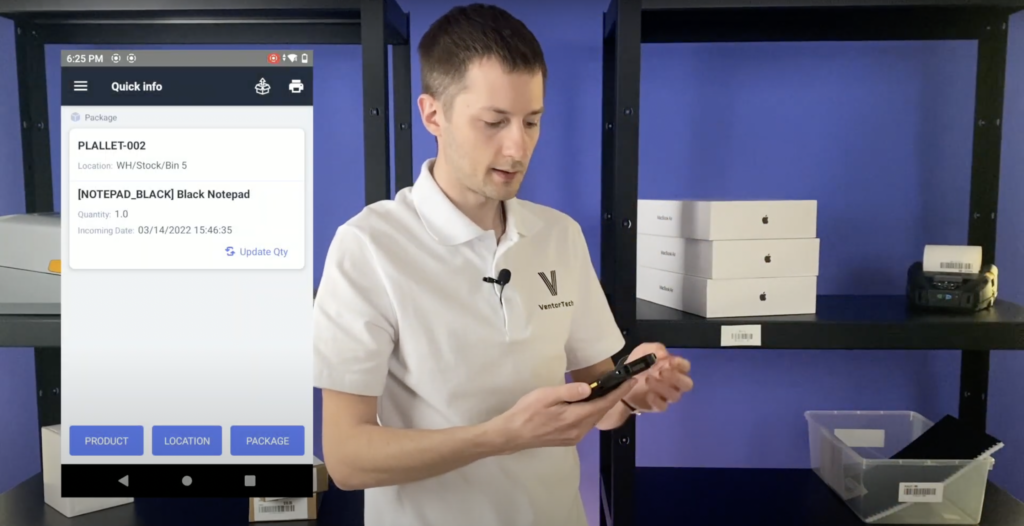
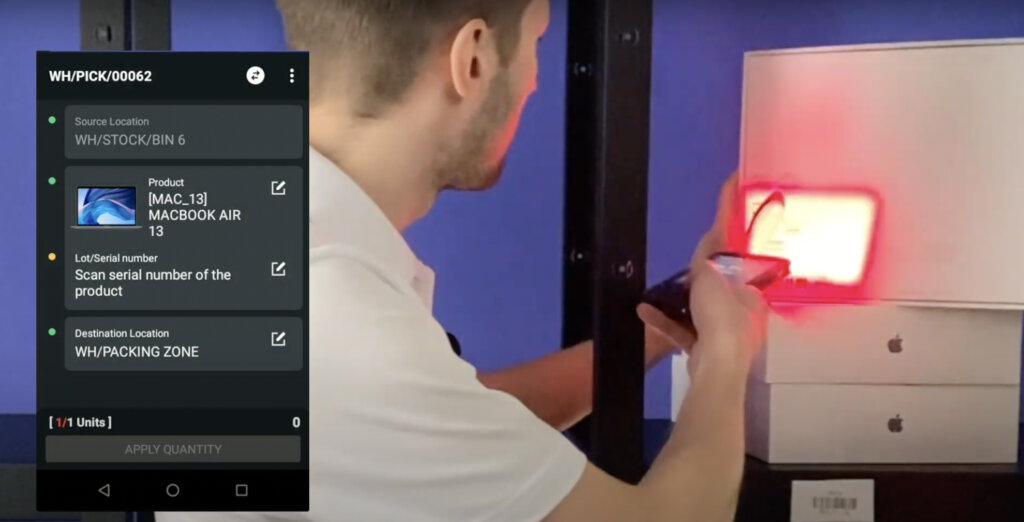
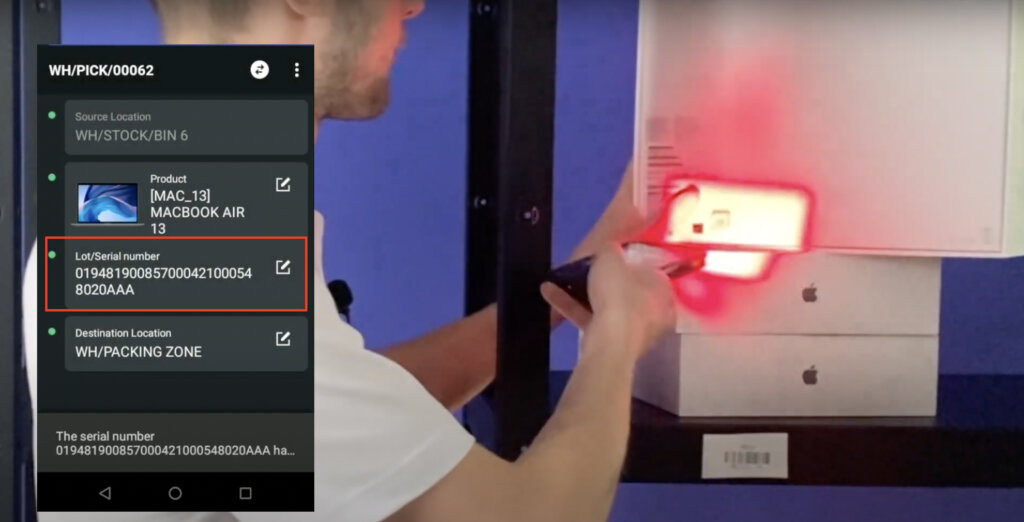
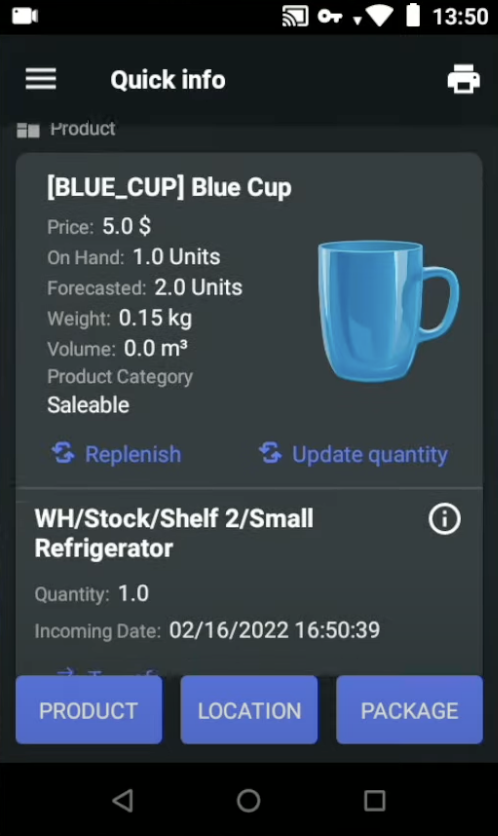
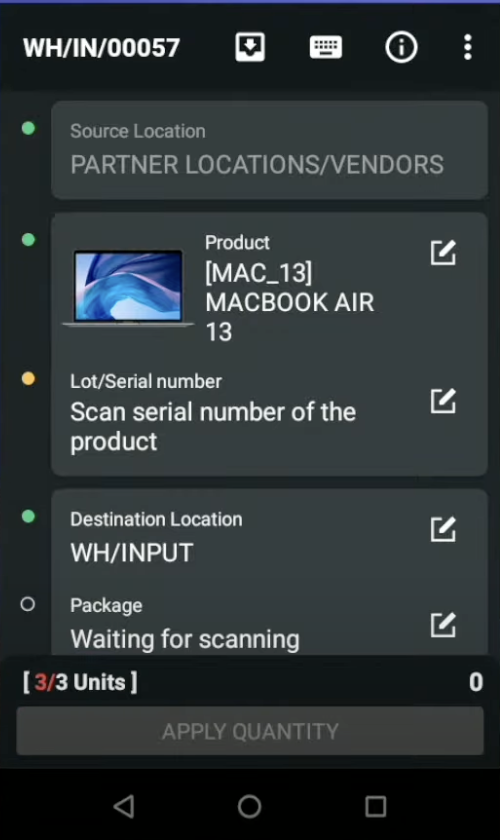
With the ‘ Instant inventory’ menu you can assign serial number at any moment. For example the MacBook from ‘Bin 4’.

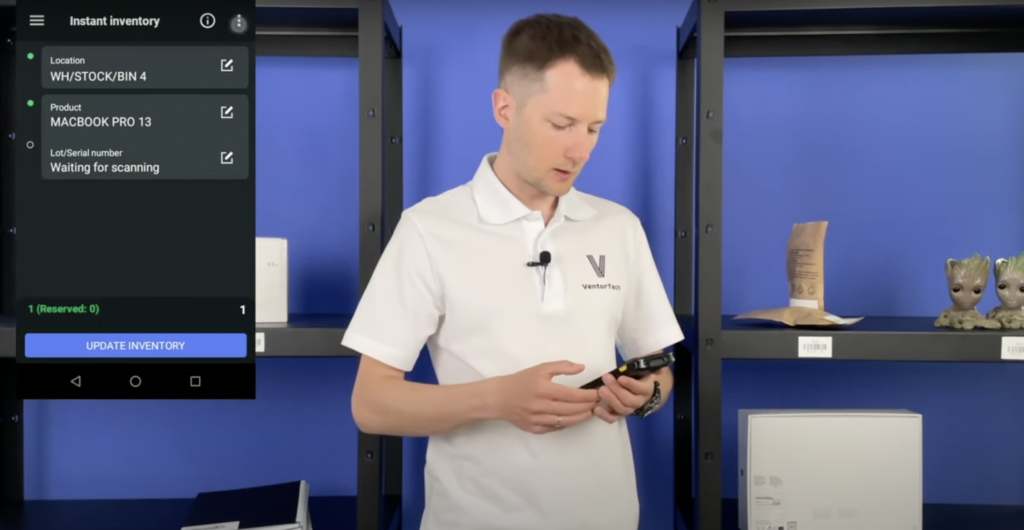
Let’s check its product moves.

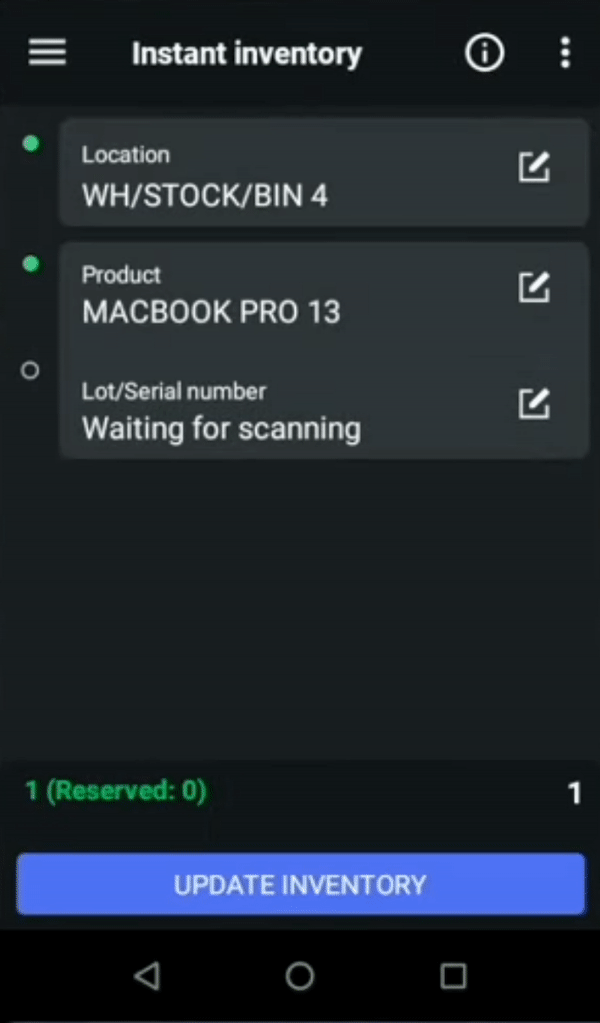
We see that this product was recently received and hasn’t been moved yet. It’s good that we found this product without serial number while nobody picked it. Let’s go back and add serial number.

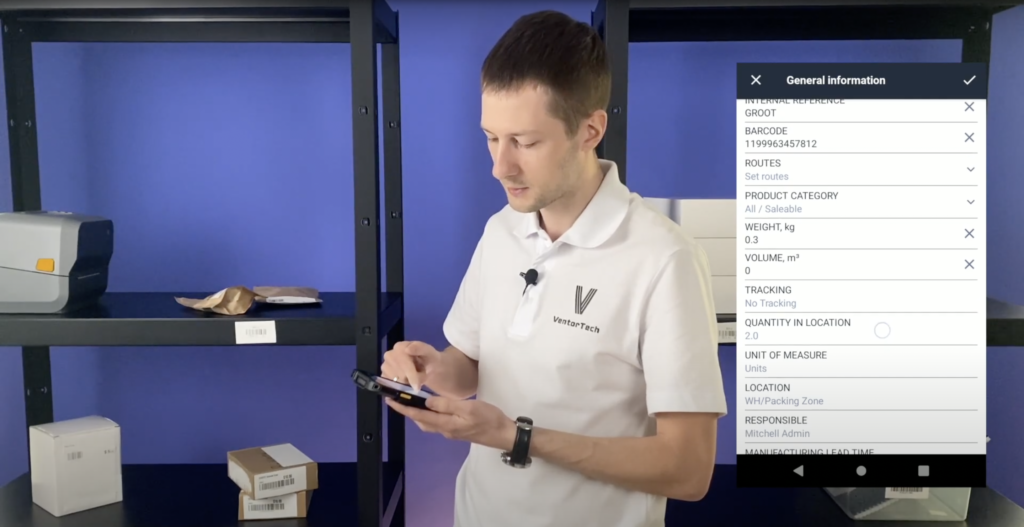
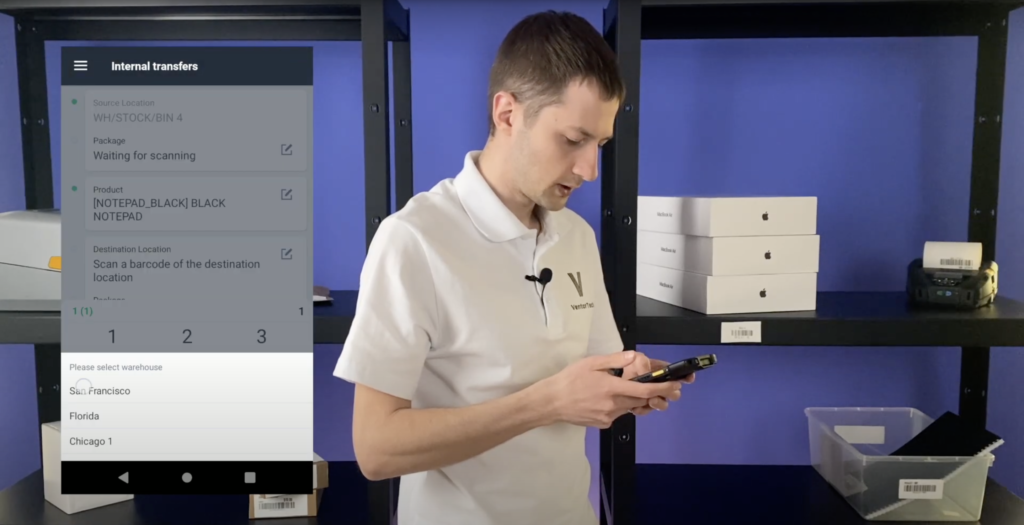
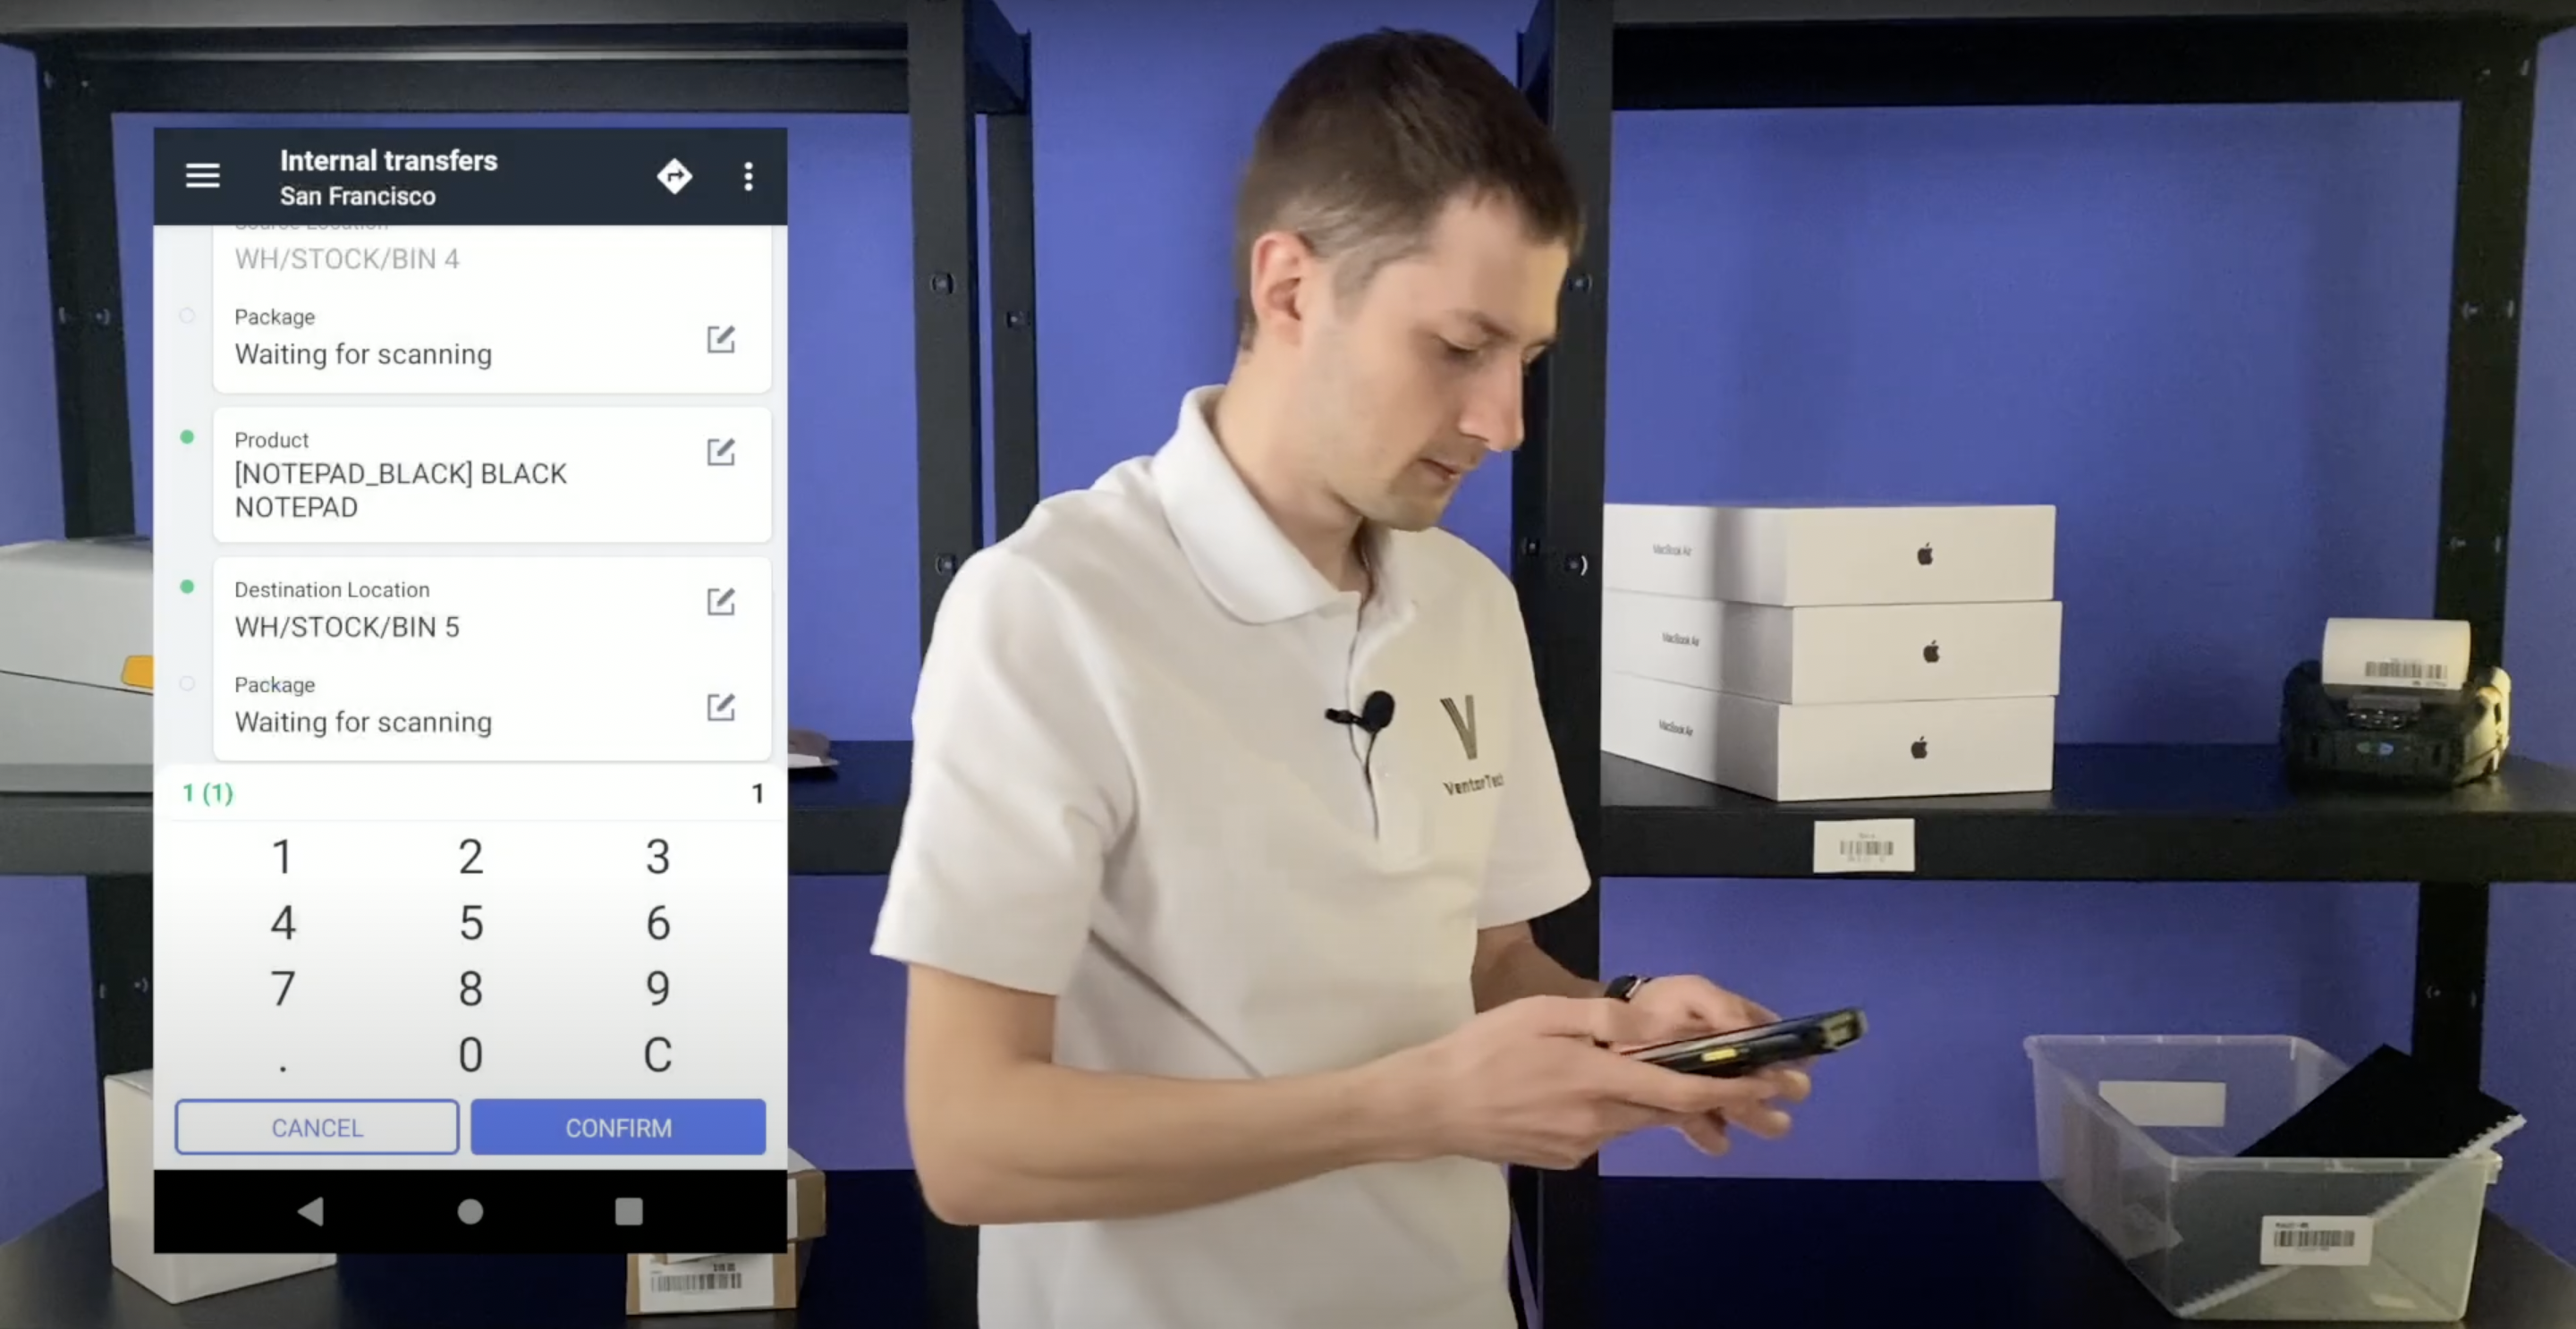
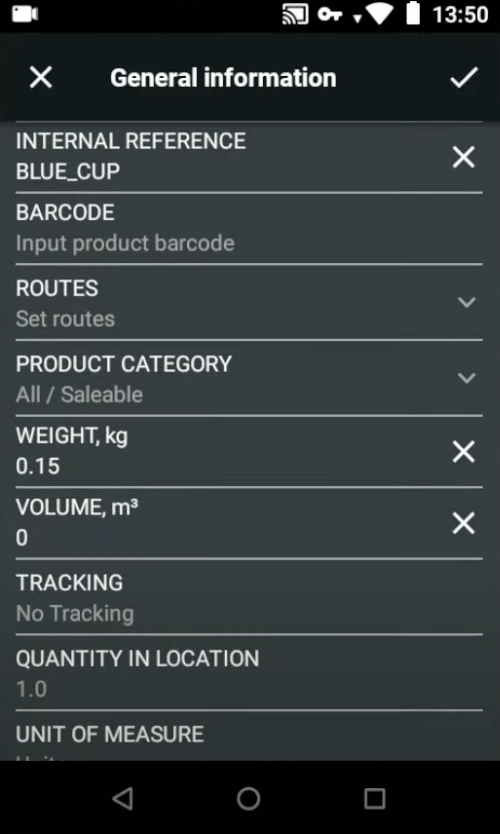
First of all we need to update this Quant, set quantity zero and create a new one, but with serial number.

Scanning the product and the serial number. The app shows a warning that there is no serial number, but suggest to enter it.

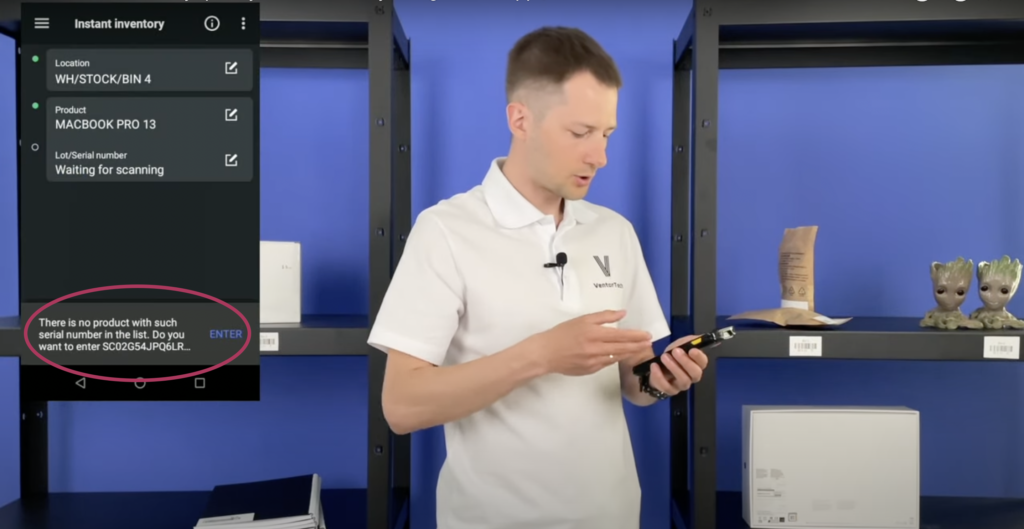
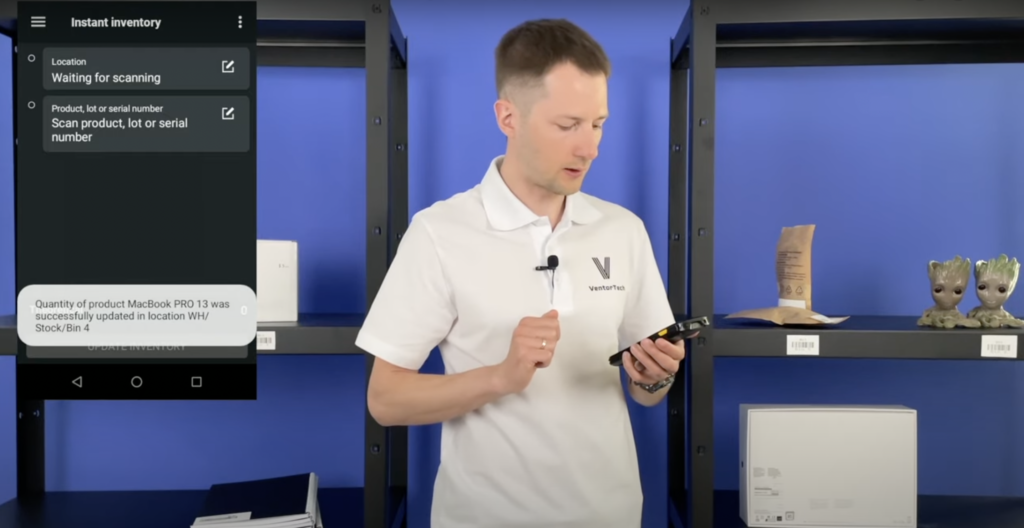
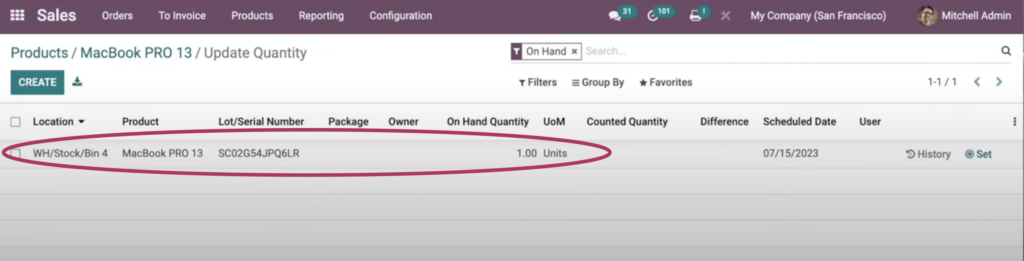
Let’s add one and update inventory.

Case is done
Ventor app pricing

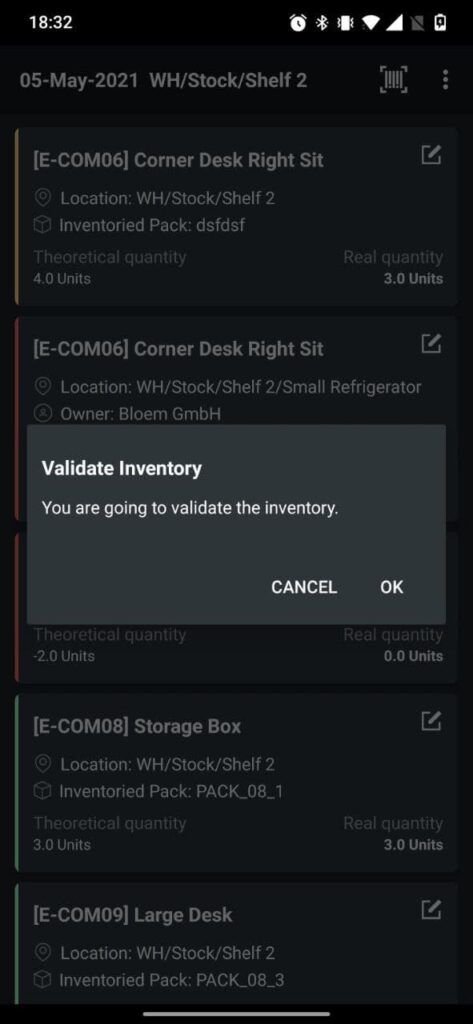
Case 5: Adding Odoo expiration date

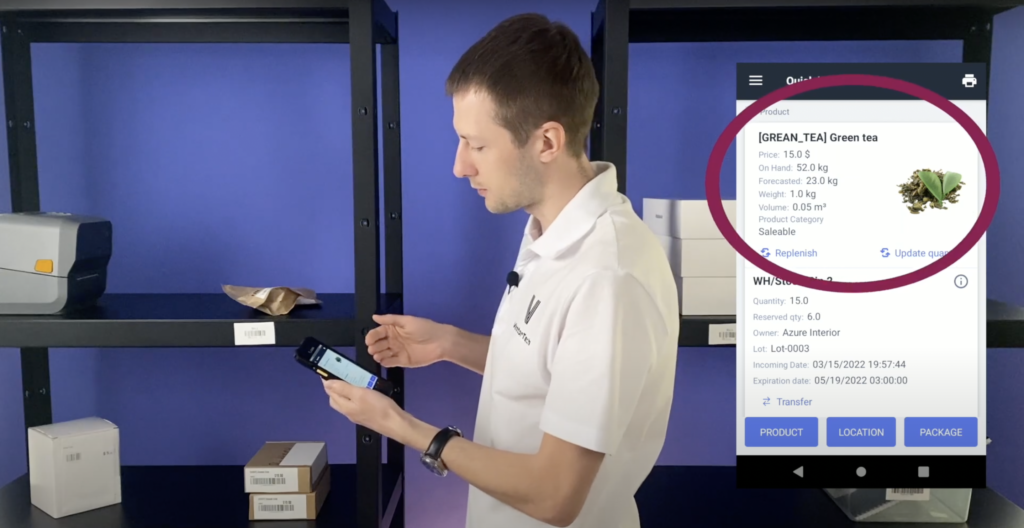
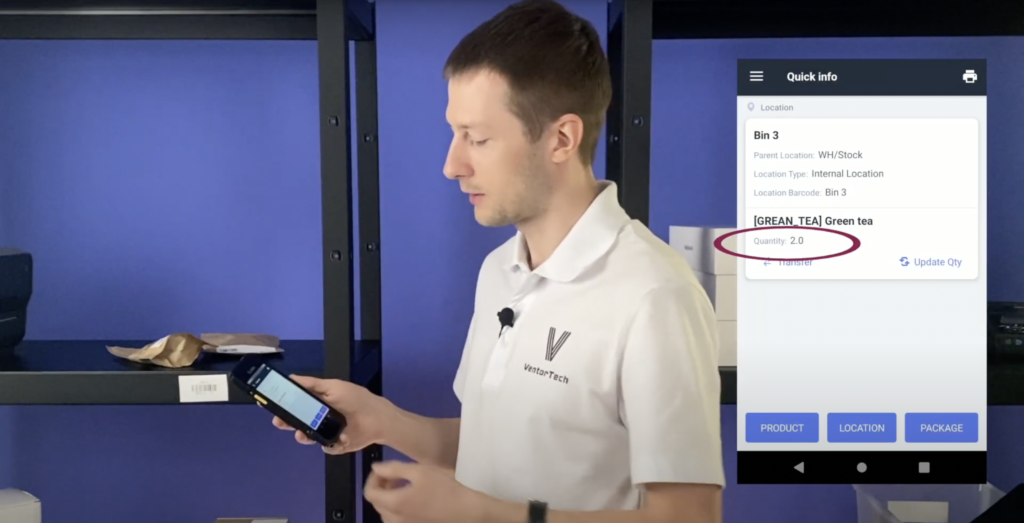
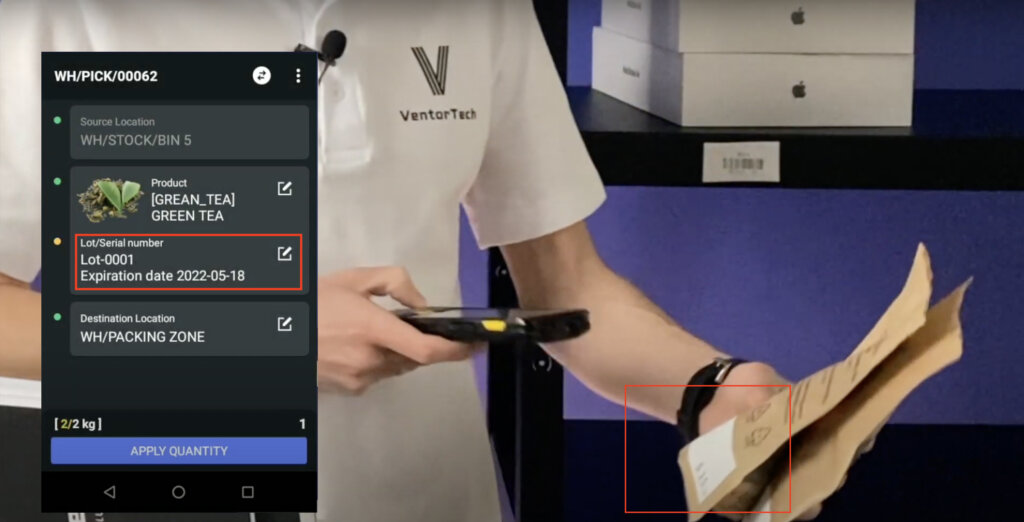
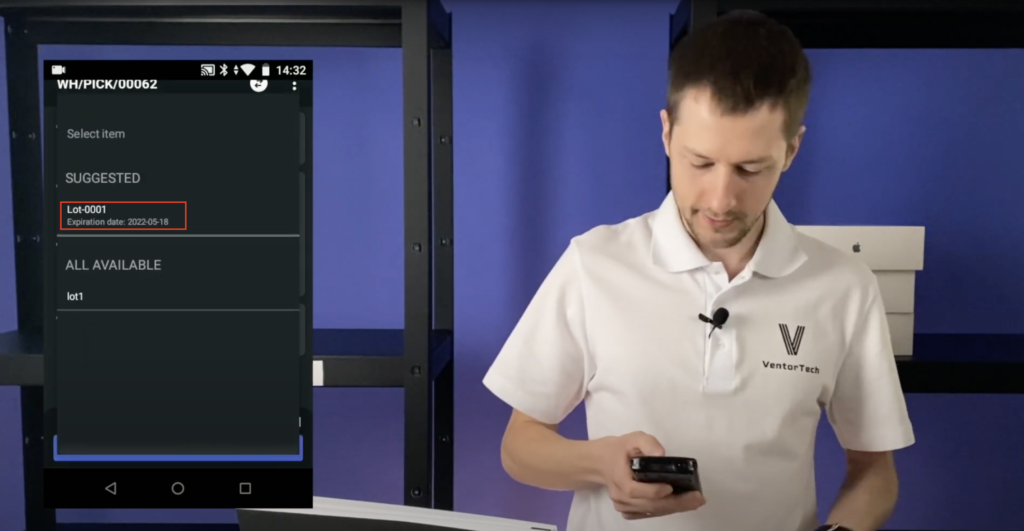
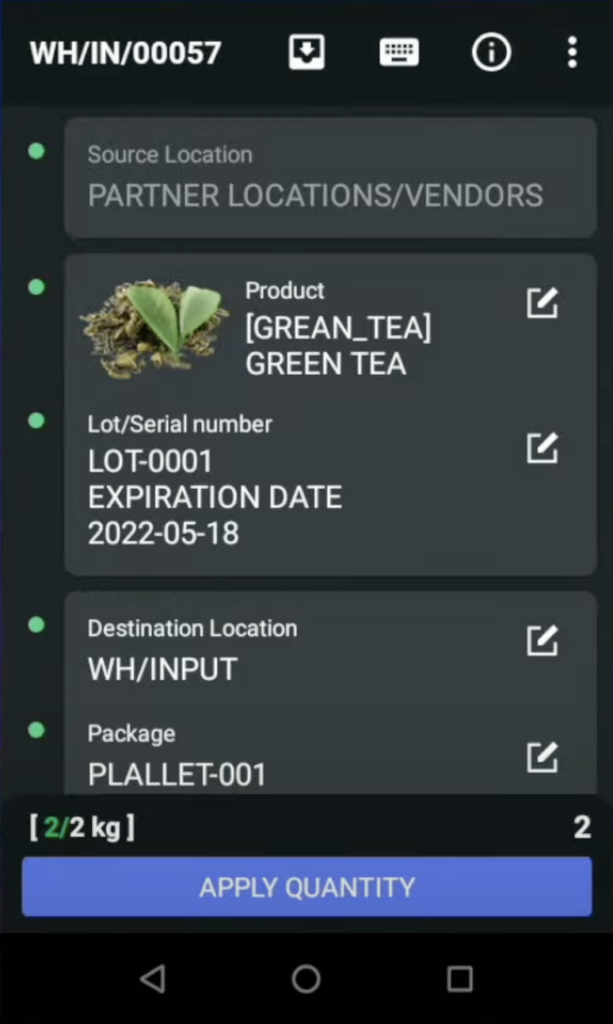
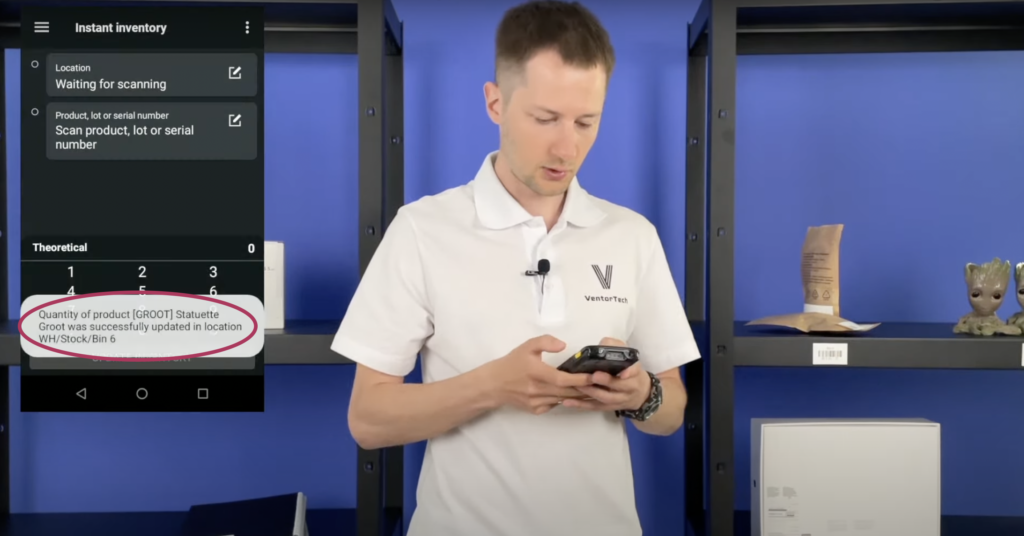
Another important point is expiration dates. If you sell goods, you know how it matters to always have relevant information about this day. I know that product ‘green tea’ in our warehouse has no expiration date in our system, so let’s add it. Scanning it.

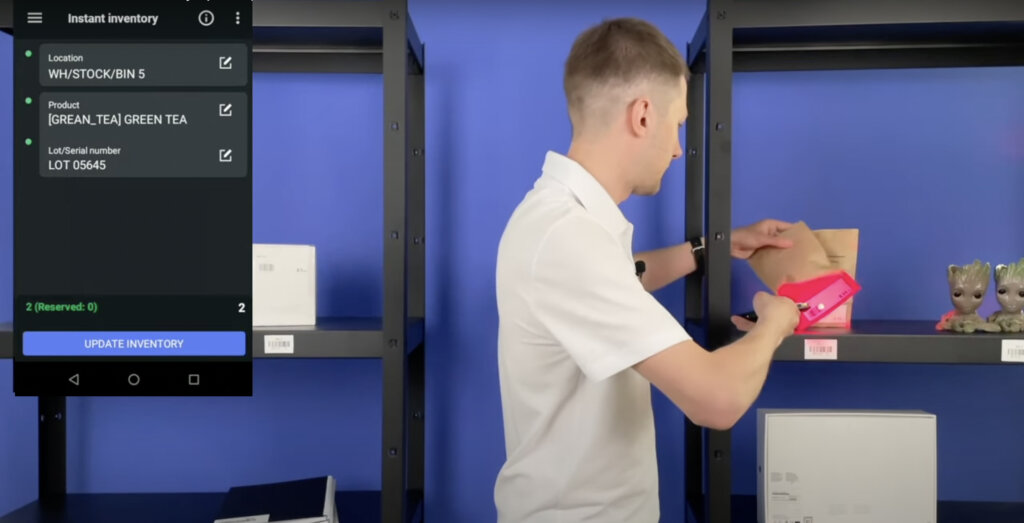
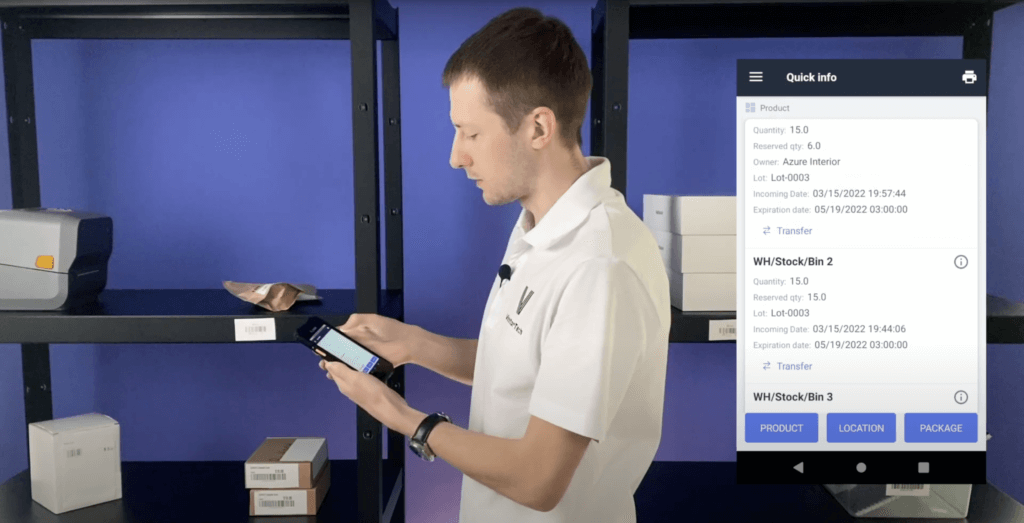
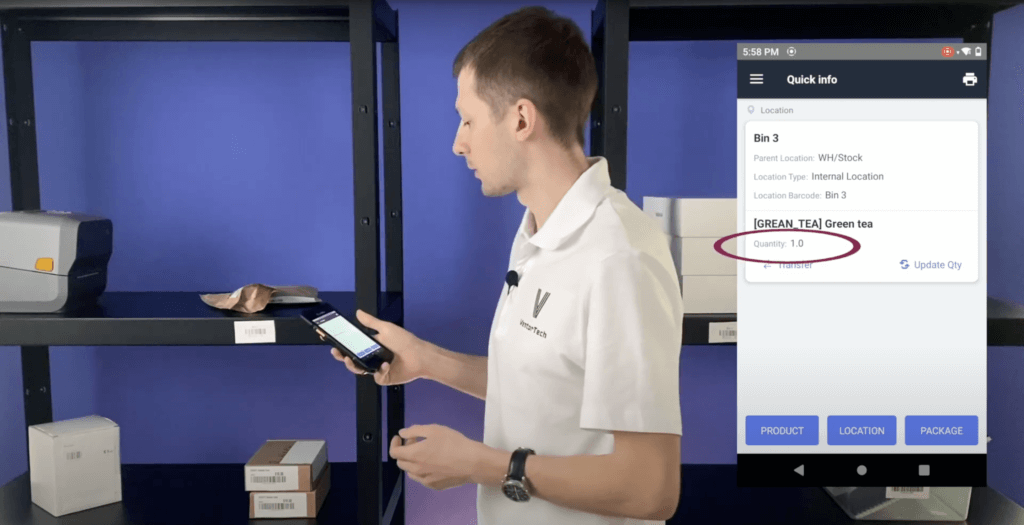
Choosing ‘Lot number’. By the way the application shows us only lot numbers from current location. Let’s add expiration date. For this go to ‘three dots’, after ‘Set Expiration date’ (it expires on June 30) and update inventory.

Adding Odoo expiration date

That’s it. Now this product will be properly reserved by Odoo to ship in time. Case is done.

Case 6: Odoo Scrap

Sometimes it happens that you find a product in your warehouse and it is damaged or defective. In these cases you need to scrap it from your warehouse . Let’s do it with Ventor.

Scan product, location, quantity, go to ‘three dots’, ‘Scrap’. We see a warning, click ‘Agree’ . Case is done.

Odoo Scrap

As you see, the ‘Instant inventory’ menu allows doing serious things with your goods: add, remove, scrap them and etc. Make sure, you provide access to this menu only to reliable users.

Try Ventor for Free

***

Ventor: Quick Start Guide – ventor.app/guides/ventor-quick-start-guide/

Ventor complete guide. Introduction – ventor.app/guides/ventor-introduction-guide/

Odoo inventory optimization for a Baltics packaging supplies retailer, PaperSeal – https://ventor.tech/odoo-inventory-optimization/

***

How to pack orders in Odoo efficiently via Ventor

In this article we are going to show you how to pack orders in a warehouse using the Ventor mobile application.

We have a few orders, packing zone they were picked on the previous step and sorted by baskets.

Also, we recorded a video, and you can watch it on our YouTube channel:

How to PACK orders in Odoo efficiently | Ventor

Table of contents:

Related article: How to pick orders in Odoo efficiently ?

Case 1: Basic Packing

Let’s open the Ventor mobile application and login to Odoo. You can enter your database or login and password or just scan your bage id .

Scan your Odoo bage ID

Let’s pack the first order. We need to open the ‘Package management’ menu and scan our source document or you can insert the number manually.

Now you see the transfer, you can check the order number and transfer, also you see the product lines, quantity to peak, customer and the whole quantity on hand in your warehouse.

The tranfer

The app shows that it’s waiting to put in pack, so let’s finally do it. Let’s put the cup to the package, click on the ‘Put in pack’ icon.

Transfer is done

You see that our cup in the package ‘104’. Now You can validate the transfer.

Try Ventor for FREE

Case 2: Pack an order to multiple packages

Let’s make something a bit complex. In this order we have: three MacBooks and two Statuette Groots.

For this we need a package a bit bigger. Let’s put our 2 MacBook to another package, by the way you can click ‘Initial quantity’ to easily set the needed number.

Now click in ‘Put in pack’ and you see that two MacBooks are in pack 107.

Now we need another package and put the last MacBook here. Instead of click in ‘Put and pack’ you just can scan ‘Put in pack’ barcode command. And our last MacBook in the package ‘108’.

We can pack Statuette Groot to the third package, but we have free space in the second package, so let’s pack them here and add all of them to the same package ‘108’.

2 Groots and 1 MacBook in one package

Now let’s validate the transfer and see what we have validated.

Package ‘108’ with 2 Groots and 1 MacBook in one package
Package ‘107’ with 2 MacBooks

Let’s check what we have in Odoo.

We see that it’s in Done State, we have two packages.

Let’s review them. Package ‘107’ with 2 MacBooks and Package ‘108’ with 2 Groots and 1 MacBook.

Package ‘107’
Package ‘108’

If you ship your orders by a carrier like Fedex, UPS or any other and use the packages with printed barcode, you can do it with Ventor even simpler.

Related article: How to quickly check product info in Odoo using a barcode scanner

Try Ventor for FREE

Case 3: Scan package type to ‘put in pack’ and print shipping labels automatically (via Odoo Direct Print)

Let’s put 2 Black Notepad to the next package.

And now instead of clicking on the ‘Put in pack’ button and choose a needed package type, you can just scan the package type barcode.

The app automatically choose a needed package type. So, confirm it.

Take other two Notepads in another package. You can just set Initial quantity, scan the barcode of package type and it’s automatically chosen. We see that we packed 2 Notepads in one Fedex box and 2 other Notepads in another Fedex box.

Now we need to validate the transfer and we can even do it simpler with scanning validate barcode to reduce interaction with mobile interface even more.

The transfer is validated

Odoo printed 2 shipping labels from our carrier.

One out of two
Two out of two
Try Ventor for FREE

Case 4: Weigh parcel to get an accurate shipping cost (via Odoo Direct Print)

Let’s put the package on the scales and pack the cup.

We have weight on scales, click on ‘Put and pack’, select Package type and now we see the weight from scales.

Let’s validate the order and we immediately get Shipping Label from our carrier with accurate shipping cost.

Now you know how to pack your orders via Ventor mobile application.

***

Make Odoo inventory quickly and accurately using Ventor app – https://ventor.app/guides/make-odoo-inventory-quickly-and-accurately-using-ventor-app/

Ventor: Quick Start Guide – ventor.app/guides/ventor-quick-start-guide/

Ventor complete guide. Introduction – ventor.app/guides/ventor-introduction-guide/

Odoo inventory optimization for a Baltics packaging supplies retailer, PaperSeal – https://ventor.tech/odoo-inventory-optimization/

***

Try Ventor for Free

The quickest way to make internal transfers in Odoo. Ventor

In this article we show how to make internal transfers in Odoo using the Ventor app – Odoo barcode app for your inventory needs.

Also, we recorded a video, and you can watch it on our YouTube channel:

The quickest way to make internal transfers in Odoo. Ventor

Table of contents

In this article, we are going to discuss the ‘internal transfer’ menu. First of all, let’s open it.

Internal transfers

The first thing that we need to do is choose a warehouse. As a user, we have access to two warehouses but need to work in only one of them.

Internal trasfers photo 2

Remember, if you have the application “Ventor Configuration”, then you can make a default warehouse for which each user inside your system has access. This saves much time for you, as we no longer need to choose a warehouse inside the application. The ‘internal transfer’ menu was developed to move one item from one location to another, as simple as that.

Internal trasfers photo 3

Move an item from one location to another in Odoo via a barcode scanner

So, let’s try moving something. Let’s start by scanning ‘Shelf 1’ as a location from where we want to move an item.

Internal trasfers photo 4

Then, we scan the item we are going to move; it’s a ‘blue cap’. We have two out of two in this location.

Internal trasfers photo 5

Two out of two are available, and we are going to move them to ‘Shelf 3’ by scanning the new shelf assignment.

Internal trasfers photo 6

Remember, you can adjust the quantity using the ‘virtual keyboard’. In our configuration, we make it possible to hide this keyboard, so it can be shown only when we need it. So, move only one item by clicking on ‘Confirm’, as simple as that.

Move an entire package in Odoo via a barcode scanner

In case if you need to move an entire package, you need to scan the package first, without scanning the product. So, let’s scan one of packages.

Internal trasfers photo 8

As this package is placed only in one location, ‘Shelf 2’, we won’t need to scan for location; it’s filled in automatically in the first field. Now we can do two things: We can scan the ‘Destination Location’ and simply move the entire package from one location to the new one. If we are going to scan a product that is placed inside this package, then we will be able to move products from the package, so in our case, we move the entire package. We need to scan only a location:

Internal trasfers photo 9

In ‘Shelf 3’, refills are hidden from the interface right now and we can see only the needed one, so we’re going to move PACK-352 from ‘Shelf 2’ to ‘Shelf 3’. Click on ‘Confirm’, and we’re all done.

Internal trasfers photo 10

Move multiple items in Odoo from different locations to the new one via barcode scanner

Let’s check up a ‘Settings’. Click on the 3 dots and then click on ‘Settings’. Here you will see many different settings. Check them out and read the descriptions in the settings. From there, you can get the information you need to activate selections or not.

Internal transfers settongs

While in the settings, you can adjust the application according to your business flow. For now, we are looking for ‘Move multiple items’. We want to show you how to move multiple items at once rather than moving them one by one, as we saw before.

Let’s scroll ‘back’, and now you can see that the interface was updated.

Internal trasfers photo 11

So, we are going to scan two items to move them at the same time. Let’s scan ‘Blue cap’. Here you can see that we need to scan a location to confirm from where we’re going to grab this item.

Internal trasfers photo 12

‘Shelf 1’, and the second product, ‘Groot statuette’, from the ‘Shelf 2’.

Internal trasfers photo 13

Now we can click on the three dots and click ‘Move’ to choose the new location manually, or we can simply scan the new destination location for where we want to move these two items. For our example, we scan ‘Shelf 3’, and then we will see the message ‘Moving items to ‘Shelf 3’ and ‘Move’.

Internal trasfers photo 14

All cases are done! Now you have a good understand of how to use your internal transfer function inside the Ventor application. Feel free to comment below this article.

Ventor: Quick Start Guide – ventor.app/guides/ventor-quick-start-guide/

Ventor complete guide. Introduction – ventor.app/guides/ventor-introduction-guide/


Try Ventor for free

How to quickly check product info in Odoo using a barcode scanner

In this article we show how to quickly check product info using barcode scanner and update quantity.

Also, we recorded a video, and you can watch it on our YouTube channel:

How to quickly check product info in Odoo using a barcode scanner | Ventor

Table of contents


Case 1: Get information and update quantity

First of all we need to open the ‘Quick Info’ menu. And scan any item right now. For example ‘Green Tea’. We can see the price, quantity on hand, weight, volume and etc.

Below we see where this product is stored, its lot numbers, expiration dates, packages, product owner, how many are reserved and etc.

odoo inventory

We can also scan the location (in our case bin3) to check how many items should be there. The app (and Odoo) thinks that there is only one kilo, but in reality we see two. Let’s update qty on the spot!

odoo qi inventory

let’s check a Serial number. It’s LOT 2. And we enter quantity 2.

odoo wms

And let’s quickly check what’s now in Bin 3. Yes, now we see 2 kilos here.

odoo inventory qty

Case is Done.

Case 2: Change product info and print label in Odoo

Besides of basic info about product you can also see all general information,  and change it. Let’s scan the item (in our case – Groot).

Clicking on the ‘Info icon’, and we see full information about this product: product name, internal reference, barcode ( we can change it or insert if it missed), also we can change routes, odoo product category, weight, volume, tracking, location and other.

odoo info

BTW, we can print the product label right here (Print icon).

odoo wms ventor

But it’s another story, you can find more details in our video “How to print product labels from Odoo directly to a printer with 1 click using Odoo Direct Print PRO“: youtube.com/print product labels from Odoo

Case 3: Replenishment

We can scan not only Odoo product barcode, but Lot or Serial number. For example, let’s scan serial number of our Mac Book.

odoo 16 wms

Let’s check in general how many MacBooks we have.

odoo 16 wms

We see that only 3 units left. Let’s replenish them. Click ‘Replenish’ button

odoo ventor app

Let’s replenish for 15 more item, change the ‘Scheduled date’, select a route ‘Buy’ and ‘Replenish’.

odoo ventor

Let’s check created purchase order. We go to the ‘Create Purchase Order ‘.

odoo 16

And we see the last orders, also we see scheduled date, and our MacBook inside.

odoo 16

Case 4: Move products and put them in pack in Odoo

Let’s check the notepads. BTW, you may search for product manually instead of scanning if you wish.

We see that it’s in Bin 4 in Odoo, but in reality in Bin 5. We can easily move this item from one location to another. Click on ‘Transfer’

odoo quick info menu

Select needed warehouse.

odoo wms16

Scan the destination location and let’s also put it in pack. And confirm.

odoo 16 wms

Now let’s return back to the ‘Quick info’ menu and check our package. Now it contains notepads.

odoo 16


***

Now you know how to quickly check all info about product, location or package via the ‘Quick Info’ menu in the Ventor mobile app. 

BTW, you can call Info right in the middle of processing any warehouse operations, e.g picking. Just click three dots > Quick Info.

ventor app quick info

***

Ventor: Quick Start Guide – ventor.app/guides/ventor-quick-start-guide/

Ventor complete guide. Introduction – ventor.app/guides/ventor-introduction-guide/


Try Ventor for FREE


Get Started Now


How to pick orders in Odoo efficiently ?

In this article you will see how to pick an order in a warehouse using the Ventor mobile application installed in your barcode scanner.

Table of contents

Also, we recorded a video, and you can watch it on our YouTube channel:

How to PICK orders in Odoo efficiently | Ventor

What we have before starting:

  1. An order
  2. A barcode of the order

You need to pick items according to this order in your warehouse. On the picking operations list, also you have a barcode of the order that helps you to open the order on the mobile scanner.

The picking operations list

Let’s open the application, select in the menu ‘Warehouse operations’, find the needed warehouse, in our case – San Francisco, and open the ‘Pick zone’ to open this transfer.

You can find the order manually. Click on the search icon, insert the number (62) and here we’ve just found the order.

Also, you can scan the picking barcode from the list of all warehouses or inside the pick zone.

If you click ‘Back’, you can see all the details about the customer: sales order number, weight and so on. And under the ToDo tab, you can find all the lines and qty you need to pick.

Let’s start the transfer.

Case 1: Basic picking in Odoo

Let’s start the transfer. You see the first item we need to pick, it is image and the location where this item is stored. Go to this location (BIN 1). The yellow dot means that we need to confirm, that we take this product by scanning the barcode.

Let’s scan product. You will see one out of two. So, you can scan another item or just insert the quantity using the keyboard. After that click ‘Apply quantity’ and you are ready to pick the next product.

Case 2: Print damaged barcode on picking in Odoo

The app says that you need to go to BIN 2 to pick the Blue Cup. But we see that the barcode is damaged.

In our case we have only one product item, so we can find this item manually by clicking on pencil.

Also you can print a new barcode label to replace damaged barcode. Clicking three dots > ‘Info’ > Print icon and print label.

And you have new barcode label.

Now go back, and apply quantity (works via Odoo Direct Print PRO) .

Case is done

Case 3: Pick items in Odoo from location different to reserved one

Next item should be picked from BIN 3. We need to pick 5 notepads. But on BIN 3 we have only 4 notepads.

Let’s apply them.

Let’s click on “On hand” button. And check where you can find the fifth notepad. Our notepad is on BIN 4. Let’s take it from there.

Let’s take the lust fifth notepad. Change Source Location for them and apply quantity.

Now you can quickly check what you have already picked. Go back, swipe to the ‘Done’ tab and here you see that 2 units of GROOT were picker from BIN 1, Blue cup from Bin 2, and Notepads picked from Bin 3 and 4.

Case 4: Confirm lot on picking in Odoo

Let’s pick the next product. Go to Bin 5, and take 2 kilos of green tea.

Scan the product barcode. The app says that you need to take Lot-00001. Select it manually from the list and apply quantity. 

BTW, if you have printed lot numbers on your packages you can change setting in the app and confirm lots in Odoo by scanning, not selecting manually.

Case 5: Change reserved serial numbers on picking in Odoo

Now let’s move on Bin 6. Here we need to pick one Mac. Let’s scan it.

Scanning the product barcode

As this product is tracked by serial number, you need to define which exactly item you will ship. Odoo has reserved one of available serial numbers, but we just pick the serial number from the first item we found (not reserved by Odoo).

Scanning the serial number barcode

And apply quantity. Case is done!

The pick transfer has been validated and now can be processed in the packing zone. Let’s check this transfer in Odoo and review what we’ve done.

Now this transfer is ready to process in packing zone.

Batch and Cluster picking in Odoo

You can also pick a few different orders at once via Batch or Cluster picking. It helps to optimize your picking workflow even more. Find more information here – https://ventor.tech/mobile/pick-more-walk-less-full-picking-and-packing-optimization-in-odoo/

Now, using Ventor, you can easily pick your orders in Odoo in just a few steps.

We hope that you have found answers to your questions in our article. If you have any other questions, then feel free to leave your comments under this article. We look forward to hearing from you!

***

Ventor: Quick Start Guide – ventor.app/guides/ventor-quick-start-guide/

Ventor complete guide. Introduction – ventor.app/guides/ventor-introduction-guide/

Receiving goods in Odoo via a barcode scanner: Receive, putaway, manage lots, serial numbers, packages

In this article you will see how to receive items using Ventor – Odoo inventory mobile app. Basic receiving, changing default location (put away), adding a barcode for a product from a barcode scanner, lots and SN management, putting on pallets (packages).

Also, we recorded a video, and you can watch it on our YouTube channel:

Receiving goods in Odoo via barcode scanner: Receive, putaway, manage lots, serial numbers, packages

Table of contents

Prerequisites

Before we start, we have:
1. An incoming shipment (physical goods)
2. A label with Internal reference
3. A delivery document with a barcode

odoo receiving

Open the Ventor app (How to connect to your Odoo), choose ‘Warehouse operations’ and open a ‘Receipt zone’ to find incoming shipments.

You can also scan any item from this order right here to immediately find all the orders where the same item is presented. But in this article, we are going to open the item and find the orders manually. Click on the ‘Search’ and insert the number ’57’

We’ve just found this order. Let’s open it and start the transfer.

Case 1: Change destination location on receiving (put away)

Click on the ‘Start transfer’ and scan the first item.

We have two Groot statuettes. Here we have all the information from where we are taking these items, from the ‘Vendors’ location to the distinction location on ‘Shelf 2’.

You can click on the image of the product to see it in a bigger size, so you can quickly compare what you’re receiving and what you have in the system. Also you have a ‘Quick info’ button: if you click on it, you can find where else this item is located, like on ‘Shelf 2’.

Let’s go ‘Back’ and put these two items into the ‘Shelf 2’ location,  and then you can confirm it. You can also change the destination location in Odoo, for example, it should be going to ‘Shelf 2’, but there is not enough space, so you can change the location – exchange the original location from ‘Shelf 2’ to ‘Shelf 1’ and put these two items into ‘Shelf 1’.

change destination location in Odoo
Change destination location in Odoo

Click ‘Apply quantity’, and we are ready to scan the next item. So now, let’s quickly check that these 2 items were moved to ‘Shelf 1’. Go to the Done tab. Here we can see that 2 units of this statuette Groot were already moved to ‘Shelf 1’.

You can click ‘Back’ to close this order and then open it once again. At any time, you can move back to get some rest and then move back to the order and pick it again. So, click on ‘Continue transfer’, and we are ready to scan the next item.

Case 2: Add product barcode in Odoo via a barcode scanner

Let’s take the next item, a ‘Blue cup’. But after scanning it, we get an error:

First of all, let’s check if this product really should be in this order.

This product is present in the Odoo view, but its barcode is missing. It’s a common situation; what can we do?

First of all, we can choose this product manually: Click on ‘Blue cup’ and then click on the ‘Info button’. Here we can get additional information about this product.

Let’s click on the ‘additional info’, and we have many fields related to this product here. We see that the ‘Barcode’ field is empty. Let’s scan it in right now.

Fill in, click ‘Save’, and move back.

Add barcode to Odoo

Now we are ready to apply the quantity of this item and move it to the ‘Input zone’ or check it once again. Next, click ‘Back’ and then click ‘Continue transfer’ and scan it one more time. Now the product can be recognized.

During the reception process, we are ready to quickly go to Ventor’s ‘Quick Info’ menu and update the information about this product to make it possible to receive it in future, without needing to put this information on the Odoo site and so on. It’s a really useful feature to update some fields right on the reception or picking process.

We want to put the product into the ‘Input’ zone, so click on the ‘Apply’ button and move it to the ‘Input zone’, and the process is finished. 

Case 3: Split on receiving to put part of a batch on a different shelf

In this case, we have 7 notebooks. Either you can scan them 7 times, or you can just get the information about this product and insert ‘7’ on your physical keyboard.

We want to split this item, putting 3 of them into ‘Shelf 1’ and 4 of them into ‘Shelf 2’. First, we insert ‘3’ and then put this into ‘Shelf 1’. By default, the destination location is the input zone, but we can change it to ‘Shelf 1’ and apply the quantity.

As you might see, ‘4’ is left out of ‘7’, because ‘3’ were already moved to ‘Shelf 1’.

Still the ‘Destination location’ is the input zone, so we need to change it to ‘Shelf 2’ here and insert ‘4’. Click on ‘Apply quantity’ and go back just to check that everything is correct.

Case 4: Create a lot on receiving and put it on a pallet

In this case, we are going to put green tea packs on one of the palettes. We need to activate ‘Palette management’. Let’s go back, click on ‘Settings’, swipe down, and find ‘Manage packages’. Let’s activate it. By default it’s deactivated, and it’s up to you when to activate package management.

Click on ‘Continue transfer’ and scan these 2 packages of green tea.

We have all the information here, we’re going to put it into the ‘Input zone’, but additionally we want to put it into palette number 1. So let’s scan it the package should be filled with ‘Palette 1’.

put in pack in Odoo
Add to a pallet in Odoo

But the application is asking us to insert the ‘Lot number’, because this green tea is tracking by ‘Lot’. By click on it to create the lot manually, we have a suggested ‘Lot 1’, but we are going to create a new one – Lot-0001. Also, let’s insert expiration date – May 18.

Put the lot into the palette and click on ‘Apply quantity’. Case completed!

Case 5: Create serial numbers on receiving by scanning SN barcodes

We have 3 MacBook Airs.

This product is tracked by ‘Serial number’, and we need to receive 3 different serial numbers to track them later. Let’s scan it.

Let’s scan palette number ‘2’ to put them all in this palette for this package. Click on ‘Apply quantity’. The transfer should be validated automatically.


Let’s finally check our order. Open it and let’s check the Done tab: 3 black notepads, 4 black notepads, 2 Groot statutes, and 1 Blue cup in the input zone; green tea on palette number 1 and 3 MacBook Airs that were put on palette number 2.

This order was received! Now, using Ventor, you can easily receive your products in Odoo in just a few steps.


We hope that you have found answers to your questions in our article. If you have any other questions, then feel free to leave your comments under this article. We look forward to hearing from you!

***

Ventor: Quick Start Guide – ventor.app/guides/ventor-quick-start-guide/

Ventor complete guide. Introduction – ventor.app/guides/ventor-introduction-guide/

Make Odoo inventory quickly and accurately using Ventor apphttps://ventor.app/guides/make-odoo-inventory-quickly-and-accurately-using-ventor-app/

Feel free to subscribe to our newsletter and follow us on Linkedin to stay up to date with our latest news.

Ventor: Quick Start Guide

Installation

First of all download the app using a link from the confirmation email (click on the “Download here” button). During installation on your phone or tablet, you may be asked to allow installation of applications that are not from Google Play. The next step – insert your server URL, then user login and password (database name is needed only if you have multi-databases). Use the “Contact Us” button to drop us an email or get support.

Warehouse operations

This menu represents a full copy of the Odoo Inventory Dashboard. The menu shows all available warehouses and their operations types (Receipts, Pick, Pack, Delivery, etc). The number of operations zones depends on your warehouse configuration. You can see the numbers of available pickings ready to be processed next to each zone (operation type). Click on a zone to see the list of all available transfers.

You can use filters inside any of the operation types by clicking a special button to add additional parameters, such as status, contact name, or schedule date. You can also find whatever you need using a search button. Click on any document (transfer) to start picking or use the scanner to scan internal references of the document (e.g., “WH/IN/0000234”) and quickly open it. 

Find instructions below for all frequent operations.

Receiving (Receipt / Input / Internal transfers)

Watch the video or read the article – ventor.app/guides/receiving-goods-in-odoo-via-barcode-scanner/

Receiving goods in Odoo via barcode scanner: Receive, putaway, manage lots, serial numbers, packages
How to receive goods in Odoo

Or follow these instructions:

  • Open the “Warehouse Operations” menu.
  • Choose a warehouse and open the “Receipts” operation type. You can use your scanner to search a document right from this screen.
  • Click on the needed transfer to open the related document.
    You can also scan a barcode of the PO/Reference to open the needed transfer by clicking on a special barcode icon (on phones) or simply scan using the scan button on your handheld device.
  • By default, you need to scan the product barcode using a scanner button or use manual input (pencil icon) to find a product manually (same for any other field).
  • Add QTY of the product and change destination location (if needed), then click on the “Apply Quantity” button to move the product. The next item will appear automatically (if any are left).
  • You can also scan GS1 barcodes, and the app will instantly fill in QTY, Lot / SN, Package, weight, and so on.

Description for this block. Use this space for describing your block. Any text will do. Description for this block. You can use this space for describing your block. Description for this block. Use this space for describing your block. Any text will do. Description for this block. You can use this space for describing your block.

Delivery (Pick / Pack / Delivery orders)

Watch how to pick orders in Odoo:

How to PICK orders in Odoo efficiently | Ventor
How to pick orders in Odoo efficiently

Or follow these instructions:

  • Open the “Warehouse Operations” menu.
  • Choose a warehouse and open the “Delivery orders” (“Pick” or “Pack” if any) operation type. You can use your scanner to search a document right from this screen.
  • Click on the needed transfer to open the related document.
    You can also scan a barcode of the PO/Reference to open the needed transfer.
  • By default, the app shows the product to pick. Scan its barcode to confirm the product or use manual input (pencil icon) to find and confirm a product manually.
  • Add QTY of the product and pack products if needed using a pack button, then click on the “Apply Quantity” button to move the product. The next item to pick will appear automatically (if any are left).

Warehouse operations settings

Each zone (receiving, internal transfers, pick, pack, and delivery, etc.) has its own specific settings. Go to the top right corner, open the additional menu, and click on the settings button. Configure any zone to follow your business procedures. 

The app can suggest the next item pick or force you to scan source/destination location, serial/lot, or packages/consignments. You can adjust only needed fields to validate or even allow moving items without additional scans. All settings are described well; you can open each of them and read the description to understand if you need to activate some of them.

Inventory Adjustments

The Inventory Adjustments menu is for the regular inventory process. You can make an inventory by product or by location (or a combination of both). Note that you can always create a new inventory inside Odoo and use the app only for running it. This way users need only process inventory rather than create them on their own.

After creating (opening) a new inventory, you will be able to see the list of items you have to scan and the QTY of items you expect to see (theoretical quantity). Every item has its own card with a color marker on the left side:

  • The yellow line means that the app is still expecting you to scan more items. 
  • The green line means that expected QTY is now equal to the QTY you have scanned.
  • The red line means that you found more items than expected (it might be OK to find more, just pay attention to such cases).

After all items are scanned, the inventory can be validated. Click on settings (3 dots at the right top corner) and then on the “validate” button.

Internal transfers

This feature allows moving an item from one location to another, in just a couple of scans. Scan the item, scan the location where you are going to move the item, and then confirm quantities. It’s very convenient to rearrange stock or simply to move items/packages from one location to another.

You can define from where to move in an item by scanning a source location. You can specify a needed lot or a serial number of the item you want to move by simply scanning it. You can also specify the product owner (use consignments settings) or even move the entire package.

Just scan the package barcode and then move it to a new destination location. All items inside the package are moved as well as the package. Use the internal transfers menu to unpack any package just with one tap.

After scanning any item, you can immediately get information about its location in other storage cells throughout the warehouse. Thus, you know in advance where else (and in what quantity) this product is. All this will help you to correctly and quickly redistribute your inventory, directing products to where they are lacking.

External transfers

This menu creates incoming or outgoing shipments without a need to create a sales or purchase order. The steps are simple.

  • Choose what you want to do: receive or send products.
  • Scan products one by one to set QTY.
  • Specify LOT or Serial numbers (if any).
  • Validate the transfer to register incoming (or outgoing) movements.

The logic is similar to the internal transfers menu, but here we move items in or from the warehouse.

Putaway

After the goods have been taken to the warehouse in the input zone, these goods must be moved to the appropriate storage locations. You can instantly place items from different purchase orders into their permanent storage locations by using the Putaway menu.

The Putaway menu automatically analyzes your settings and shows all products ready for placement depending on these settings:

  • Receive goods directly (1 step)
  • Receive goods in input and then stock (2 steps)
  • Receive goods in input, then quality check and then stock (3 steps)

If a putaway rule has been created for a product, the application will offer to place it there. In addition, the Ventor application will show where else this product is in the warehouse. And besides that, you can still replace recommended places to any available on your own. Note that with the Ventor app, a few users can do putaway at the same time.

Products placement

  • Take any product from the batch into your hands and scan its barcode.
  • Get information about all the putaway rules and locations where you can find this product.
  • A warehouse worker can decide where to place the product based on all the information above.
  • The worker goes to the desired place in the warehouse, puts this product there, scans the final location of the product, and then enters its quantity.
  • The placement of the goods is completed, and the distributor returns to the input zone for a new item.
  • As soon as all items in one document will be moved to shelves, the transfer will be confirmed automatically.

Packing

A dedicated menu for the easiest packing management. Open a needed transfer (stock picking) with items ready to be packed. Scan line by line to confirm QTY and click the “put in pack” button to add a new package. Afterward, you can continue scanning other items.

As soon as a box is full, you can click on the “put in pack” button to generate the next package. The main difference between the warehouse operations menu and packing is that here you can see the whole list of the products that you need to pack. Moreover, you can scan them in any order and generate a package every time if a box becomes full.

Additionally, you can print all package labels just with one print button. This menu is ideally working for a dedicated packing zone and packing operator. As a result, you make a quality/quantity control of every item and generate a pack at the right time.

Instant inventory

The menu allows making a quick inventory with one item in one location. This concept is so simple and straightforward that many companies use this menu as the only one for their regular inventories instead of performing inventory adjustments.

Scan the location and the item to immediately update QTY on hand. Don’t forget to specify the lot/serial number or package/ownership (consignments) if you have any of them for the given product. Check additional settings (3 dots at the top right corner) to manage packages or consignments or if you want to activate additional features.

Quick info

Watch this video about the Quick Info menu or read the article – https://ventor.app/guides/odoo-quick-info/

How to quickly check product info in Odoo using a barcode scanner | Ventor
How to quickly check product info in Odoo using a barcode scanner?

The Info menu can show you all information about products and their lot/serial numbers, locations, and packages. Scan a product (location, package, product owner, etc.) barcode to get comprehensive details about this product or its location.

Clicking on the image will make the picture bigger and might be helpful for pickers.

You also can update the QTY of the product by using the “Update Quantity” button or make a product replenishment with the “Replenish” button. Clicking on the “Transfer” button will move you to the “Internal transfer” menu to move the product even quicker.

About

How to check odoo version?

In the About menu you can check the app version, Odoo version, database name, user, company and other info.


If you have questions, please feel free to ask them in the comments section below.


Join over 200 happy customers of Ventor App

Ventor complete guide. Introduction

Introduction

For the last five years, Ventor mobile app has been a number one inventory companion to the Odoo ERP system. Each working day, more than a thousand customers around the world use our application for receiving and picking goods, inventory control, and warehouse management. We continually collect feedback about the app and release new features and updates every month.

This is the first in a series of articles about the app and its features. Today we will talk about the application’s interface, main elements, navigation, and functions. We will also show you how to install and configure the application. Let’s get started!

Installing and activating

After you have purchased the application, you will receive an email with a key that must be entered into the application. The application itself (installation file) can be downloaded from the link in the same letter or from your account on the ventor.app website.

Note that you can buy the app from the official site or Google Play. There are no functional differences. However, you cannot customize the Google Play version, and you will not get access to license management to activate or deactivate devices remotely for your employees. 

So, if you don’t need customizations and you work in a small family business, then go ahead with the Google Play version. You can use the app on up to three devices under the same Google account. However, if you need new features or you have employees, you need to buy the PRO version from our website, not from Google Play.

Download the APK file (installation file) to your handheld device or phone. Alternatively, download the file to your PC/Mac and then move the file to a handheld device connected wirelessly (or by using Bluetooth). Simply open the file using any file manager and install it. Allow installing the app from other resources.

All future updates will be installed automatically with an internet connection. Run the application.

Ventor App will ask you to enter the key immediately on first opening it. You can find the key in your account on ventor.app or in the email you received after purchase. We provide a 14-day trial period for your first purchase (subscription).

How to get 14-day trial period – youtube.com/watch?v=Ventor

You can control your licenses in your account on the ventor.app website.

We recommend you also confirm data collection during installation. It helps us improve the app and fix bugs.

How to connect to your Odoo instance

Open the app and insert your Odoo URL like this: erp.companyname.com. Note that you should have a valid SSL certificate to have a protected connection. Otherwise, the app warns you of an error message or simply doesn’t allow you to connect to the instance. Next, you will need to insert your user login (or email) and password, the same way as you need to log in using your web browser. Note that if you have multiple Odoo databases, you have to choose one needed from the list of databases.

After first login, you can then login by scanning barcode from your Odoo badge ID (need to install Odoo attendances app)

scan odoo badge id to login

Main menu, navigation, design

After login, you will see the main menu. It contains different menus (apps), and each of them is responsible for a dedicated business case:

ventor app menu

Warehouse operation

Manage incoming shipments, pick, pack, and deliver orders. The main menu manages all transfers at different warehouses and zones.

Package management

Package management for orders in the dedicated packing zone. Useful for packers who checked items after picking, and then the items are packed at the packing zone.

Batch / Cluster picking

Pick multiple orders at once (batch picking) or sort them out in boxes placed on a cart (cluster picking) in an optimal route. Pickings can be created on the Odoo side and assigned to pickers.

Internal transfers

Move items or entire packages, from a shelf to another shelf inside your warehouse in a couple of scans.

External transfer

Move items into or out of a warehouse without the creation of sales or purchase orders.

Instant inventory

Update quantity on hand for an item at one given location.

Inventory adjustments

Planned inventory for all locations and products, or a combination of both.

Quick info

Get quick info about product, location and package, lot or S/N simply by scanning its barcode.

How to quickly check product info in Odoo using a barcode scanner | Ventor

Create sales order

Only available if the user has appropriate access rights in Odoo (Settings > User > Access rights > Sales)

Сreate sales and purchase orders in Odoo directly from the warehouse via a barcode scanner | Ventor

Create a purchase order

Create requests for quotations by scanning items. Only available if a user has has appropriate access rights in Odoo (Settings > User > Access rights > Purchase)

Leave feedback

Send us a bug report or request a new feature. We will fix it ASAP or add it to a backlog to implement in future releases.

ventor app feedbck

Click on any of the menus above to read more detailed instructions. You will be able to check them as soon as we publish them one by one. There you will also find all frequently asked questions.

Ventor settings

There are two main groups of settings in the app:

  1. General settings are available on the main menu.
  2. Individual settings within the menu: individually for every sub-menu (individual settings are available inside the different menus).

The general settings are divided into different categories, as follows:

Ventor configurations

Settings have detailed explanations; check them out to set them up properly for your warehouse. Note that these settings are general for the app, and they will apply to the whole operations types and sub-menus.

Data collection

You can enable or disable data collection. We do not share or otherwise disseminate any personal data. The app only collects issues and cases when the app crashes or freezes. All this just helps us to fix problems faster than you think about reporting them.

Update management

Turn on or turn off auto-updates. The app gets new features and fixes every month. Some customers want to update only one device at a time to test it first before a massive release for all devices and users.

License manager

Apply for a license or unlink a device from the key. The menu is only available for the PRO version. So if you bought the app from the Google Play Store, you can use it only for personal usage (one person or a family company). For the rest, please use the PRO version and control connected devices on the site.

Password management

You can ask to insert a password to log in with all the time. By default, users have the possibility to easily log in with a saved user profile.

Advanced Ventor configurations

Simply redirects you to all Odoo apps developed by the VentorTech team for Odoo ERP or Odoo Inventory. Check it out, and you will find a lot of free and paid useful apps for Odoo. 


Individual settings are related to specific menus. You can always find them inside all menus. We will discuss them in detail in appropriately related articles. Just do not forget that you can configure and manage your Odoo Inventory app or internal transfers even with more customizable settings.

How to get support

There are a few ways to get support:

Principles of the support:
  • Customers get support and feature requests in first
  • Cosmetics fixes are planned for one time per month
  • Bottlenecks and big issues with the app are resolved within 24 hours
  • If you have troubles with the app, please record a video to show the issue. Issues with a video get support priority and usually get resolved faster

If something doesn’t work with the app (e.g., you can’t validate a transfer or get error messages while trying to make internal transfers), please make sure that you have no the same issues on the Odoo side. In most cases, such issues are related to the server-side and not to the Ventor app.

If you have questions, please feel free to ask them in the comments section below.

Exit mobile version