Today, we will look at how to manage user access and device settings in the Ventor PRO app and Odoo. If you manage a warehouse and want to optimize user management, this guide is for you.
To optimize user settings management and hide menus in Ventor PRO/Lifetime, you can use our free module, Ventor Base (ventor_base). While not mandatory, this module enhances the efficiency of the application.
You can always find it in our repository: GitHub – Ventor Base.
Before downloading, make sure to select the correct Odoo version.
- Hiding Menus for Users
- Restricting Access to Warehouses
- Locking Configuration Changes (Key Case)
- Downloading Older App Versions
- Enabling Inventory Validation for Users
Hiding Menus for Users
Ventor allows you to control which menus are available to users. Using Ventor Menu Management, you can hide unnecessary sections, leaving only those that are essential. For example, if an employee is only responsible for inventory adjustments, you can leave only Warehouse Operations and Inventory Adjustments.
How to set it up:
- Go to Settings → Manage Users → User.
- Disable all menus except Warehouse Operations and Inventory Adjustments.
- Ensure that Ventor Roles is set to “Empty.” If a predefined role (Administrator, Warehouse Manager, Warehouse Worker) is selected, the menus will be configured automatically.
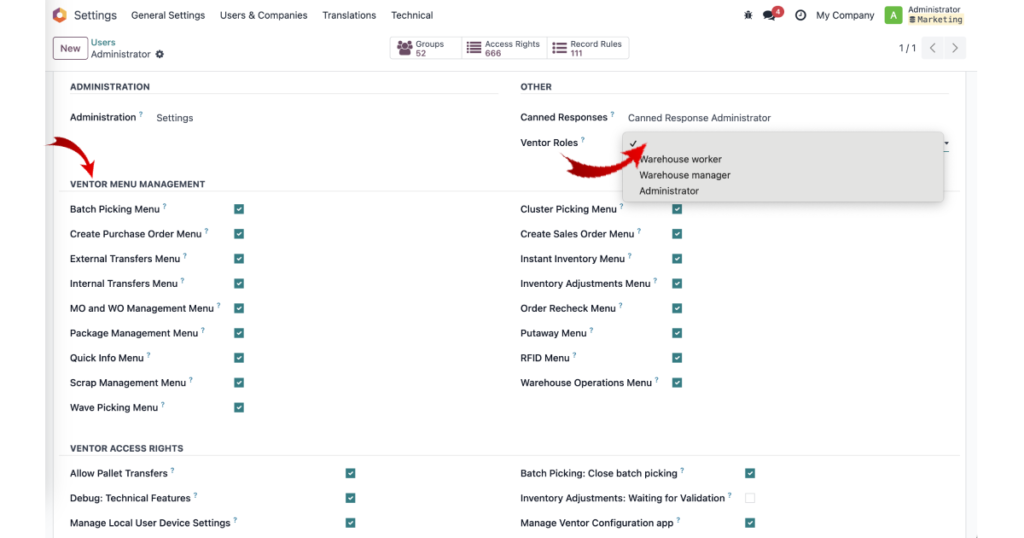
This reduces distractions and makes work more efficient.
⚠️ Don’t forget to log out and log back in for the new settings to take effect.
Restricting Access to Warehouses
You can configure employees to have access only to specific warehouses. For example, if a worker operates only in Warehouse A, they should not see data for Warehouse B.
How to set it up:
- Open Settings → Manage Users → User.
- Enable the Allowed Warehouses option and select the appropriate warehouse.
- After applying the changes, the employee needs to re-login to Ventor.

Note: This setting only works for the Inventory: User group and does not apply to administrators.
⚠️ Don’t forget to log out and log back in for the new settings to take effect.
Locking Configuration Changes (Key Case)
One of the most in-demand features is the ability to centrally manage settings for all devices through Odoo. With Ventor, there is no need to configure each scanner individually.
How it works:
⚠️ Don’t forget to log out and log back in for the new settings to take effect ↴↴↴Manage Local User Device Settings
- True – users can change settings on the scanner.
- False – users cannot change settings on the scanner.
Go to Settings → Select User → Ventor Access Rights → Manage Local User Device Settings (on/off). Ensure that Ventor Roles is set to “Empty.”

Use Local User Device Settings
Go to Settings → Select User → Ventor Access Rights → Manage Local User Device Settings (on/off). Ensure that Ventor Roles is set to “Empty.”
- True – the settings configured on the scanner will be applied to the user.
- False – the global settings from the Ventor Base module (Ventor Conf → Global Ventor Setting) will be applied to the user.
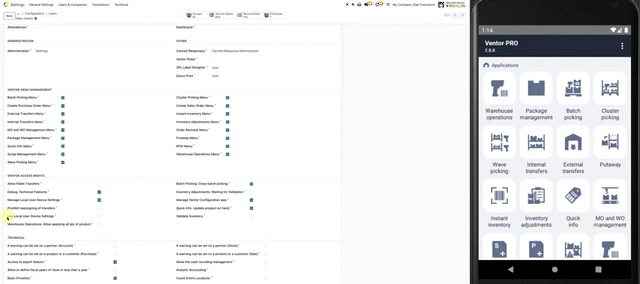
Manage Ventor Configuration app
To prevent users from changing settings, disable Manage Ventor Configuration – this will remove the configuration icon from Odoo.
Go to Settings → Select User → Ventor Access Rights → Manage Local User Device Settings (on/off). Ensure that Ventor Roles is set to “Empty.”
This feature is especially useful if you manage hundreds of scanners and want to maintain unified settings.
Downloading Older App Versions
If you need an older version of Ventor, download it from Ventor Release Notes.
To download, you need to select the version you are using:
- Ventor PRO
- Ventor Lifetime
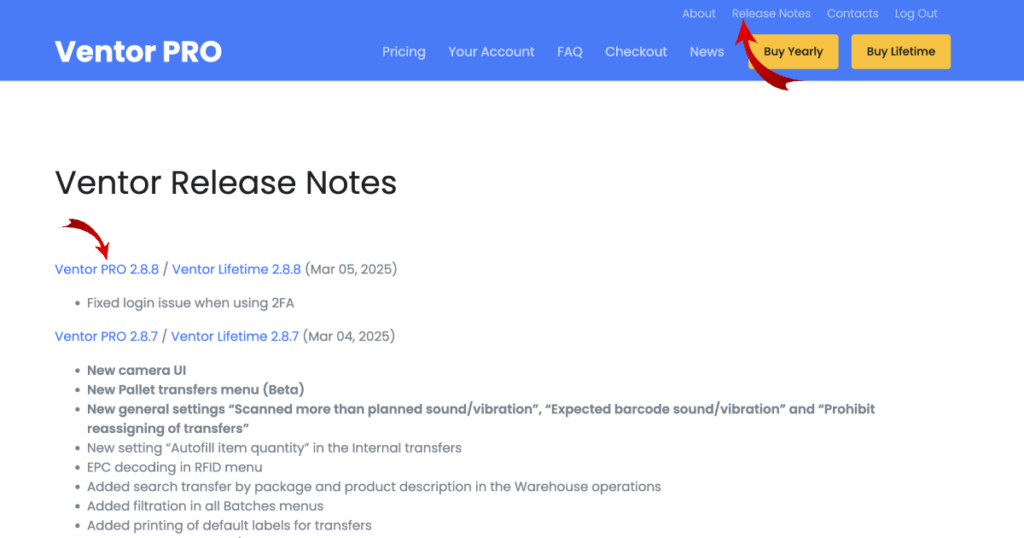
How to install the old version of Ventor on your device if you have the latest version installed?
To install an older version of the apk, follow these steps:
- Uninstall the current version from your device.
- Download the apk to your device.
- Install it by clicking on the apk file.
Enabling Inventory Validation for Users
By default, Odoo prevents users in the Inventory: User group from confirming inventory adjustments. However, Ventor has a special group called Validate Inventory, which allows these users to confirm inventory counts without requiring administrator rights.
How to set it up:
- Go to Settings → Manage Users → User.
- Enable Validate Inventory for the required user.
If Validate Inventory is set to True, a user in the Inventory: User group can perform product counts in the warehouse and confirm inventory adjustments in both Odoo and Ventor. This allows workers to complete essential tasks without elevated permissions, speeding up warehouse operations.
⚠️ Don’t forget to log out and log back in for the new settings to take effect.
By using these features, you can flexibly manage data access and device settings, minimize errors, and make warehouse staff operations more efficient. Ventor settings will help you create a more organized and effective warehouse management system!
Related Apps:

⭐️⭐️⭐️⭐️⭐️ Rating from Customers
Instant printing of any Odoo report
Allows you to print labels immediately after validating a delivery order
💬 Want to learn how to handle a specific user management case in your warehouse? Leave a comment, and we’ll answer—or maybe even add a new feature!
------------------------------------------------------------------
Education: University of Lodz
------------------------------------------------------------------
Experience:
Product Marketing Manager
------------------------------------------------------------------
Current position: Product Marketing Manager
------------------------------------------------------------------
The Global Mini MBA